How to Install Vinyl Plank Flooring in 7 Steps

Home ImprovementMedium10:107 steps
Also in:Adulting

By ShowMeStepByStepPublished Updated

Based on a video by Fix This Build That.

Click-lock luxury vinyl plank is the most forgiving DIY floor on the market. The planks float on top of your existing subfloor, the tongue-and-groove edges snap together without glue or nails, and you can cut most pieces with a utility knife. A laundry room takes one afternoon. A whole bedroom is a weekend if you take your time.

Before you open a box of planks, give them 48 to 72 hours in the room where you're installing them. Vinyl expands and contracts with temperature and humidity, and an acclimated plank locks tight and stays tight. While you're waiting, run a moisture meter across the subfloor in a few spots - anything above 4 percent and you need to dry out the room or pull the subfloor up. Leave a quarter-inch expansion gap around every wall and fixed object so the floor has room to move once it's down.

This walkthrough is for a click-lock LVP install over an existing sheet vinyl subfloor. The same steps work over plywood, OSB, tile, or concrete - the prep changes a little, but the install sequence is identical. Related home-improvement reads: how to install laminate flooring uses the same click-lock mechanic with a slightly stiffer plank, and how to fix holes in drywall covers any baseboard damage you find when you pull the shoe molding.

Tools you'll buy if you don't already own them: a vinyl plank cutter or sharp utility knife, a tapping block, a pull bar, and a bag of wedge spacers. A circular saw or jigsaw handles the cuts you can't score-and-snap. None of it is expensive and you'll use most of it again on the next flooring job.

Step-by-Step Guide

1

Step 1: Clear the Room and Pry Off the Quarter Round

0:43
Step 1: Step 1: Clear the Room and Pry Off the Quarter Round

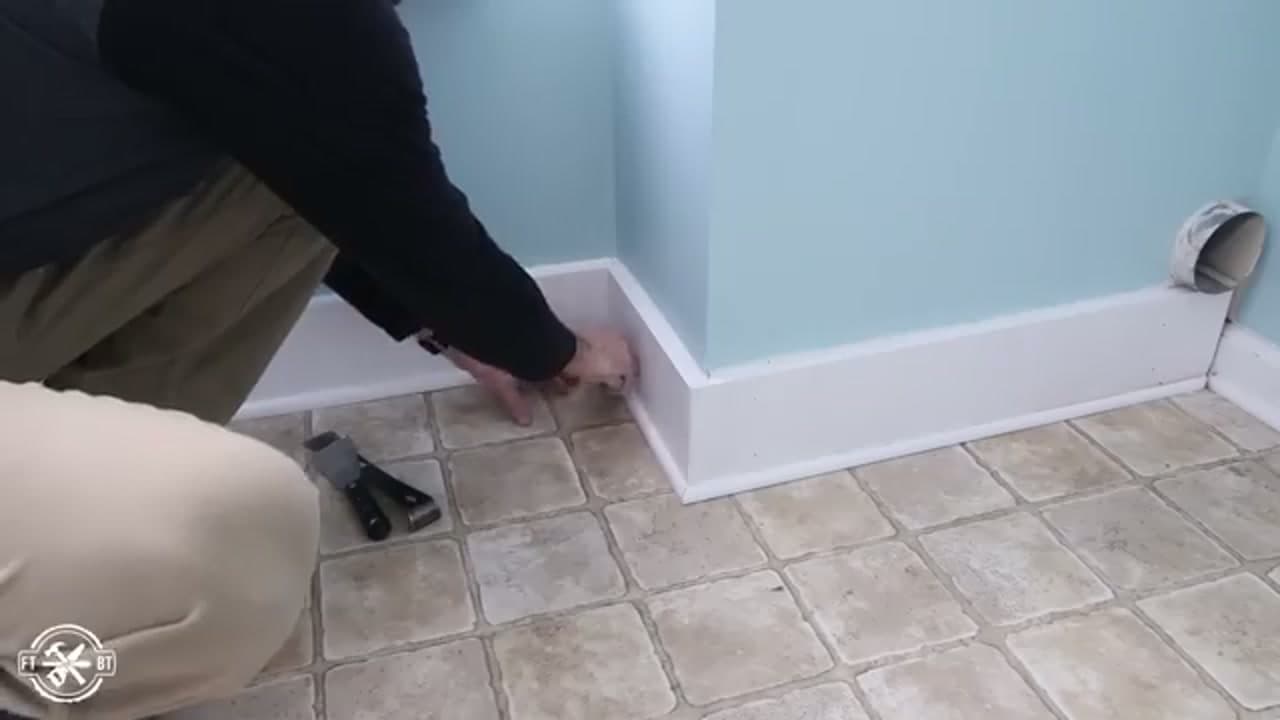
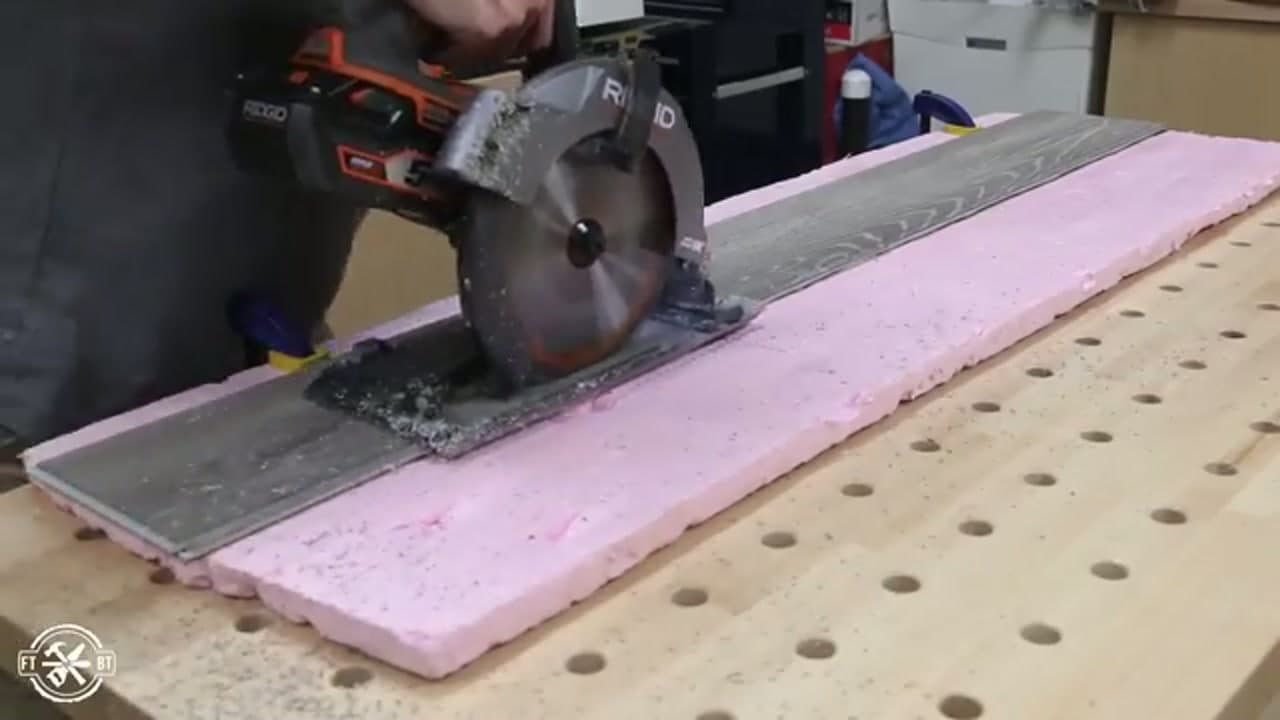
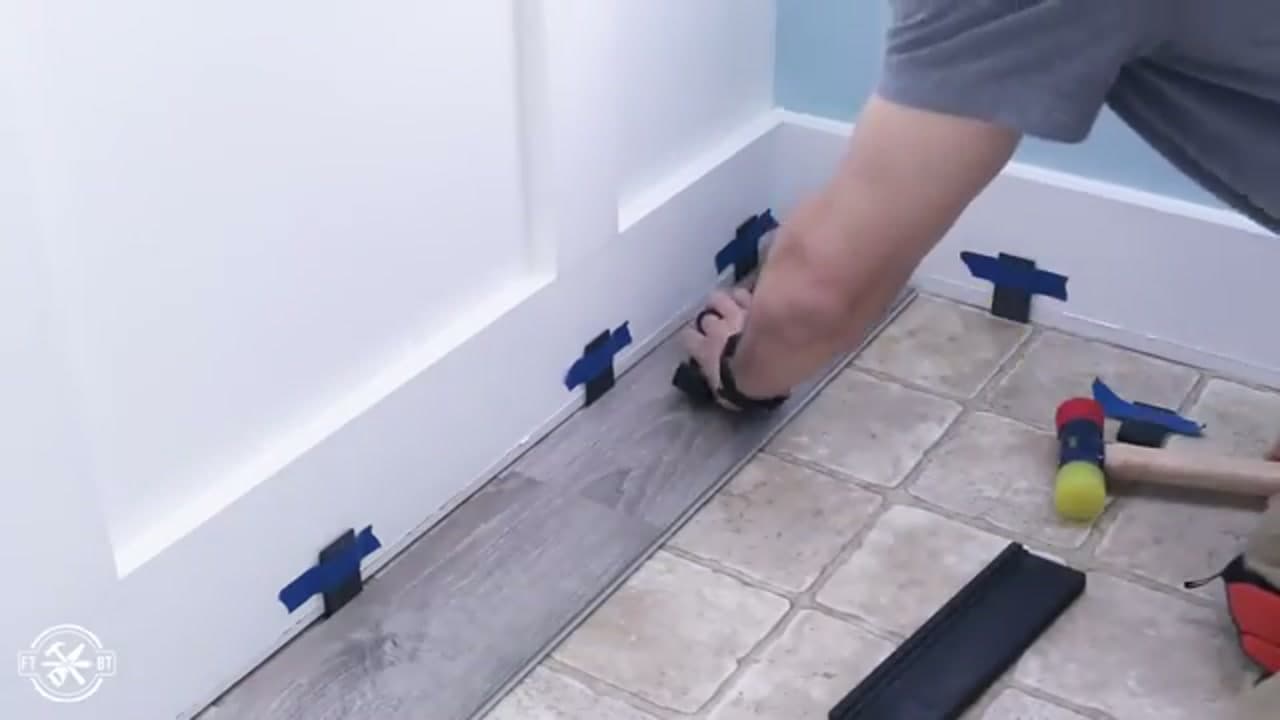
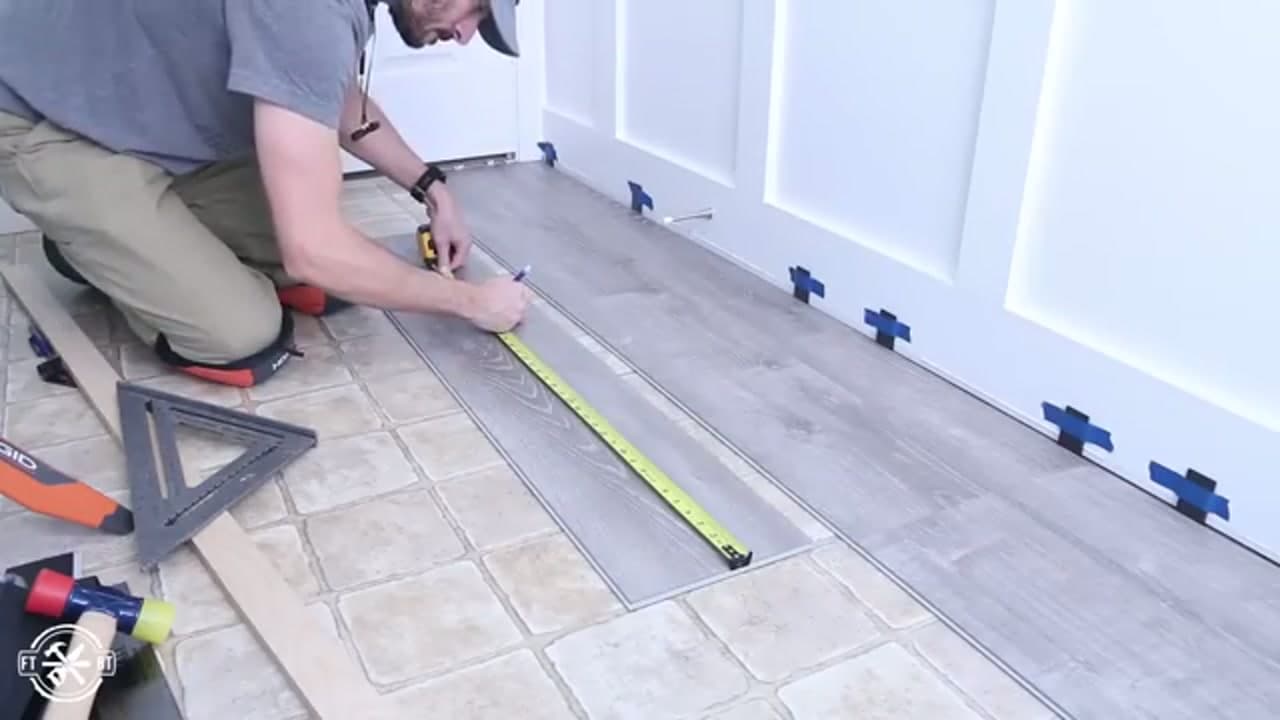
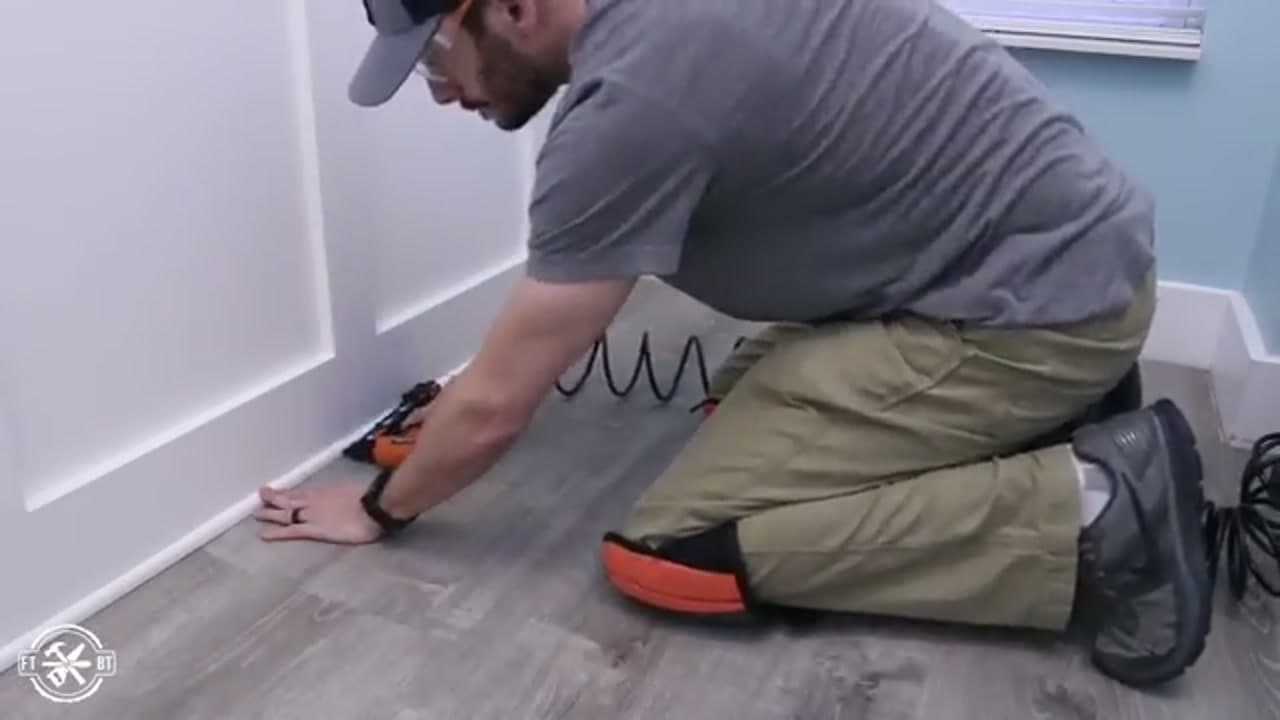
Move appliances out and let the planks acclimate in the room for 48 to 72 hours. While the room is empty, paint anything you'd regret missing later. Then slide a trim puller behind the shoe molding (the small quarter-round at the base of the baseboard) and walk it along until each piece pops off. Watch at 0:43. Number the back of each piece with a pencil so you can reinstall it in the same spot at the end.

Leave the baseboards themselves on the wall if they're tall or attached to wainscoting. The new quarter round will cover the expansion gap just fine.

Tip

Run a moisture meter on the subfloor before the planks go in. Anything above 4 percent and you need to dry the room or pull the subfloor.

2

Step 2: Plan the Layout So You Don't End on a Sliver

1:40
Step 2: Step 2: Plan the Layout So You Don't End on a Sliver

Measure the room and divide by the plank width. If your last row works out under two inches wide, the floor will look amateur. Either narrow the first row to push width into the last row, or shift your starting line so both ends end up roughly equal. Sketch it on graph paper or model the room in any free 3D software - SketchUp or even a quick paper layout is faster than ripping a bunch of bad first rows. Watch at 1:40.

Plan your stagger pattern too. End seams in adjacent rows should be at least six inches apart, and you want the pattern to look random, not bricklike. Pull planks from three or four different boxes so the wood-grain repeats don't bunch up.

Tip

Measure both walls of the room - they're rarely parallel. Mark the gap at each end of your first plank so you cut to the actual wall, not a square wall.

3

Step 3: Undercut the Door Jambs and Set the Transition Channel

3:15
Step 3: Step 3: Undercut the Door Jambs and Set the Transition Channel

Lay a sample plank flat on the subfloor next to each door jamb. Run a flush-cut jamb saw across the top of the plank, using it as a height guide, and trim the bottom of the jamb. The new flooring will slide under the trim for a clean look.

At doorways where the new floor meets carpet or a different floor, screw down a metal transition channel sized to the opening. Cut it to length with a hacksaw if the snap-marks won't break clean. Watch at 3:15. Position the channel so the finished transition strip will land in the middle of the door stop, then screw it to the subfloor.

Tip

If there's a gap between your old underlayment and the carpet tack strip, shim it with a scrap of plywood before you screw the channel down. You want solid backing under the metal lip.

4

Step 4: Rip the First Row Narrower on a Circular Saw

4:08
Step 4: Step 4: Rip the First Row Narrower on a Circular Saw

Lay a full-width plank along the starting wall. Measure the gap at both ends - walls are never perfectly straight - and transfer those two marks onto the plank. Connect the marks with a chalk line or a long straightedge. Score the line with a utility knife for short cuts under a foot.

For a full long edge, score-and-snap will fight you. Take the plank to a workbench, lay it on a sacrificial board, and rip it with a circular saw using a fine-tooth blade. Watch at 4:08. A jigsaw works for curved cuts around bump-outs. Cut on the back face if you're worried about chip-out on the surface.

Tip

A pink foam board is the perfect cutting bed. The circular saw blade can dive into the foam past the plank without hitting your bench.

5

Step 5: Tape Spacers to the Wall and Click-Lock the First Row

5:45
Step 5: Step 5: Tape Spacers to the Wall and Click-Lock the First Row

Vinyl plank floats, so it needs a quarter-inch expansion gap on every wall and around every fixed object. Tape a wedge spacer to the wall every two feet along your starting row. Drop the first plank into the corner with the tongue side facing the wall. Slide the next plank's long-edge tongue into the previous plank's groove at a slight angle, then lower it flat. Watch at 5:45.

Slide a tapping block against the end seam and rap it with a non-marring mallet to seat the planks tight. For the last plank in each row, hook a pull bar over the far end and tap it with the mallet to pull the plank into place against the wall spacers.

Tip

If a plank won't lock down flat, check the tongue and groove for debris. A speck of plastic or a curl of plank shaving keeps the joint from seating.

6

Step 6: Stagger the Seams and Notch Around Door Jambs

6:55
Step 6: Step 6: Stagger the Seams and Notch Around Door Jambs

Start row two with a shorter plank - around 18 inches - so the end seams don't line up with row one. Continue rotating starter lengths to keep the seam pattern random. Use offcuts from one end of the room to start or finish the other end and avoid waste.

When a plank hits a door jamb, dry-lay it next to the jamb, transfer the cut marks onto the plank with a carpenter square, and cut the notch with a jigsaw. Watch at 6:55. Err on the side of taking off too little - you can always shave more, but you can't add it back. Slide the notched plank under the trim and click it into the previous row.

Tip

For corners that are out of square (most of them), measure the notch depth at both ends of the cut. Don't trust the back of the plank to be parallel to the front of the jamb.

7

Step 7: Rip the Last Row, Drill Outlet Holes, and Reinstall the Quarter Round

9:30
Step 7: Step 7: Rip the Last Row, Drill Outlet Holes, and Reinstall the Quarter Round

Measure the gap between the previous row and the wall at several points - rip the last row to that width minus a quarter inch for the expansion gap. For drains, outlets, or pipes coming up through the floor, drill the hole with a Forstner bit slightly larger than the obstacle. Drop the plank around it and you'll never see the gap once the trim is back on.

Snap the vinyl transition piece into the metal channel at each doorway and tap it home with the mallet. Reinstall the quarter round along every baseboard with 1.5-inch finish nails. Watch at 9:30. Nail into the baseboard, not the floor - the planks need to keep floating. Set the nails with a punch and dab a little caulk in the holes if you want a finished look.

Tip

Save a few extra planks in a closet for repairs. Vinyl plank production runs change and you may not match the floor in two years if you have to swap a damaged piece.

Products Used

☐ The Checklist

How to Install Vinyl Plank Flooring in 7 Steps

Tools
14
Materials
8
Steps
7
Video
10 min

Your Guide

Fix This Build That

As an Amazon Associate we earn from qualifying purchases. Links on this page may be affiliate links - clicking them and buying doesn't change your price, but helps support ShowMeStepByStep.

Tags

Related Tutorials