How to Take a Screenshot on a Chromebook (Full, Partial, and Window)

TechEasy8:337 stepsBrowse more →
Also in:Adulting

By ShowMeStepByStepPublished

Based on a video by The Book of Chrome.

Chromebooks don't have a PrtScn key like a Windows laptop, and they don't have the Cmd+Shift+3 combo from a Mac. The shortcut is its own thing - Ctrl plus Shift plus the Show Windows key (the one above the 6 that looks like a rectangle with two lines next to it). That opens a small toolbar at the bottom of the screen, and from there you pick how much of the screen you want to grab.

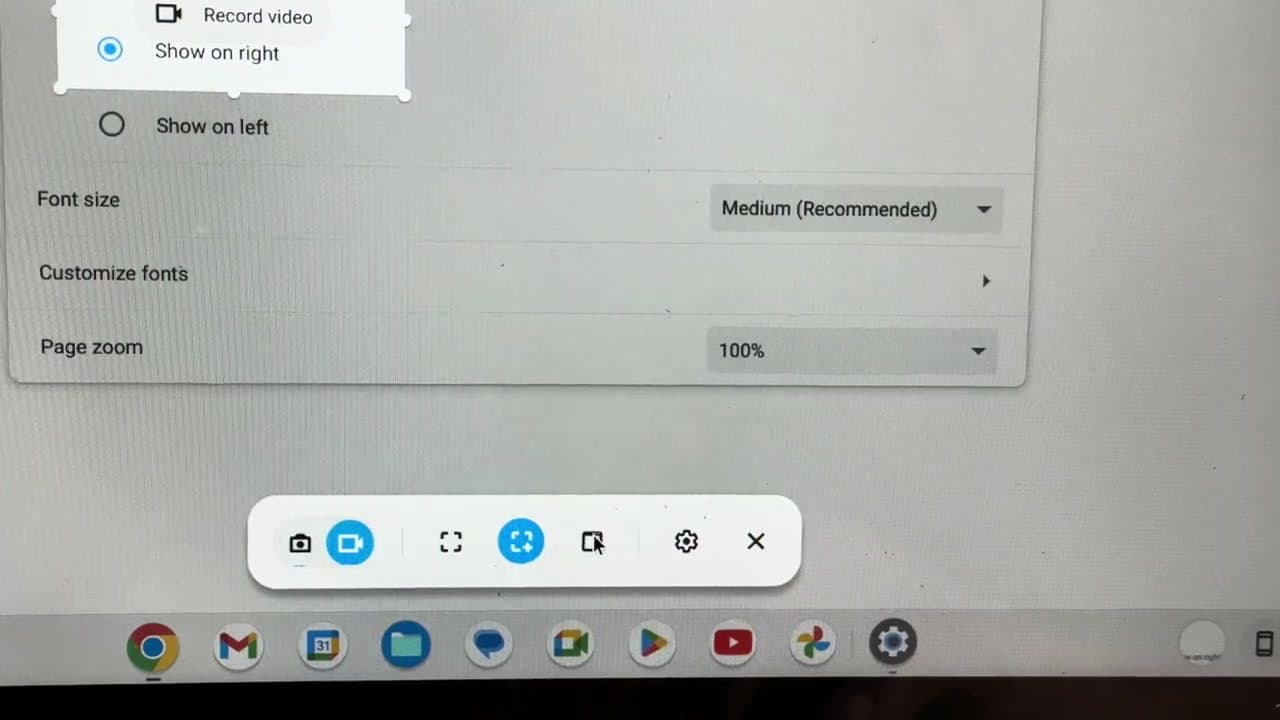
The toolbar has three screenshot modes side by side: full screen, partial (drag a box around an area), and window (click any open window). One click switches between them. There's also a settings gear for audio and save-location, and a video camera icon if you'd rather record a clip than freeze a single moment.

Every screenshot lands in two places at once - a file in your Downloads folder and a copy on the clipboard, so you can paste it straight into Gmail, Docs, or a chat without opening the file. The notification that pops up after each capture has buttons for Show in folder, Edit (to crop or annotate), and Delete.

This walkthrough follows the demo from The Book of Chrome, who runs through all three modes plus the screen-recording option on an Acer Chromebook. The same toolbar works on every Chromebook running a recent version of Chrome OS.

Step-by-Step Guide

1

Press Ctrl + Shift + Show Windows to Open the Screenshot Toolbar

0:45
Step 1: Press Ctrl + Shift + Show Windows to Open the Screenshot Toolbar

Hold down Ctrl and Shift, then tap the Show Windows key. It's on the top row, usually above the 6, and the icon looks like a rectangle with two vertical lines next to it. A small toolbar slides up from the bottom of the screen.

That single shortcut is the only one you need to remember. The toolbar is where you pick what kind of screenshot to take - one click instead of a different shortcut for each mode.

Tip

If you'd rather not memorize the shortcut, click the clock in the bottom-right corner of the screen to open Quick Settings and tap the Screen capture tile. It opens the same toolbar.

2

Click the Full-Screen Icon to Grab Everything

2:02
Step 2: Click the Full-Screen Icon to Grab Everything

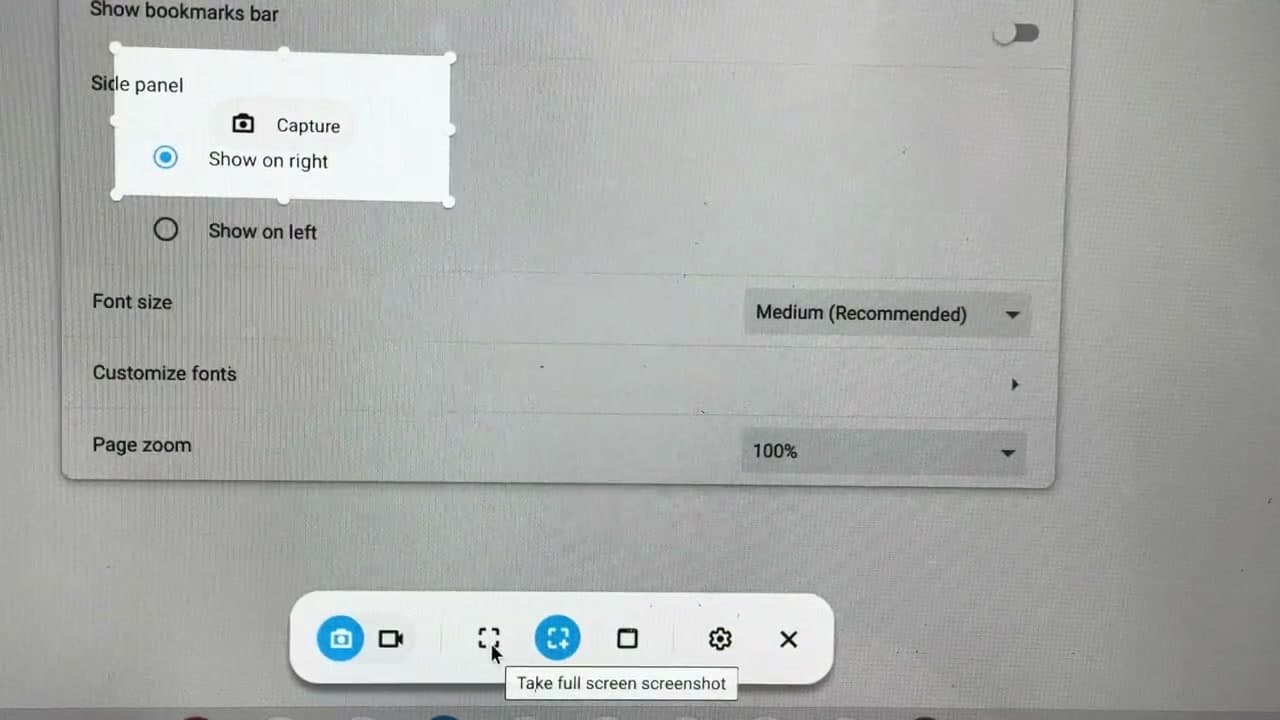
On the toolbar, the leftmost screenshot icon - the camera with a solid square around it - is the full-screen mode. Hover over it and the tooltip reads Take full screen screenshot. Click it once.

The whole display gets captured. No selecting, no clicking - the screenshot is taken the instant you press the button. Use this when you want everything that's visible, including the shelf at the bottom.

Tip

There's a faster shortcut for this exact mode if you're already comfortable: Ctrl + Show Windows (no Shift) snaps a full-screen shot without opening the toolbar at all.

3

Click Partial and Drag a Box Around the Area You Want

1:15
Step 3: Click Partial and Drag a Box Around the Area You Want

The middle screenshot icon is partial mode - it looks like a dotted square with a crosshair in the corner. Click it. The cursor turns into a crosshair.

Click and drag a box around whatever you want to capture. A small camera button labeled Capture appears next to the selection. Click Capture and just that rectangle gets saved. You can resize the box by dragging the corners before you commit.

Tip

If your box isn't quite right, drag the handles on the corners and edges to fine-tune it before clicking Capture. The selection stays open until you confirm.

4

Click Window to Capture Just One Open Window

2:22
Step 4: Click Window to Capture Just One Open Window

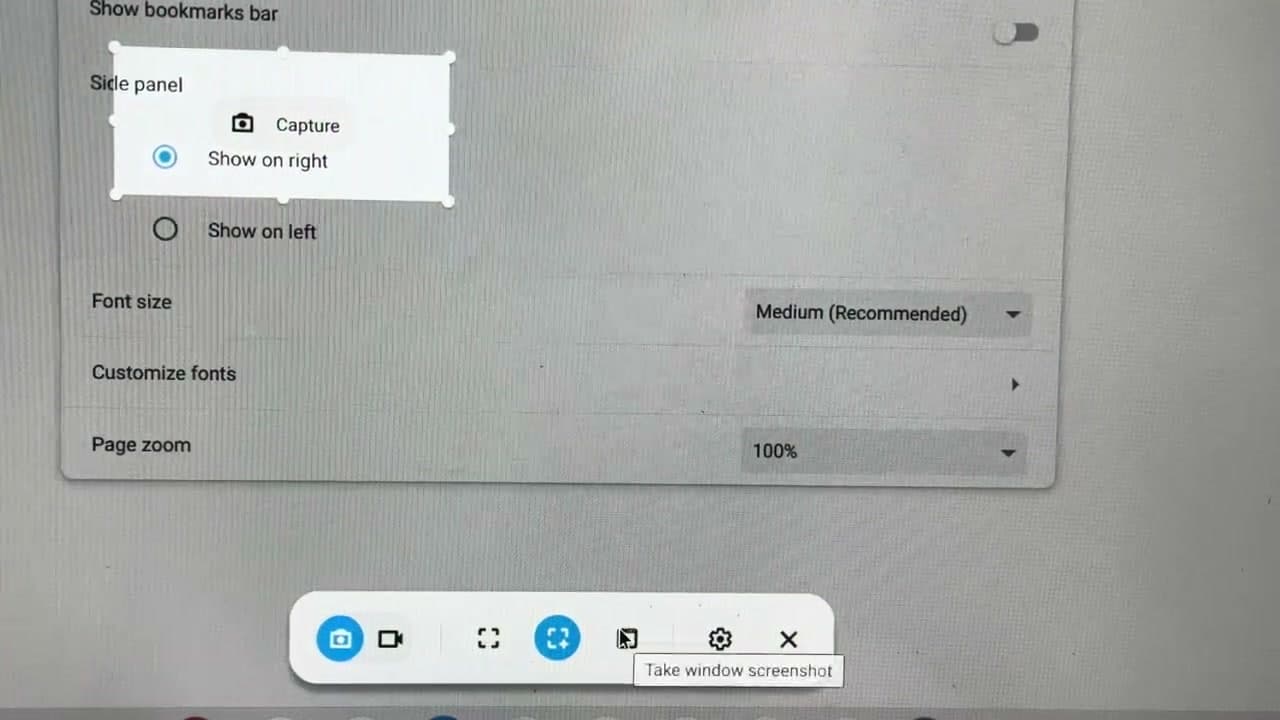
The third screenshot icon is window mode - a solid rectangle that looks like a single window outline. Hover over it and the tooltip says Take window screenshot. Click it.

Move your cursor over any open window - a Chrome tab, the Files app, a Settings panel - and the window highlights. Click it. Only that window ends up in the screenshot, with nothing else around it. Useful when you want to share one app without showing your other tabs or the shelf.

Tip

This mode is the cleanest way to share a screenshot of one app without manually cropping out the rest of the desktop afterward.

5

Open the Settings Gear for Audio, Camera, and Save Location

3:00
Step 5: Open the Settings Gear for Audio, Camera, and Save Location

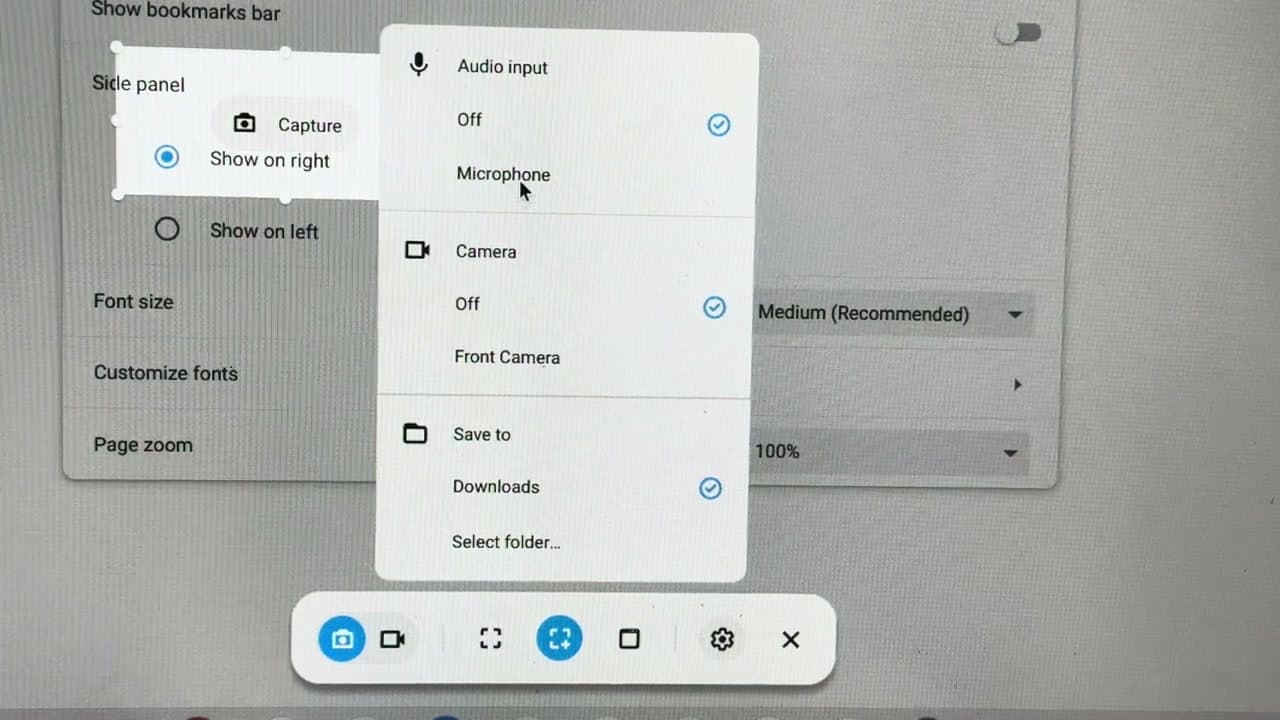
The gear icon on the right end of the toolbar opens a settings panel. Three sections show up: Audio input (for recordings - Off or Microphone), Camera (Off or Front Camera, so your webcam can overlay on recordings), and Save to (Downloads is the default, or pick a different folder).

For plain screenshots, the audio and camera settings don't do anything. They only kick in once you switch the toolbar over to video recording mode. The Save to setting applies to both screenshots and recordings.

Tip

If you take a lot of screenshots, set Save to a dedicated folder like Documents/Screenshots so they don't pile up in Downloads with the rest of your files.

6

Find Your Screenshot in the Notification or in Downloads

4:00
Step 6: Find Your Screenshot in the Notification or in Downloads

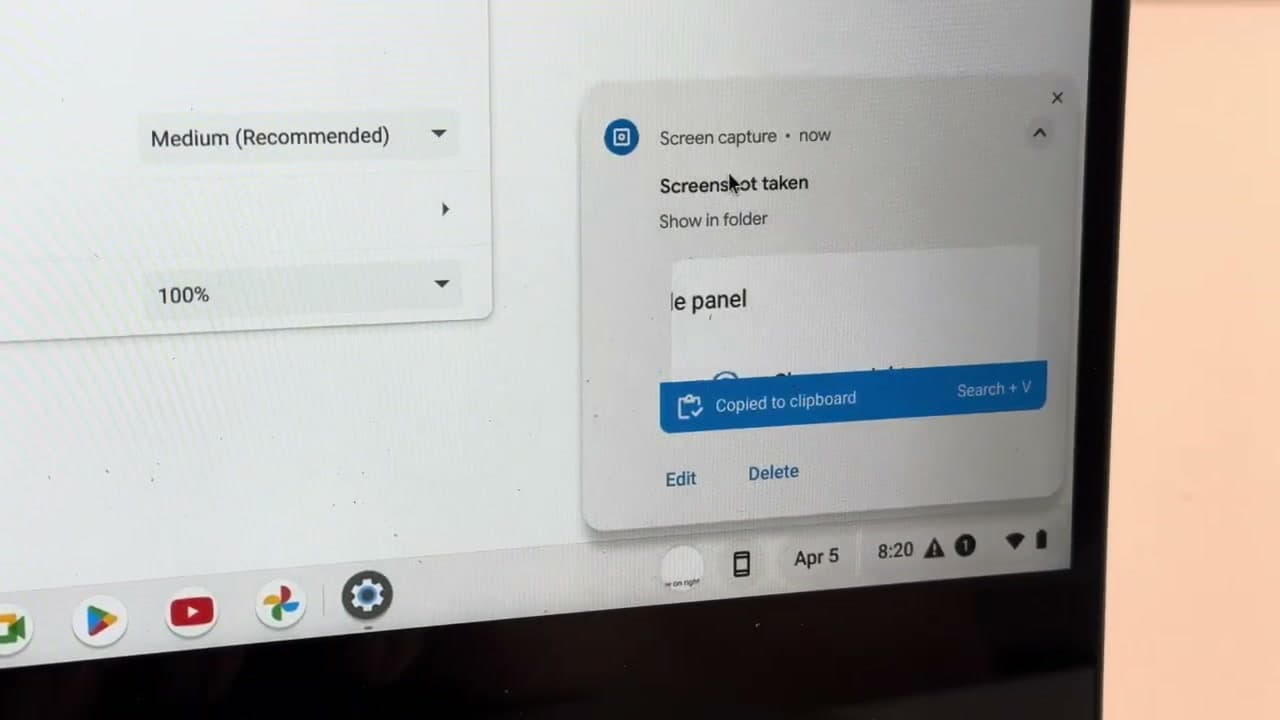
The moment you take a screenshot, a notification slides in from the bottom-right corner that says Screenshot taken with three buttons: Show in folder, Edit, and Delete. A blue banner under it confirms Copied to clipboard.

Show in folder opens the file in your Downloads folder. Edit opens the Chrome OS image editor where you can crop, draw on it, or add text. Or you can skip the file entirely and paste the screenshot straight into an email or document with Ctrl + V - the clipboard copy is still there.

Tip

Search + V opens the clipboard history, which keeps your last five screenshots and copied items. Handy when you took several shots and want to paste an earlier one.

7

Switch to Video Camera Icon to Record Your Screen

4:50
Step 7: Switch to Video Camera Icon to Record Your Screen

The toolbar isn't just for screenshots. The second icon from the left - the video camera - switches the whole thing into screen-recording mode. The label above it reads Record video.

Pick full, partial, or window the same way you did for screenshots, then click to start. A countdown counts you in and a red stop button appears in the shelf at the bottom-right. Click that stop button when you're done, and the recording saves as a webm video to your Downloads folder.

Tip

Turn on Microphone in the gear settings before you start if you want to narrate. The audio gets baked into the video file.

Products Used

☐ The Checklist

How to Take a Screenshot on a Chromebook (Full, Partial, and Window)

Tools
1
Steps
7
Video
9 min

Your Guide

The Book of Chrome

As an Amazon Associate we earn from qualifying purchases. Links on this page may be affiliate links - clicking them and buying doesn't change your price, but helps support ShowMeStepByStep.

Tags

What's next

Related collections

Curated theme pages that include this tutorial.

Weekly Digest

Liked this tech tutorial?

Pick the categories you want to hear about. Weekly digest of new step-by-step tutorials. No spam, easy unsubscribe.

Send me tutorials about

We only email about new tutorials. Easy unsubscribe anytime.