How to Use Google Slides - Beginner's Guide

Also in:Adulting

By ShowMeStepByStepPublished

Based on a video by Howfinity.

Google Slides is the presentation tool that comes with every Google account. There's nothing to install, your work saves automatically as you type, and you can share a slideshow with someone the same way you'd share a YouTube link. If you've ever used PowerPoint, the menus will feel familiar - they're just in a browser tab instead of a desktop app.

What makes Slides different is that it lives in the cloud. You can build a deck on your laptop at home, finish it on a Chromebook at work, and present it from a phone in a meeting room. Two or three people can edit the same slideshow at once, watching each other's cursors move. That's why teachers, students, and small teams use it as their default presentation tool.

This guide walks through the parts of Google Slides you'll actually use every day. Opening a new deck, naming it, picking a theme, adding text and images, inserting a YouTube video, presenting full screen, and sharing with the right permissions. Howfinity recorded the source video on a Mac, but every step works the same on Windows and on a Chromebook.

If you're new to the Google Workspace tools, our guides on how to use Google Docs and how to use Google Sheets cover the word processor and spreadsheet side. If you're setting up a fresh Chromebook to follow along, how to factory reset a Chromebook gets you a clean device first.
Step-by-Step Guide

1

Open Google Slides From Your Browser

0:19
Step 1: Open Google Slides From Your Browser

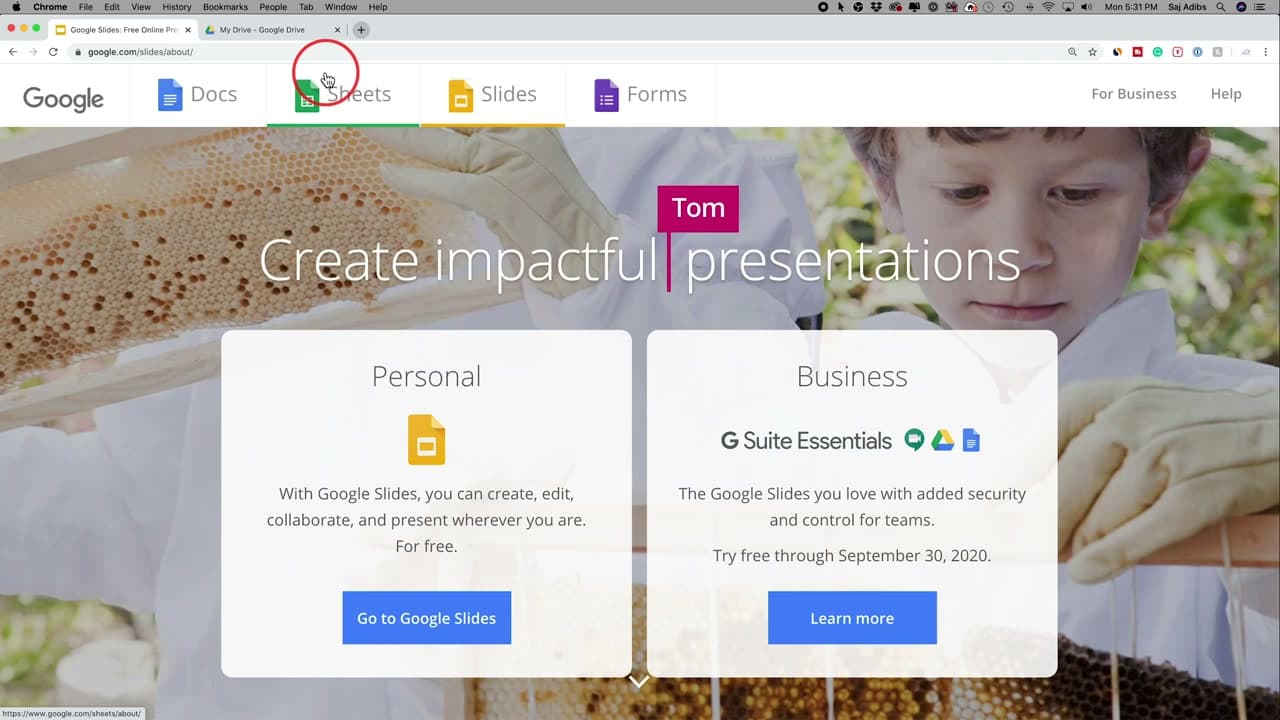
Open any web browser and go to slides.google.com or drive.google.com. Sign in with your Google account. If you don't have one yet, click Create Account and walk through the free signup - it takes about two minutes.

There's nothing to download. Everything runs inside the browser tab, which means your Chromebook, your old laptop, and a brand new PC all behave exactly the same. From the Slides home page you can start a new presentation, or browse the ones you already have.

Tip

Bookmark slides.google.com once you're signed in. It saves you typing the URL every time.

2

Create a New Presentation From the Drive New Button

1:00
Step 2: Create a New Presentation From the Drive New Button

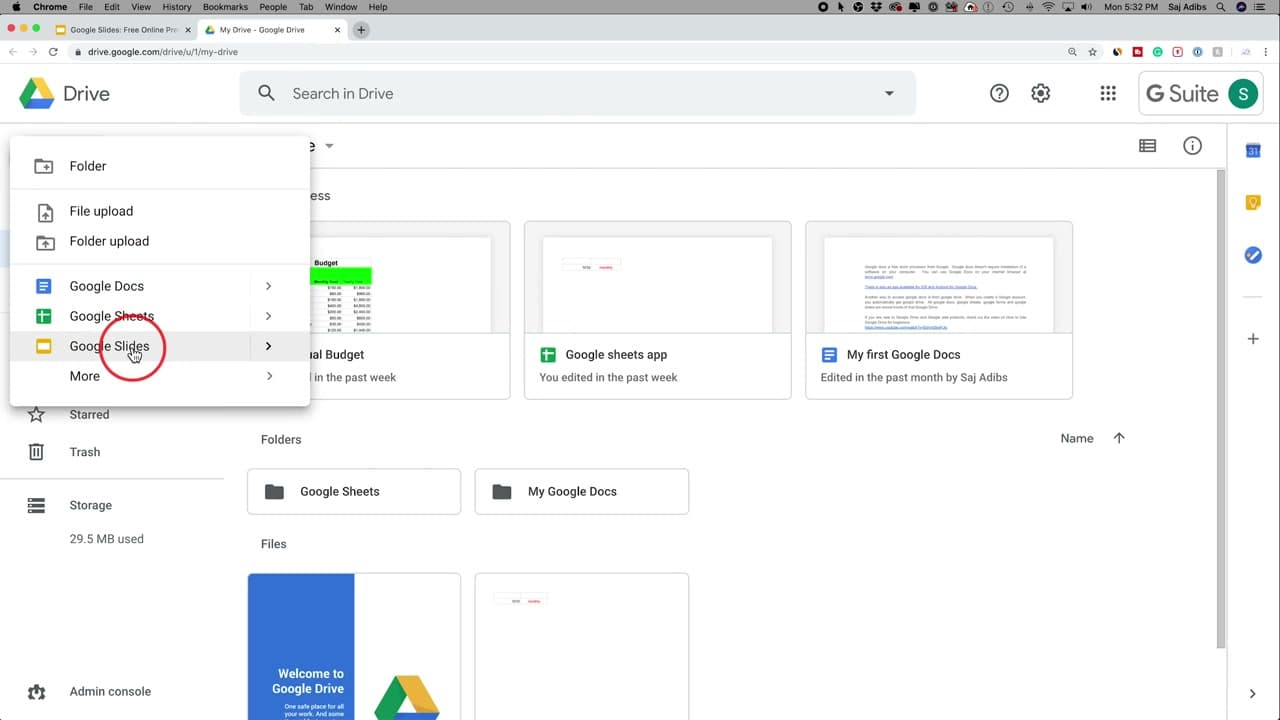
From Google Drive, click the New button at the top left. The menu opens with Folder, File upload, Google Docs, Google Sheets, Google Slides, and More. Click Google Slides to open a fresh deck in a new tab.

You can also start from the Slides home screen by clicking the big plus sign labeled Blank. The result is the same - an empty presentation with one title slide ready to edit.

Tip

The arrow next to Google Slides on the New menu lets you start from a template. The pitch deck and lesson plan templates are a head start when you don't want a blank slide.

3

Name Your Presentation - Google Saves It Automatically

1:20
Step 3: Name Your Presentation - Google Saves It Automatically

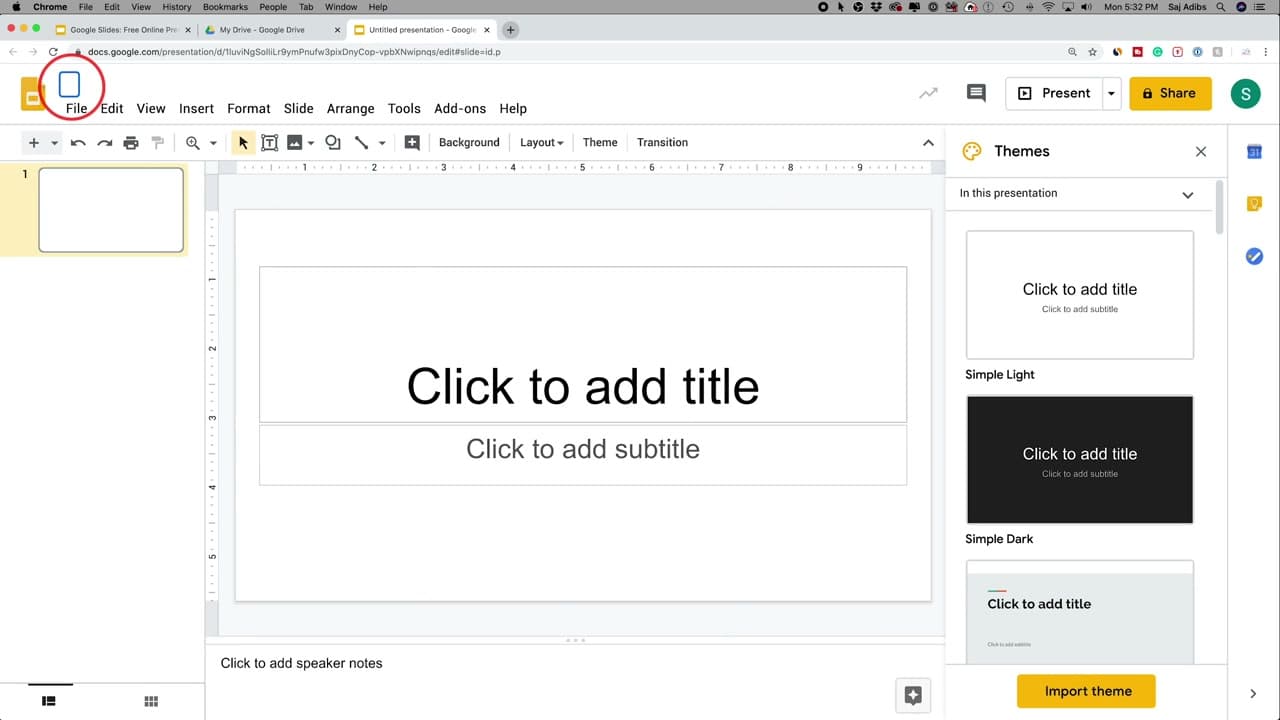
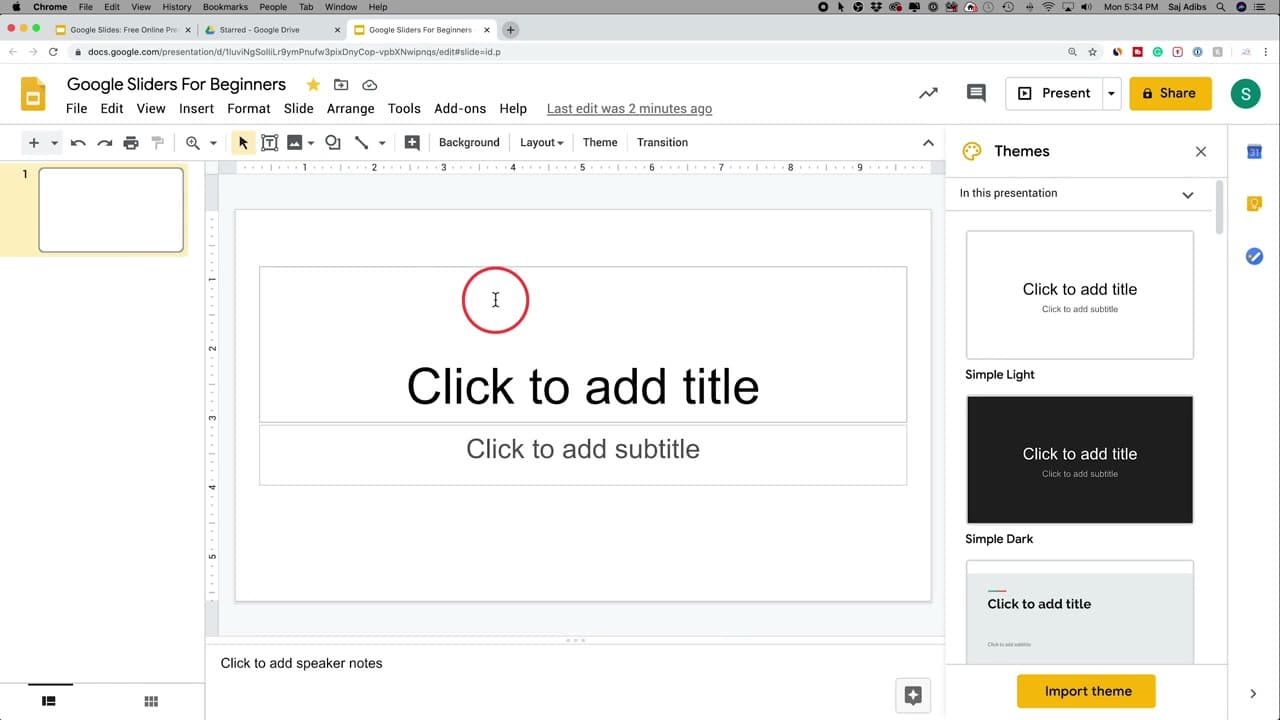
At the top left, your new deck is called Untitled presentation. Click that text, type a real name, and press Enter. The new name shows up immediately.

You don't need to hit Save. Slides writes every change to your Google Drive in the background. Look just below the menu bar - it says All changes saved in Drive. Click the small folder icon next to the title to move the file into a Drive folder so it's easy to find later.

Tip

The star icon next to the title marks the deck as a favorite. Starred files show up under the Starred section in Drive for one-click access.

4

Pick a Theme to Set the Look of Every Slide

2:38
Step 4: Pick a Theme to Set the Look of Every Slide

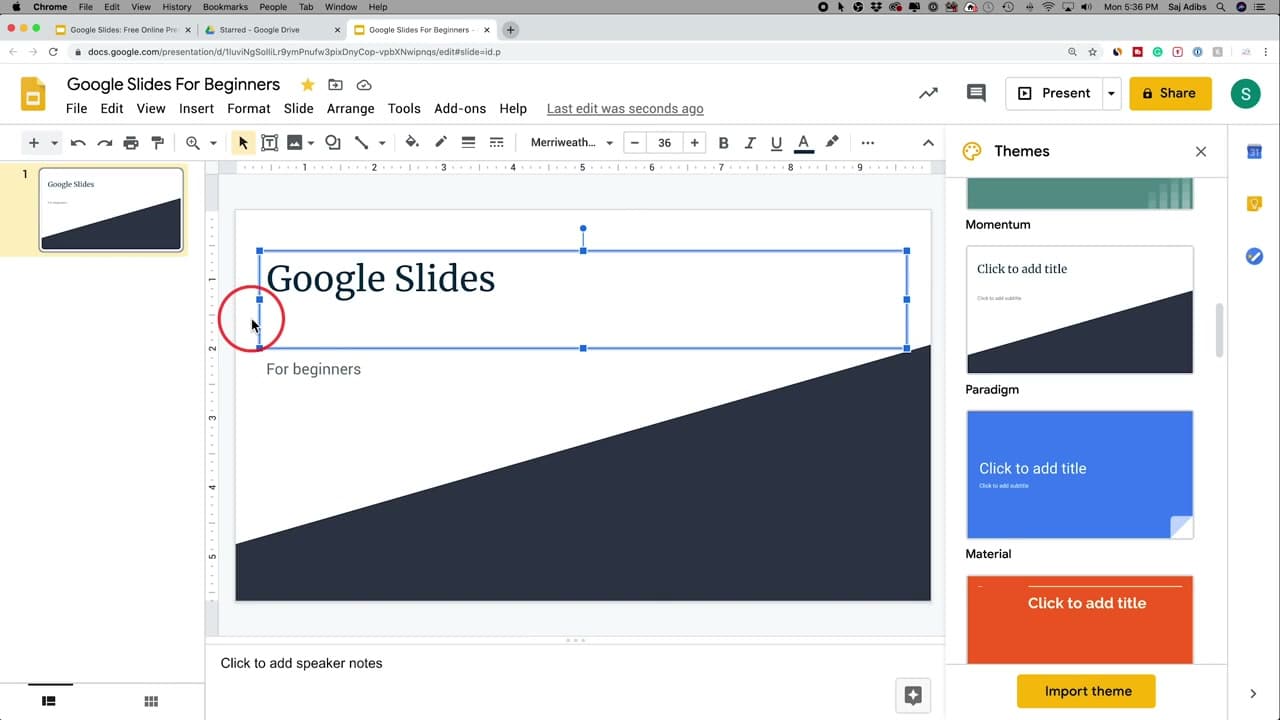
The Themes panel opens on the right side of a new deck. Scroll through Simple Light, Simple Dark, Momentum, Paradigm, Material, and the rest. Click any one to apply it to your whole presentation at once.

Themes set the fonts, colors, backgrounds, and slide layouts for you. That means the deck looks consistent without you having to format each slide by hand. If you closed the panel, reopen it from the Slide menu - pick Change theme at the bottom.

Tip

You can swap themes any time, even after you've added content. Slides reflows your text into the new layout automatically.

5

Add a Title and Subtitle to Your First Slide

3:35
Step 5: Add a Title and Subtitle to Your First Slide

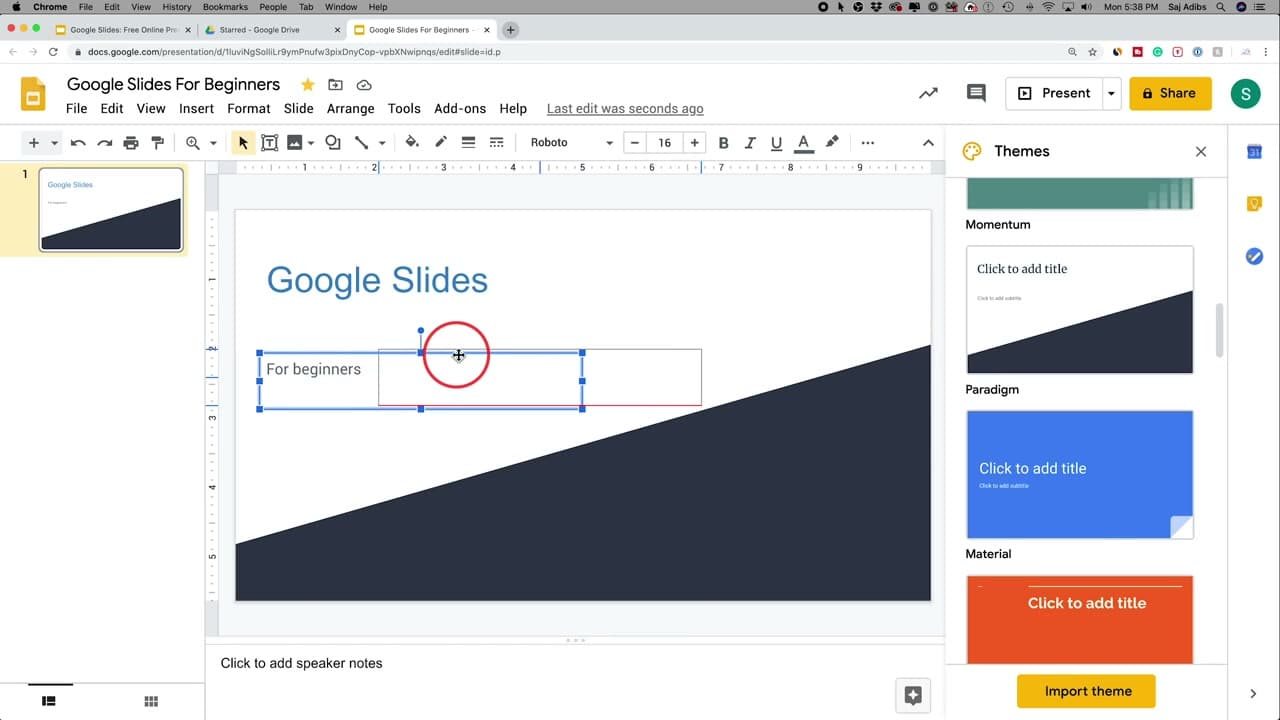
Your title slide has two text boxes - Click to add title and Click to add subtitle. Click the title box and type the name of your presentation. Tab down or click the subtitle box and add a short line underneath.

You can grab any text box by its border and drag it to a new spot. The blue handles on the corners and sides let you resize it. The theme keeps your fonts and colors consistent without you having to think about them.

Tip

If you accidentally delete a text box, press Ctrl+Z to bring it back. Same shortcut works for every edit in Slides.

Products used in this step

6

Format Text With Fonts, Sizes, and Colors

4:20
Step 6: Format Text With Fonts, Sizes, and Colors

Select the text you want to change by clicking and dragging across it. The formatting toolbar at the top lights up: font name, font size, bold, italic, underline, text color, and highlight color.

Pick a font from the dropdown (More fonts at the bottom adds new ones from Google Fonts). Type a number in the size box or use the plus and minus buttons. The text color and fill bucket icons change the color of selected text and any selected shape's background.

Tip

Keyboard shortcuts save time: Ctrl+B for bold, Ctrl+I for italic, Ctrl+U for underline. Works on every operating system.

7

Add More Slides and Rearrange the Order

4:40
Step 7: Add More Slides and Rearrange the Order

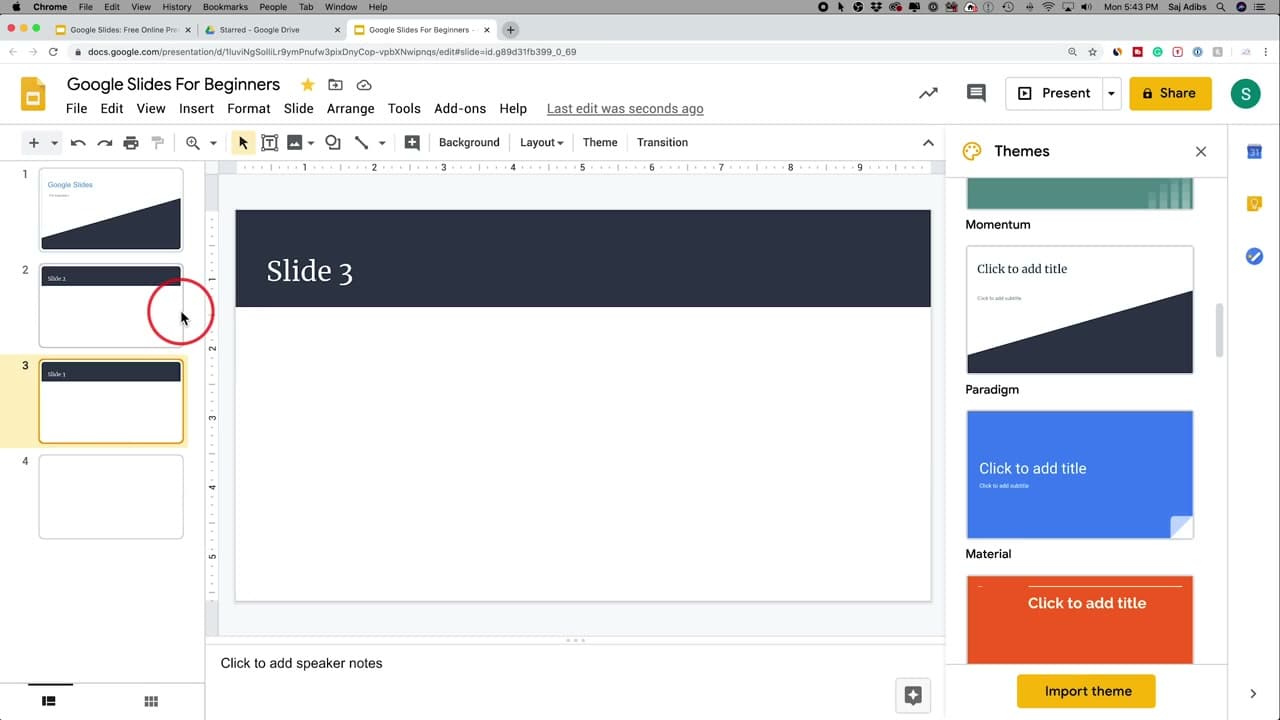
Click the plus sign at the top left of the slide panel to add a new slide using the same theme. To pick a different layout (title and body, two columns, blank, and others), click the small arrow next to the plus sign and choose one.

The thumbnail panel on the left shows every slide in order. Click and drag a thumbnail up or down to change the order. Right-click any thumbnail to duplicate, delete, or skip it during presentations.

Tip

Ctrl+D duplicates the currently selected slide. Useful when several slides share the same layout.

8

Insert Images, Videos, and Charts Into a Slide

8:05
Step 8: Insert Images, Videos, and Charts Into a Slide

Click the slide you want to add content to. Go to Insert in the menu bar to see every option: Image, Text box, Audio, Video, Shape, Table, Chart, and more.

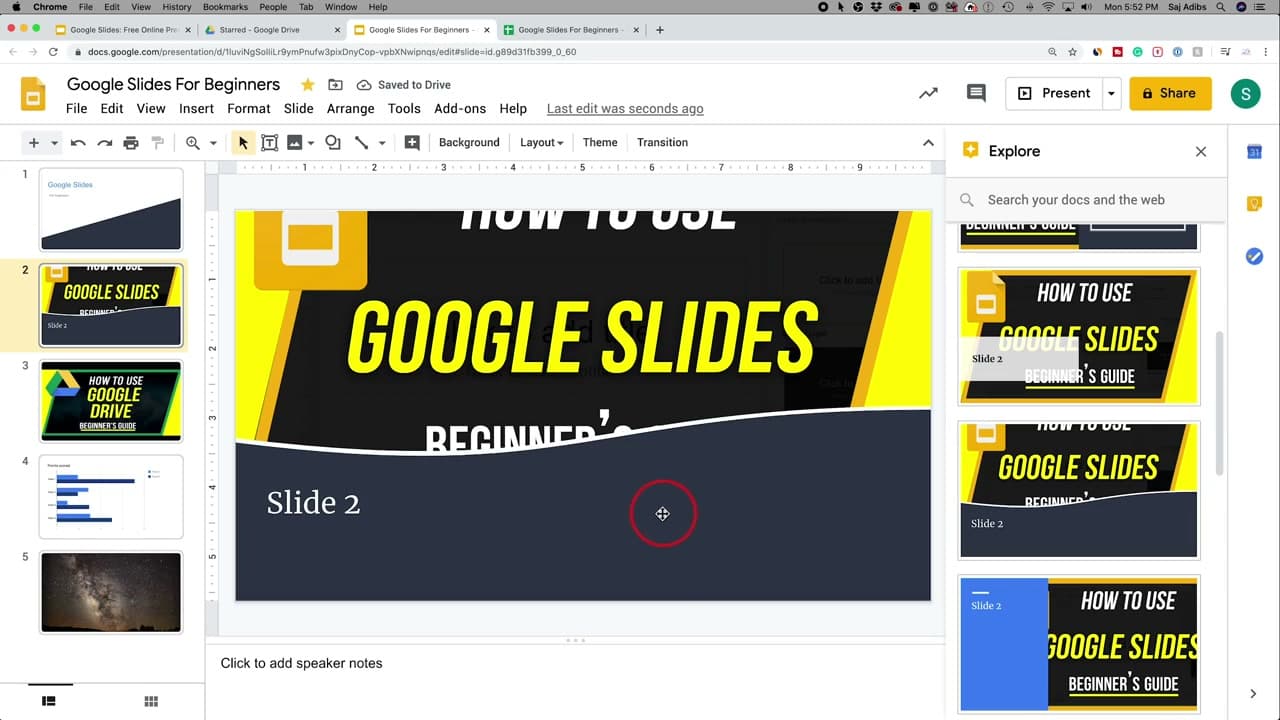
Image lets you upload from your computer, search the web for copyright-safe pictures, pull from Drive or Google Photos, paste a URL, or snap from your webcam. Video opens a search box for YouTube - find the clip you want, click Select, and the video embeds right in the slide with options to mute or trim. Chart pulls from Google Sheets or builds a bar, line, or pie chart directly in Slides.

Tip

The Explore button at the bottom right suggests layouts based on what's already on the slide. Worth clicking when a slide feels off-balance.

9

Click Present to Enter Full-Screen Mode

12:23
Step 9: Click Present to Enter Full-Screen Mode

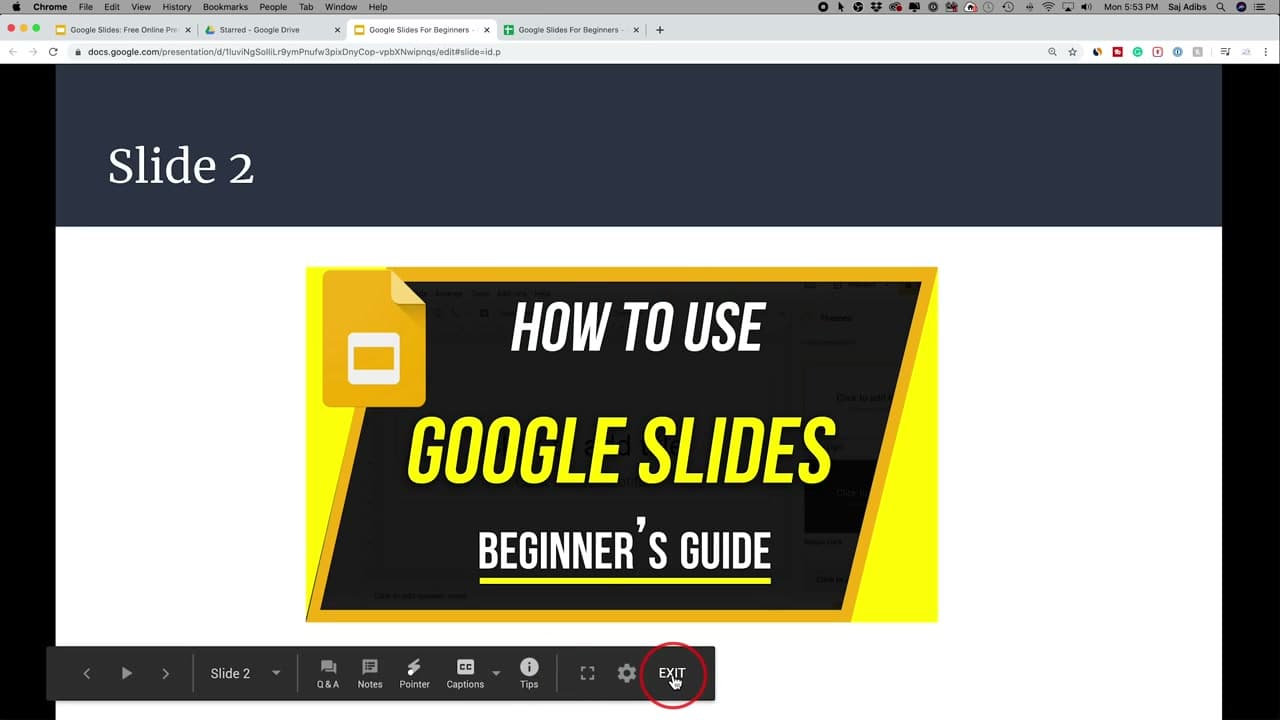
When the deck is ready, click the Present button at the top right. The first slide takes over your screen and the toolbar disappears. Click anywhere or press the right arrow to move to the next slide.

Move your mouse to the bottom of the screen to see the presenter toolbar: jump to any slide, turn on the laser pointer, enable captions for live transcription, and open speaker notes on a second screen. Press Esc or click Exit to return to the editor.

Tip

The arrow next to Present opens Presenter view, which puts your speaker notes on one screen and the slide on the other. Good for two-monitor setups.

10

Share With Viewer, Commenter, or Editor Permissions

14:00
Step 10: Share With Viewer, Commenter, or Editor Permissions

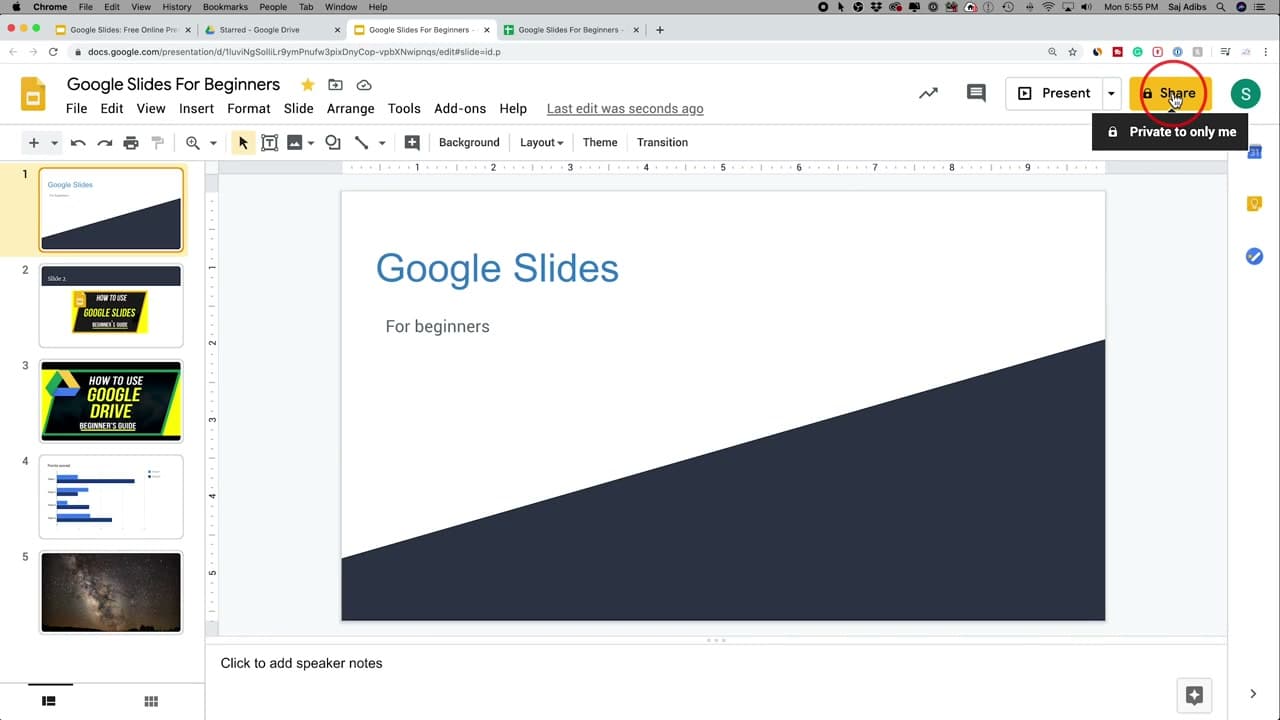
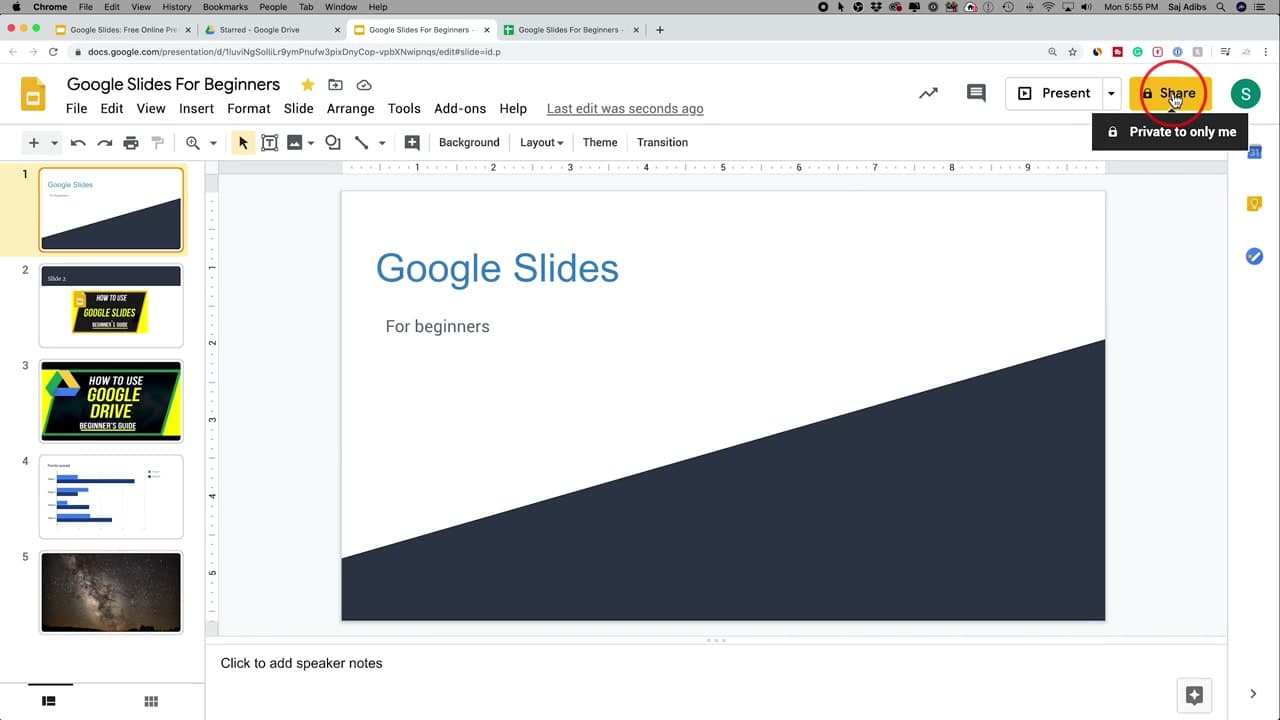
Click the yellow Share button at the top right. The Share panel opens. Type an email address in the People field, add a quick message, and pick a permission level from the dropdown: Viewer (read-only), Commenter (can leave feedback), or Editor (can change anything).

Click Send and that person gets an email with a link to your deck. To share with a bigger group, click Get link at the bottom of the panel and copy the URL - anyone with the link gets the permission level you set.

Tip

The padlock icon on the Share button is a quick visual reminder of who can see the file. Click it to check the current permissions without opening the full Share panel.

Products Used

☐ The Checklist

How to Use Google Slides - Beginner's Guide

Tools
2
Steps
10
Video
15 min

Your Guide

Howfinity

As an Amazon Associate we earn from qualifying purchases. Links on this page may be affiliate links - clicking them and buying doesn't change your price, but helps support ShowMeStepByStep.

Tags

Test your knowledge

Did the lesson stick? Find out in 2 minutes.

5 quick questions covering what you just read. No signup, no score saved — just a gut check.

Quick reference

Key takeaways from How to Use Google Slides - Beginner's Guide

5 questions, answers, and one-line explanations. Tap to expand.

  1. 1.Do you need to save your work?

    Answer: Auto-saves to Drive

    Writes every change to Drive in background. Look just below menu bar - 'All changes saved in Drive.' No Save button.

  2. 2.What does picking a theme do?

    Answer: Sets fonts and colors

    Themes set fonts, colors, backgrounds, slide layouts for the whole deck at once. Consistent without per-slide formatting.

  3. 3.Where do you reopen the Themes panel?

    Answer: Slide > Change theme

    Slide menu > Change theme (at the bottom). Panel reopens with all theme options.

  4. 4.How do you embed a YouTube video?

    Answer: Insert > Video > YouTube

    Insert > Video opens a YouTube search. Click Select and the video embeds right in the slide with mute/trim options.

  5. 5.Three share permission levels?

    Answer: Viewer, Commenter, Editor

    Viewer (read-only), Commenter (feedback), Editor (change anything). Or get a link with set permission for anyone.

What's next

Related collections

Curated theme pages that include this tutorial.

Weekly Digest

Liked this tech tutorial?

Pick the categories you want to hear about. Weekly digest of new step-by-step tutorials. No spam, easy unsubscribe.

Send me tutorials about

We only email about new tutorials. Easy unsubscribe anytime.