How to Install Peel and Stick Tile Backsplash

By ShowMeStepByStepPublished Updated

Based on a video by The DIY Mommy.

How to install a peel and stick backsplash in your kitchen: this is one of the cheapest, fastest, and most renter-friendly upgrades you can make. No mortar, no grout, no tile saw. If you can put stickers on paper, you can do this. The whole job takes about two hours and runs under $50 in materials.

This 7-step guide follows Christina from The DIY Mommy through a complete kitchen install with peel and stick subway tiles from the dollar store. She covers the part that trips up most beginners - surface preparation - and three different methods for cutting tiles to fit around outlets, windows, and cabinets without a wet saw.

Surface prep is the single biggest difference between a peel and stick backsplash that lasts five years and one that starts curling at the corners after six months. Clean the wall with TSP or a heavy-duty degreaser to strip cooking grease, let it dry overnight, and don't skip this step even if the wall looks clean.

Related home-improvement tutorials: how to install laminate flooring, how to install a ceiling fan, and how to fix holes in drywall.

Step-by-Step Guide

1

Clean the Surface

1:31
Step 1: Clean the Surface

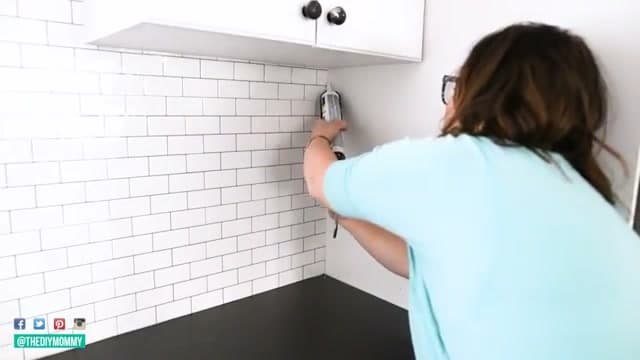
This is the most important prep step. Use a degreaser and wipe down the entire wall where the tiles are going. Kitchen walls collect grease and dust that you cannot always see, and any residue will weaken the adhesive over time.

Let the wall dry completely before you start sticking anything.

2

Choose Your Tiles and Plan the Layout

2:18
Step 2: Choose Your Tiles and Plan the Layout

Peel and stick tiles come in all kinds of styles - subway tiles, mosaics, marble look, hexagons. Larger format tiles (like the 10x10 inch sheets used here) are easier to align than tiny mosaics.

Measure your backsplash area to figure out how many tiles you need. Buy 10-15% extra to account for cuts and mistakes. You will use more material than the raw square footage suggests.

3

Start in a Corner and Apply the First Tiles

3:14
Step 3: Start in a Corner and Apply the First Tiles

Peel the backing off and press the first tile onto the wall starting in a lower corner. Smooth it down with your hand, but do not press too hard right away. Position it first, make sure the lines are straight, then press firmly once you are happy with the placement.

You can usually reposition a tile once if you catch it quickly. After that the adhesive loses grip, especially on cheaper tiles.

Tip

Use a level to make sure your first row is straight. Everything above it follows that line, so getting the base row right matters.

Products used in this step

4

Cut Tiles to Fit Edges and Corners

4:07
Step 4: Cut Tiles to Fit Edges and Corners

Mark your cut lines with a pencil (it wipes off the tile surface easily). Cut with regular scissors, a craft knife, or a box cutter. For complex shapes around windows, make a paper template first, then trace it onto the tile.

Cut slightly generous. You can always trim more off, but you cannot add material back. A ruler helps keep lines straight on longer cuts.

Products used in this step

5

Measure and Cut Around Cabinets

7:00
Step 5: Measure and Cut Around Cabinets

For cuts around cabinets and trim, use a tape measure to get the distance, then transfer those measurements to the tile with a pencil and ruler. Do a dry check before you peel the backing - hold the unpeeled tile in position to confirm the fit, then peel and apply.

This saves tiles. Once you peel and stick in the wrong spot, that sheet is harder to reuse.

6

Work Around Obstacles

9:00
Step 6: Work Around Obstacles

For small sections under cabinets or near the ceiling, use leftover pieces from previous cuts. Flip tiles to use both the top and bottom halves. Think about how to use each sheet before cutting so you are not wasting full tiles on tiny fill pieces.

When marking cuts for tight spots, hold the tile in position against the wall and mark directly where it needs to be trimmed. That is usually more accurate than measuring with a tape.

Products used in this step

7

Caulk the Seams and Finish

11:01
Step 7: Caulk the Seams and Finish

Once all the tiles are up, run a bead of caulk where the tile meets cabinets, countertops, window trim, and any other edges. Use latex caulk for dry areas. For spots near a sink, use silicone caulk rated for wet areas.

The caulk fills tiny gaps between the tiles and surrounding surfaces and gives the whole thing a finished, professional look.

Products Used

☐ The Checklist

How to Install Peel and Stick Tile Backsplash

Tools
5
Materials
1
Steps
7
Video
13 min

Your Guide

The DIY Mommy

As an Amazon Associate we earn from qualifying purchases. Links on this page may be affiliate links - clicking them and buying doesn't change your price, but helps support ShowMeStepByStep.

Tags

Test your knowledge

Did the lesson stick? Find out in 2 minutes.

5 quick questions covering what you just read. No signup, no score saved — just a gut check.

Quick reference

Key takeaways from How to Install Peel and Stick Tile Backsplash

5 questions, answers, and one-line explanations. Tap to expand.

  1. 1.Most important prep step?

    Answer: Degrease the surface

    Single biggest difference between 5-year lifespan and curling corners at 6 months. TSP or heavy-duty degreaser to strip grease.

  2. 2.How much extra material should you buy?

    Answer: 10-15% extra

    Accounts for cuts and mistakes. You use more material than the raw square footage suggests.

  3. 3.First tile goes where?

    Answer: Lower corner

    Start in a lower corner. Use a level on the first row - everything above follows that line, so the base row matters.

  4. 4.Best tool to cut peel-and-stick tiles?

    Answer: Scissors or craft knife

    Regular scissors, craft knife, or box cutter. For complex shapes around windows, make a paper template first then trace.

  5. 5.Right caulk for spots near the sink?

    Answer: Silicone for wet areas

    Latex is fine for dry edges. Near a sink, use silicone caulk rated for wet areas - latex breaks down with constant moisture.

What's next

Related collections

Curated theme pages that include this tutorial.

Weekly Digest

Liked this home improvement tutorial?

Pick the categories you want to hear about. Weekly digest of new step-by-step tutorials. No spam, easy unsubscribe.

Send me tutorials about

We only email about new tutorials. Easy unsubscribe anytime.