How to Plant Garlic

Also in:Adulting

By ShowMeStepByStepPublished Updated

Based on a video by Epic Gardening.

Garlic is one of the easiest crops to grow at home, but it gets planted at the wrong time more than any other vegetable. The dominant search intent on how to plant garlic is fall planting, and that is for a good reason. Garlic needs to go in the ground in the back half of fall, develop roots through winter, and break dormancy in early spring. Plant in spring and you get small, sad bulbs - or none at all. Plant in fall and you get the big, juicy heads you see at the farmers market.

The other thing most first-time growers miss is the difference between hardneck and softneck. Hardneck garlic needs real cold to form bulbs. Softneck does not. Pick the wrong variety for your climate and you can do everything else right and still get nothing.

This walkthrough is built from Kevin Espiritu's full guide at Epic Gardening, which covers every step from variety selection through mulching. Once your garlic is in, the rest of your fall bulb-planting follows the same rhythm - see our companion guide on how to plant onion sets for the other big fall bulb crop, and how to prune tomato plants if you still have summer crops to wrap up before the garlic goes in.

Step-by-Step Guide

1

Pick Hardneck or Softneck Garlic

0:45
Step 1: Pick Hardneck or Softneck Garlic

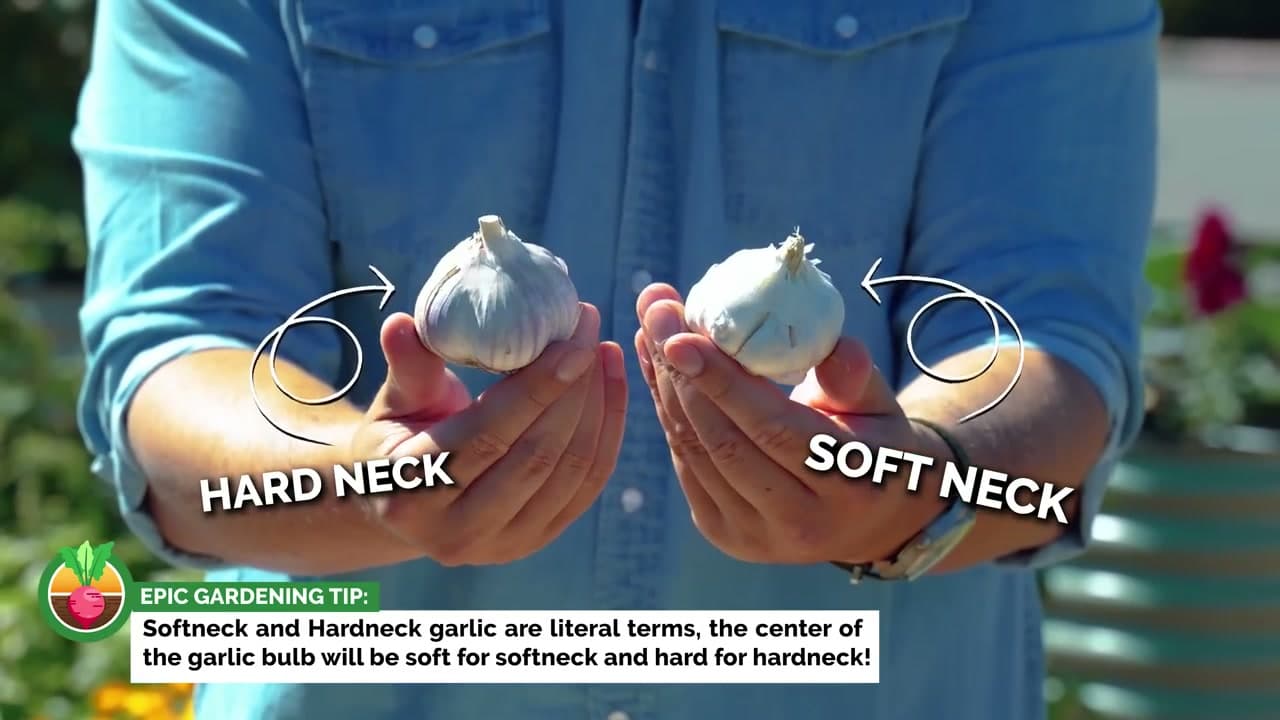
Garlic breaks into two camps and the choice depends on your climate. Softneck garlic is what you see at the grocery store. It has smaller, more numerous cloves, milder flavor, stores up to a year in the pantry, and handles warm climates without any special treatment. Hardneck garlic has fewer but much bigger cloves, more pungent and spicy flavor, stores about six to eight months, and strongly prefers a cold climate.

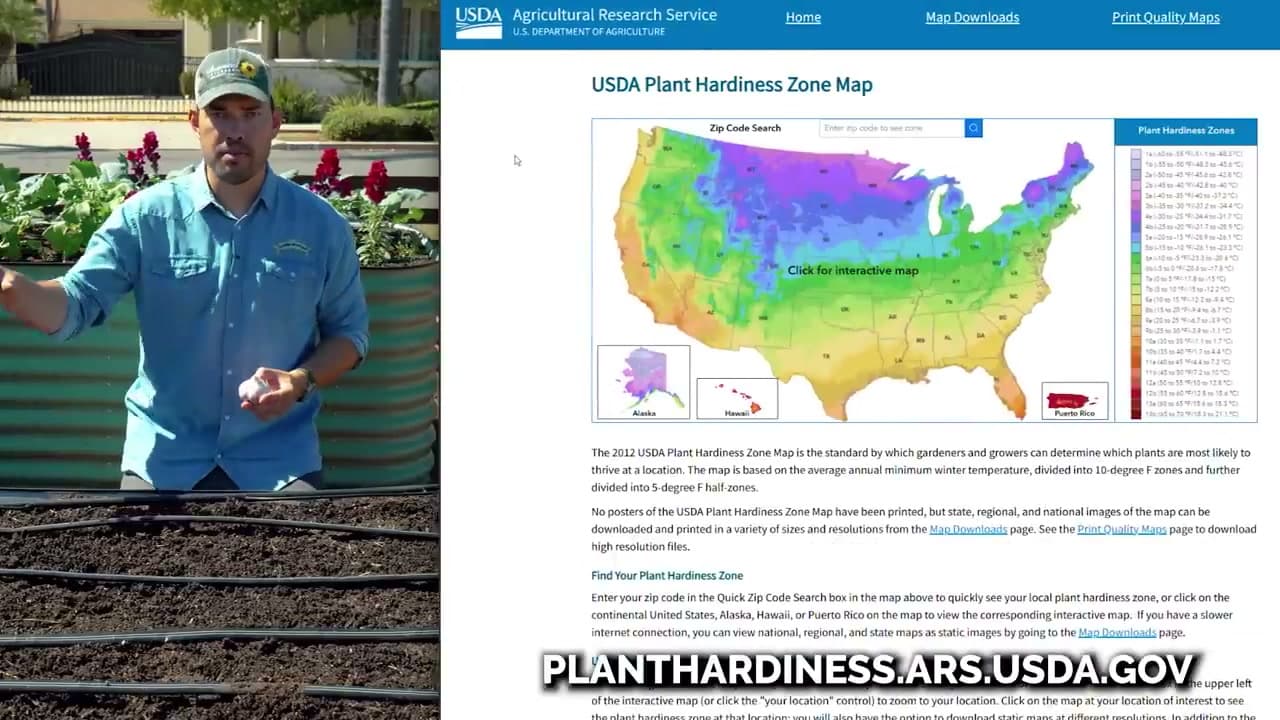
If you are in USDA zones 3 through 7 (the northern half of the US), default to hardneck. The big, easy-to-peel cloves are worth growing for the kitchen alone, and the cold winters do the work of vernalization for you. If you are in zones 8 through 10, start with softneck because it is forgiving. Hardneck is still possible in warm climates, but it requires the refrigerator trick covered in the next step.

Tip

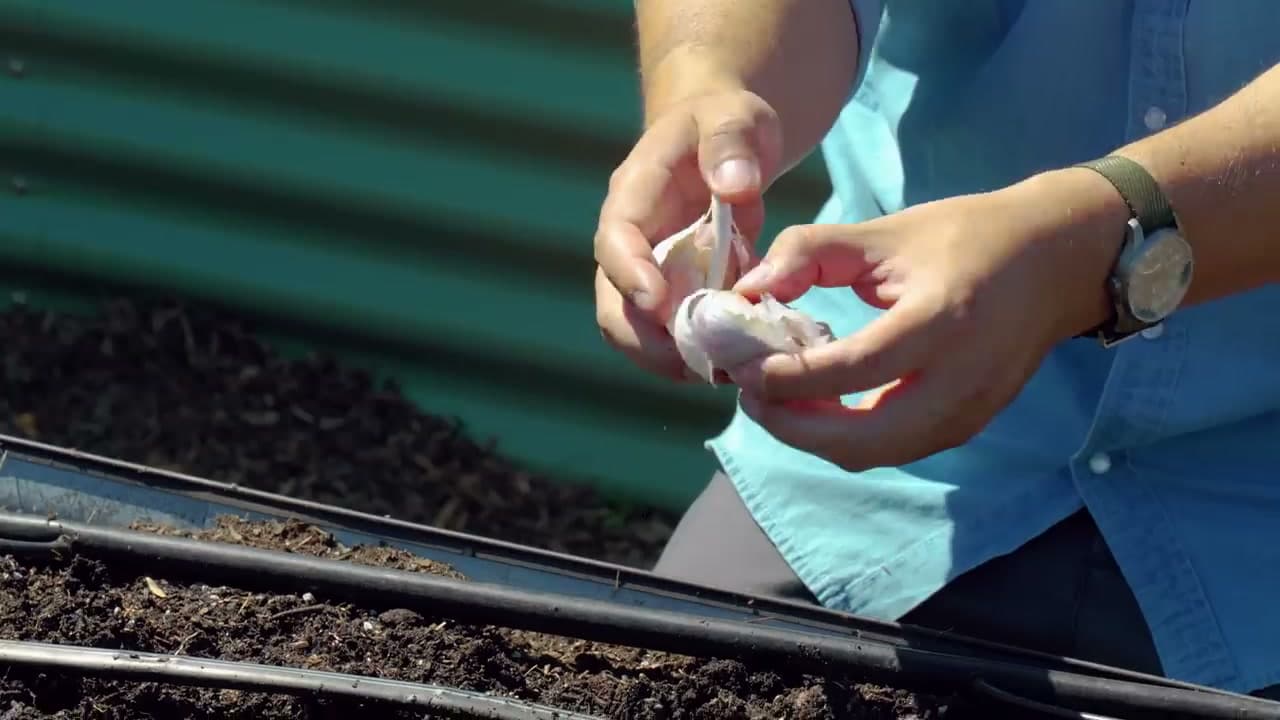
Popular hardneck varieties: Music, German Red, Spanish Roja, Chesnok Red. Popular softneck varieties: Inchelium Red, California Early, Silverskin. Buy seed garlic from a seed company, not the produce aisle - grocery store garlic is often sprayed to prevent sprouting and may carry diseases that will infect your soil.

2

Vernalize Hardneck Garlic in Warm Climates

2:10
Step 2: Vernalize Hardneck Garlic in Warm Climates

If you live in zone 8 or warmer and want to grow hardneck garlic, you have to fake winter. Hardneck has a built-in requirement for two to three months at 40 to 45 degrees Fahrenheit before it will form a proper bulb. In a cold climate this happens naturally in the ground. In a warm climate the bulbs just sit there and never split.

Put the whole bulbs in a paper bag and stash them in the crisper drawer of your refrigerator for 8 to 10 weeks. Check them once a week and pull out any that go soft or moldy. Do not put them in the freezer - freezing temperatures burst the cells inside the clove and kill the garlic outright. The fridge is cold enough.

Take the cloves out of the fridge a day or two before planting and let them come to room temperature. Plant them right after the vernalization window ends so they keep moving forward into the growth phase instead of stalling.

Tip

Set a calendar reminder on the day you put the garlic in the fridge so you do not forget about it. Eight to ten weeks is the sweet spot - much shorter and it does not form bulbs, much longer and the cloves start to soften or sprout in the bag.

3

Choose a Full-Sun Bed with Loose Soil

2:50
Step 3: Choose a Full-Sun Bed with Loose Soil

Garlic wants direct sun and demands drainage. Pick a bed that gets at least six hours of full sun a day. Heavy clay or compacted soil leads to garlic rust, rotted bulbs, and poor sizing - so if your native soil is dense, build a raised bed or amend hard before planting. In very hot climates, a spot with light afternoon shade is acceptable and will actually help during the heat of late spring.

Clear the bed completely before you start prepping. Pull out any leftover summer crops, weeds, and large roots. Garlic hates competition - it puts very little energy into shading out neighbors and any plant nearby will outgrow it. Empty bed means a clean start. Aim to plant garlic in a spot that did not grow onions, leeks, shallots, or garlic the previous year to avoid disease buildup in the soil.

Tip

Raised beds with metal sides (like the galvanized panels in the video) drain especially well and warm up faster in spring, which gives garlic a strong start when the bulbs start sizing up in May and June.

4

Work in a Heavy Dose of Compost

3:40
Step 4: Work in a Heavy Dose of Compost

Garlic is a heavy feeder and you almost cannot give it too much compost. Spread two to three inches of finished compost across the surface of the empty bed. Then take a garden fork and work the top 8 to 12 inches of soil, mixing the compost down and breaking up any compaction at the same time.

The fork does two jobs at once. It tills the compost into the root zone so the garlic has nutrients available all winter and spring, and it loosens the soil so the developing bulbs can swell without resistance. Bulbs that grow in tight soil come out small and misshapen. Bulbs that grow in loose, fluffy soil come out round and full-sized.

Pull out any rocks, thick roots, or chunks of old plant material you turn up. Smooth the surface with the back of a rake when you are done so the bed is level for planting.

Tip

If you do not have your own compost, a bag of organic compost from the garden center works fine. Skip fresh manure - it is too hot and will burn the cloves. Composted manure that has aged six months or more is great.

5

Time the Planting to Your Growing Zone

4:20
Step 5: Time the Planting to Your Growing Zone

The rule for timing is simple: get the cloves in the ground a few weeks before the coldest part of your year. That gives the roots time to develop in the still-warm fall soil and the tops time to break dormancy in early spring. Plant too early and the shoots come up in late fall and get hammered by hard freezes. Plant too late and the roots do not develop before the ground freezes.

In USDA zones 3 through 7, that usually means mid-September through mid-November - you want to be done planting two to three weeks before your first hard frost. In warmer zones 8 through 10, the window shifts later to November through early January, because the coldest part of the year arrives later. Look up your zone with your zip code at planthardiness.ars.usda.gov, then pick a date in the back half of fall.

Tip

If you missed the fall window entirely, you can still plant in very early spring, as soon as the ground can be worked. Spring-planted garlic will produce bulbs but they will be smaller and you may not get full clove separation. Plan ahead and stick to fall for the best harvest.

6

Separate the Bulb into Individual Cloves

5:05
Step 6: Separate the Bulb into Individual Cloves

Break each bulb into individual cloves right before planting, not days ahead. Press your thumb against the basal plate at the bottom of the bulb and pop each clove off one at a time. Keep that loose papery skin on each clove - it is a protective layer that helps the clove survive contact with the soil and resist rot.

Look at the cloves as you separate them. Bigger cloves produce bigger bulbs in the harvest, so save the largest and fattest for the bed. The small inner cloves from a softneck head can still be planted, but if you have more cloves than bed space, plant the biggest ones and set the small ones aside. Toss them in a shallow pot indoors and they will sprout up as green garlic - a green-onion-shaped culinary treat with mild garlic flavor.

Discard anything that feels soft, looks brown inside, or is starting to mold. Only plant firm, healthy cloves with intact papery skins.

Tip

One head of garlic usually yields 6 to 12 plantable cloves depending on the variety. Plan on planting about ten cloves per square foot of bed space. Buy a little more seed garlic than you think you need - you will throw out 10 to 20 percent for size or quality.

7

Plant Cloves Pointy Side Up, Three Inches Deep

6:10
Step 7: Plant Cloves Pointy Side Up, Three Inches Deep

Take a clove and look at it. One end is pointed (the tip where the original sprout came out) and one end is flat (the basal plate where the roots come out). Push each clove into the soil pointy side up, three to four inches deep, so the tip is one to two inches below the soil surface. Cover with soil and pat firm.

Pointy side up is non-negotiable. If you plant a clove upside down, the sprout still grows toward the surface but it has to loop around the bottom of the clove first, and the resulting bulb is small, twisted, and misshapen. Take a second per clove to check the orientation - it is the single most common rookie mistake.

Space the cloves six inches apart in the row. Rows can go six to eight inches apart, with the wider spacing on beds that have had any disease pressure in past seasons. Tight spacing gives you more garlic per square foot but reduces airflow and increases the chance of fungal problems in wet years.

Tip

A short ruler or a tape measure makes spacing fast. Mark a six-inch grid with the back of a trowel and you can plant a whole bed in twenty minutes. Some growers use a dibber - a pointed wooden tool that pokes a perfect three-inch hole - which speeds it up further.

8

Cover with Three Inches of Straw Mulch

7:05
Step 8: Cover with Three Inches of Straw Mulch

Once every clove is in, cover the entire bed with about three inches of straw mulch. A light-colored shredded straw reflects heat back into the air instead of letting the soil bake, holds moisture so the cloves do not dry out, insulates the developing roots through hard freezes, and suppresses weeds that would otherwise compete with the new shoots in spring.

Water the bed thoroughly right after mulching to settle everything in. Through winter, garlic mostly takes care of itself - you do not need to water unless you are in a dry climate with no winter rain or snow. Green shoots will push up through the mulch in late winter or early spring depending on your zone. Leave the mulch in place all the way through spring and into summer.

Stop watering about two weeks before harvest, which lands in mid-to-late summer for fall-planted garlic. You will know harvest is coming when the lower leaves yellow and brown while the top three or four leaves are still green. Dig a test bulb, check the clove definition, and pull the rest of the crop when the cloves are clearly separated.

Tip

If you cannot get straw, shredded leaves or pine straw work too. Avoid hay - hay is full of grass seed and you will create a weed problem on top of the garlic. Three inches of mulch sounds like a lot but it compresses fast over winter to one to two inches.

Products Used

☐ The Checklist

How to Plant Garlic

Tools
3
Materials
3
Steps
8
Video
8 min

Your Guide

Epic Gardening

As an Amazon Associate we earn from qualifying purchases. Links on this page may be affiliate links - clicking them and buying doesn't change your price, but helps support ShowMeStepByStep.

Tags

Test your knowledge

Did the lesson stick? Find out in 2 minutes.

5 quick questions covering what you just read. No signup, no score saved — just a gut check.

Quick reference

Key takeaways from How to Plant Garlic

5 questions, answers, and one-line explanations. Tap to expand.

  1. 1.Which garlic type strongly prefers a cold-winter climate?

    Answer: Hardneck

    Hardneck needs a real cold dormancy; softneck handles warm winters fine.

  2. 2.If you live in zone 8+ and want hardneck garlic, how do you fake winter?

    Answer: Store bulbs in the fridge crisper at 40-45 F for 8-10 weeks

    That's vernalization - cold-storing forces the dormancy hardneck needs.

  3. 3.Which way should each clove face when you plant it?

    Answer: Pointy end up

    Pointy up means roots from the basal plate, shoot from the tip. Upside-down makes small twisted bulbs.

  4. 4.How deep should each clove sit?

    Answer: 3 to 4 inches deep, tip 1-2 inches below surface

    3-4 inches gives root room without freezing the clove out in winter.

  5. 5.Why cover the bed with three inches of straw mulch after planting?

    Answer: Insulates roots, holds moisture, and suppresses weeds

    Straw is the all-in-one buffer through winter - insulation, moisture, weed block.

What's next

Related collections

Curated theme pages that include this tutorial.

Weekly Digest

Liked this gardening tutorial?

Pick the categories you want to hear about. Weekly digest of new step-by-step tutorials. No spam, easy unsubscribe.

Send me tutorials about

We only email about new tutorials. Easy unsubscribe anytime.