How to Deposit a Check on Mobile (Step by Step)

BankingEasy4:057 stepsBrowse more →
Also in:TechAdulting

By ShowMeStepByStepPublished Updated

Based on a video by GOBankingRates.

Standing in line at the bank to deposit a check is an avoidable errand. Every major US bank app - Chase, Wells Fargo, Bank of America, Capital One, Citi, USAA, Ally - has mobile check deposit built in, and the flow is nearly identical across all of them. Sign in, pick the account, type the amount, photograph both sides of the check, submit. Two minutes total.

This walkthrough uses Jenn from GOBankingRates demonstrating Chase Quick Deposit on an iPhone. The screen names and exact button labels vary by bank (Chase calls it Quick Deposit, Wells Fargo calls it Deposit Checks, Bank of America calls it Mobile Deposit), but the actions are the same. If you bank somewhere else, the steps still map cleanly.

One detail the source video glosses over deserves more weight: the endorsement. Banks now require you to write 'For mobile deposit only' beneath your signature on the back of the check. Without that exact phrase, many banks reject the deposit - and if a stolen photo of an unrestricted endorsement gets into the wrong hands, the check can be cashed again. That's step 4 below and it's the one most people skip.

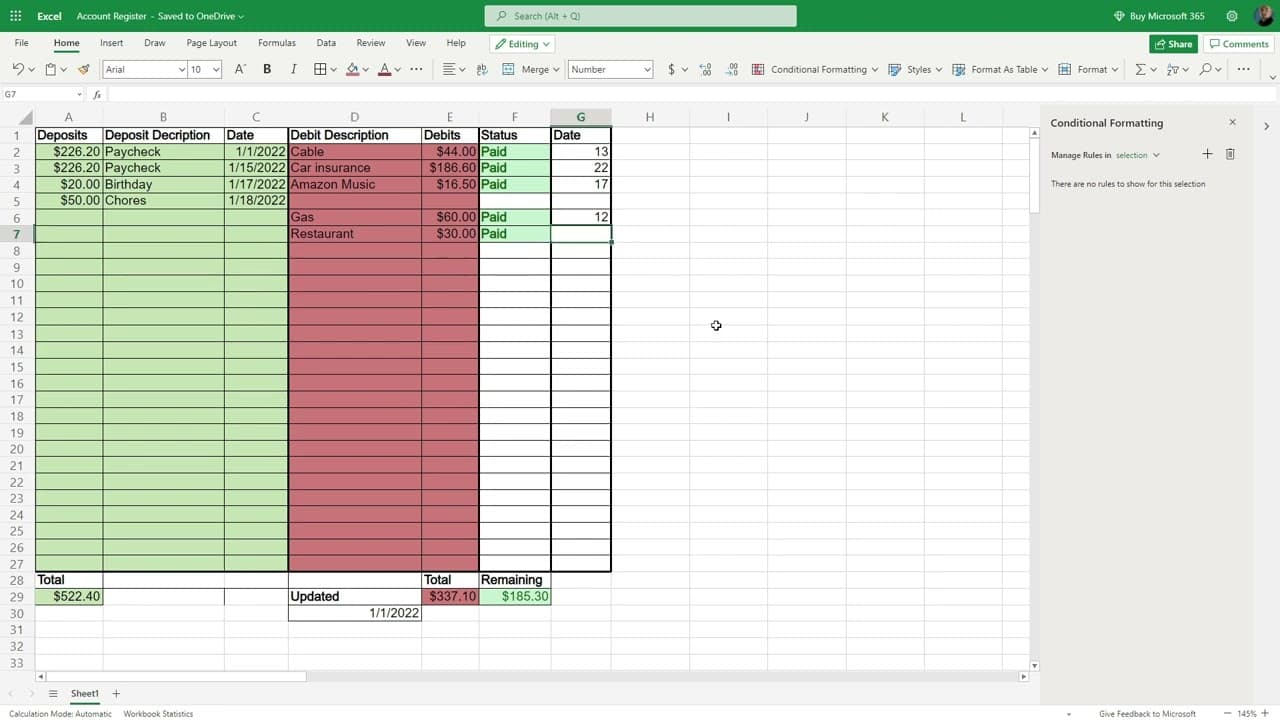
Before you start: have your phone, the bank app installed, the paper check, and a pen handy. Sit somewhere with bright, even light and a dark, plain surface to lay the check on for the photos. If you already balance your account, log this deposit in your checkbook register as soon as you submit, and keep the paper check until the funds clear (usually 1-5 business days) - same rule that applies when you write a check. While you have your phone out, this is also a good moment to confirm you have a recent phone backup, since losing a phone mid-deposit is its own headache.

Step-by-Step Guide

1

Step 1: Open your bank app and sign in

1:20
Step 1: Step 1: Open your bank app and sign in

Tap your bank app and log in. Use Face ID, Touch ID, or your password - whichever your bank supports. If you haven't opened the app in a while, you may have to re-enter credentials from scratch or pass a one-time security code sent to your phone.

Most major bank apps (Chase, Wells Fargo, Bank of America, Capital One, Citi) follow the same flow from this point on. Chase calls it Quick Deposit, Wells calls it Deposit Checks, BoA calls it Mobile Deposit. The screens look slightly different but the actions are identical.

Tip

If you don't have your bank's app installed, download it from the App Store or Google Play before you start. Banks block mobile check deposit through their mobile websites - the app is the only way.

Products used in this step

2

Step 2: Open the Deposit Checks menu

1:32
Step 2: Step 2: Open the Deposit Checks menu

From the home screen of the app, tap the menu and choose Deposit Checks. Chase calls this Quick Deposit and tucks it under Pay & Transfer. Wells Fargo and BoA put a Deposit Checks tile on the home dashboard. The icon usually looks like a check or a camera.

If you can't find it, search 'deposit' inside the app's help search bar. Some smaller banks require a one-time enrollment in mobile deposit before the option appears, which takes about 30 seconds.

3

Step 3: Choose the account and enter the check amount

1:31
Step 3: Step 3: Choose the account and enter the check amount

Tap the account selector and pick the account you want the money to land in. For most people this is a regular checking account. If you have multiple accounts, double check you're depositing into the right one before you move on.

Then type the exact dollar amount printed on the check, down to the cent. The number you enter has to match the check or the deposit will get flagged and reversed. If the check says $247.83, type 247.83 - not 247 or 250.

Tip

If the check amount in numbers and the amount written in words don't agree, banks honor the written amount. Type that one. Better still, contact the person who wrote you the check and ask them to reissue it.

4

Step 4: Endorse the back of the check

1:30
Step 4: Step 4: Endorse the back of the check

Before you photograph anything, flip the check over and endorse it. On the top set of lines on the back, sign your name. Directly under your signature, write 'For mobile deposit only' in clear printing.

This is a restrictive endorsement and it's required by every major bank for mobile deposits. Without that exact phrase, banks reject the deposit on the spot. The phrase also protects you - if the photo or the paper check is intercepted, no one can cash or deposit it any other way. Skipping this step is the #1 reason mobile deposits get rejected.

Tip

Use blue or black ink and a steady pen - a smudged endorsement reads as fraud to the bank's image-recognition system. A Pilot G2 or any rollerball gel pen works better than ballpoint here.

5

Step 5: Photograph the front of the check

1:38
Step 5: Step 5: Photograph the front of the check

Tap Photograph Check Front (Chase's label - other banks call it Take Photo or Check Front). The camera opens with a rectangle overlay showing where to line up the check.

Place the check flat on a dark, plain surface - a wooden table or a black notebook works well. The contrast helps the camera find the edges. Hold the phone directly above the check, line up all four corners inside the rectangle, and wait. Most bank apps auto-capture once the corners are aligned. If yours doesn't, tap the shutter button.

Retake the photo if any corner is cut off, the image is blurry, or the writing isn't readable. The bank's OCR has to read the routing number, account number, and amount cleanly.

Products used in this step

6

Step 6: Photograph the back of the check

2:30
Step 6: Step 6: Photograph the back of the check

Now tap Photograph Check Back. Flip the check over and line up the corners the same way you did for the front. Your signature and the 'For mobile deposit only' line should both be clearly visible.

Auto-capture or tap the shutter. The app shows a preview - if the corners are crisp and the writing is sharp, tap Use. If anything looks off, tap Retake.

Tip

Don't worry if your endorsement looks crooked or your handwriting is sloppy. As long as the words are readable, the bank doesn't care about penmanship. They just need to confirm the restrictive endorsement is there.

7

Step 7: Review, submit, and save the confirmation

3:20
Step 7: Step 7: Review, submit, and save the confirmation

The review screen shows the account, the amount, and both check photos. Look it over once. If anything is wrong, back out and fix it - it's much easier to correct before submitting than to call the bank afterward.

Tap Next or Submit. You'll get a confirmation number on screen and an email receipt within a minute or two. Save both. Funds typically clear in 1-5 business days, sometimes faster for known senders or smaller amounts.

Hold onto the paper check until the funds fully clear. Then shred it - don't just throw it in the trash, because the routing and account numbers on the bottom are enough for someone to commit fraud. After it's shredded, you're done.

Tip

Some banks let you set up an alert that pings your phone the moment a mobile deposit clears. Turn it on in the app's notification settings - it removes the guesswork about whether the money has actually landed.

Products Used

☐ The Checklist

How to Deposit a Check on Mobile (Step by Step)

Tools
4
Steps
7
Video
4 min

Your Guide

GOBankingRates

As an Amazon Associate we earn from qualifying purchases. Links on this page may be affiliate links - clicking them and buying doesn't change your price, but helps support ShowMeStepByStep.

Tags

What's next

Related collections

Curated theme pages that include this tutorial.

Weekly Digest

Liked this banking tutorial?

Pick the categories you want to hear about. Weekly digest of new step-by-step tutorials. No spam, easy unsubscribe.

Send me tutorials about

We only email about new tutorials. Easy unsubscribe anytime.