How to Share Your Location on iPhone Using Find My

TechEasy6:336 stepsBrowse more →
Also in:Adulting

By ShowMeStepByStepPublished Updated

Based on a video by Apple Support.

The Find My app on iPhone is the easiest way to share where you are with someone, whether that's your spouse, an adult kid checking in on a parent, or a friend you're meeting up with. The whole flow lives in one place, so you don't have to dig through Settings or text a pin from Apple Maps.

Before you can share with anyone, Find My needs to be on. It usually turns on automatically the first time you sign into iCloud on a new iPhone, but it's worth a quick check in Settings - especially if you've ever turned it off to save battery or troubleshoot something.

Once Find My is on, sharing is three taps. Open the app, hit the People tab, and tap the plus button to send someone an invitation. You pick how long they can see your location: one hour, until the end of the day, or indefinitely. They get a notification, accept it, and your dot shows up on their map.

This tutorial uses Apple's own walkthrough from the Apple Support channel, so the screens you see here match what's on your iPhone right now.

Step-by-Step Guide

1

Confirm Find My Is Turned On in Settings

0:55
Step 1: Confirm Find My Is Turned On in Settings

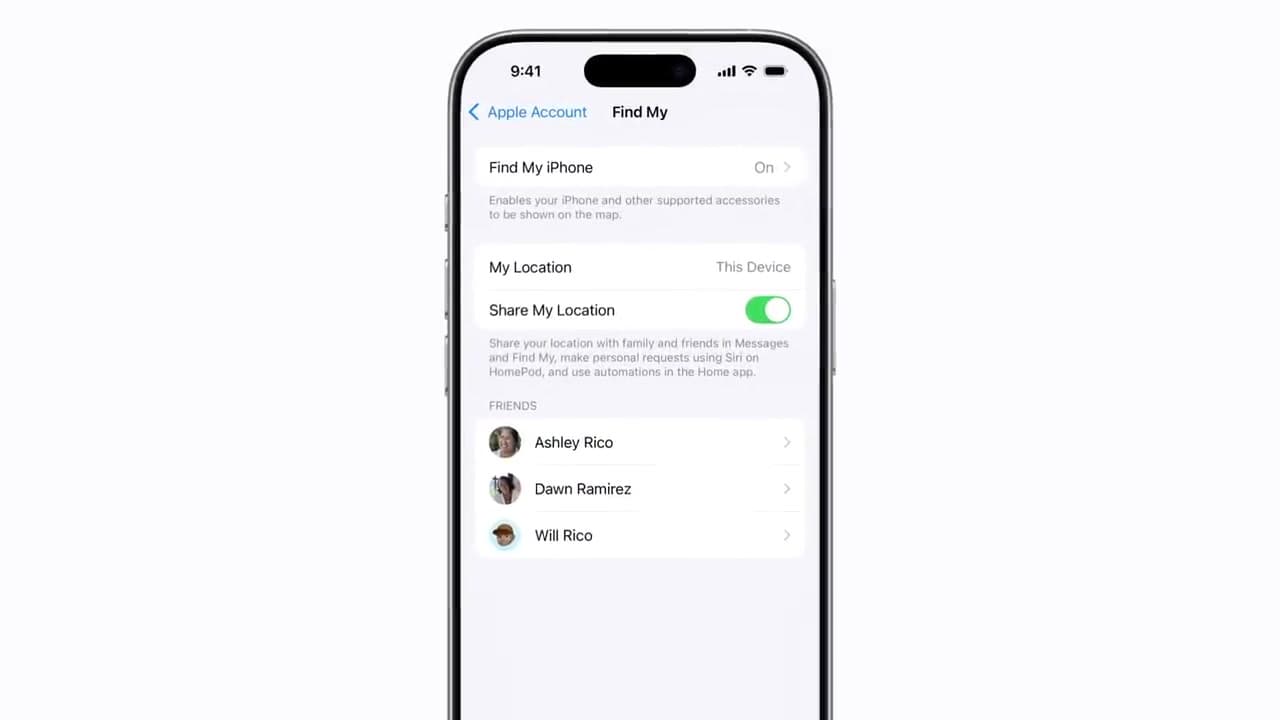
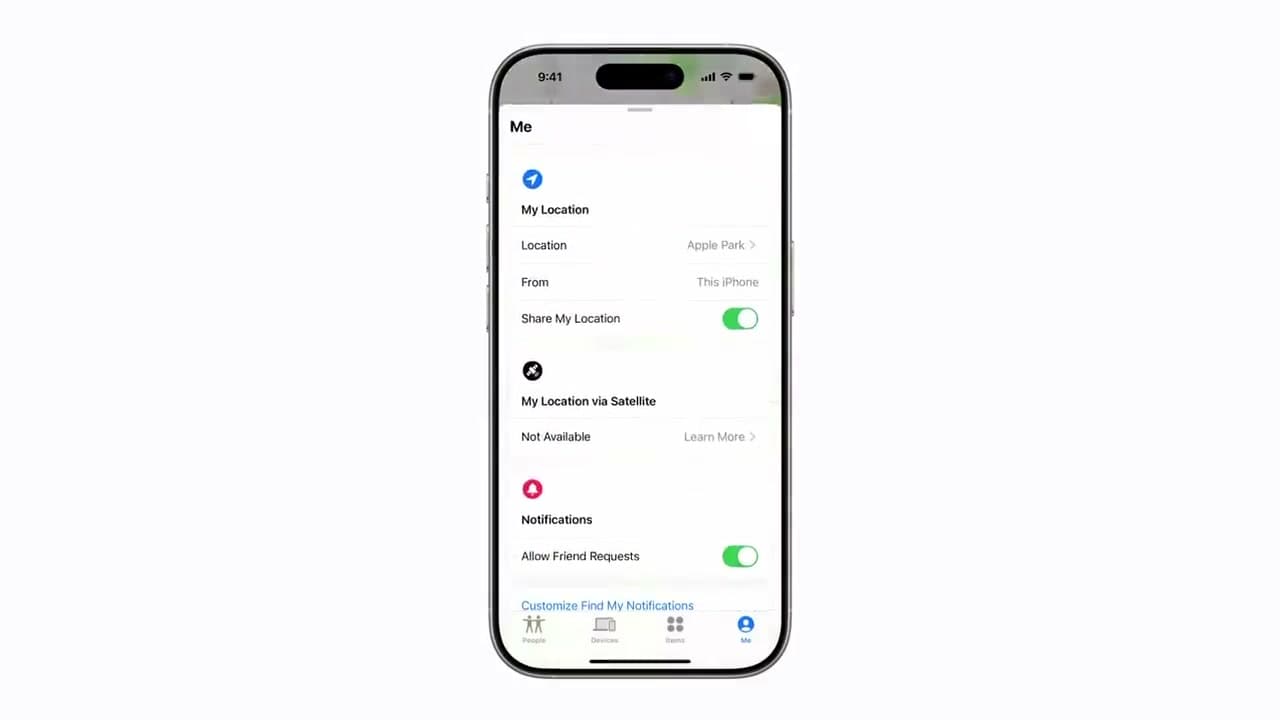
Open the Settings app and tap your name at the very top of the screen. Tap Find My, then tap Find My iPhone. The toggle next to Find My iPhone should be green. If it isn't, tap it to turn it on.

While you're on this screen, check that Share My Location is also toggled green. That second toggle is what lets you send your location to other people - the first one is just so Apple's network can find your phone if it's lost.

Tip

If anyone already shares with you, their names appear under FRIENDS on this same screen. You can tap a name to manage what they see.

2

Open Find My and Tap the People Tab

1:18
Step 2: Open Find My and Tap the People Tab

Swipe back to your home screen and tap the Find My app - the icon is a green circle with a blue dot. Along the bottom of the screen you'll see four tabs: People, Devices, Items, and Me. Tap People.

The People tab is where every location-sharing relationship lives. Anyone who already shares their location with you shows up in this list with their last known city and how long ago it updated.

Tip

If you don't see the Find My icon, swipe down on the home screen and search 'Find My'. It's an Apple app, so it can't be deleted, but it can be moved into a folder.

3

Tap the Add Button and Choose Share My Location

1:34
Step 3: Tap the Add Button and Choose Share My Location

Look in the top right corner of the People panel for a small blue plus button. Tap it. A menu slides up with two options: Share My Location and Help A Friend. Tap Share My Location.

A contact picker opens with your most-recent contacts at the top and a search field if you need to type a name. You're now one tap away from sending the invitation.

Tip

Help A Friend lets you sign into a friend's Apple account on your device to find one of their lost items. It's not the option you want for sharing your own location.

4

Pick a Contact and Send the Invitation

1:45
Step 4: Pick a Contact and Send the Invitation

Type the person's name in the To field or tap one of the suggested contacts. Their name turns blue once they're selected. Tap Send in the top right corner.

Find My then asks how long you want to share for: Share for One Hour, Share Until End of Day, or Share Indefinitely. Pick whichever fits the situation - 'until end of day' is good for a meetup, 'indefinitely' is what most families use.

Tip

Your contact has to be using an Apple device with an Apple account for them to accept. If they're on Android, sharing through Google Maps or a third-party app is the workaround.

5

Manage Sharing in the Me Tab

5:45
Step 5: Manage Sharing in the Me Tab

Back at the bottom of Find My, tap the Me tab on the far right. Swipe up on the handle just below the map to expand the panel.

You can tap Location and rename it to something friendlier than the address - 'Home', 'Mom's house', 'Cabin'. Below that, the Share My Location toggle lets you turn off all location sharing without disabling Find My itself. Useful when you want to go off-grid for a weekend.

Tip

Turning off Share My Location here pauses sharing for everyone you've shared with. You don't have to revoke each person individually.

Products used in this step

6

Send Your Location via Satellite When You're Off Grid

6:02
Step 6: Send Your Location via Satellite When You're Off Grid

Still in the Me tab, scroll past Share My Location to the My Location via Satellite section. When you have cellular and Wi-Fi, this shows Not Available. When you're outside coverage, tap it to send your current location to anyone you already share with.

Satellite sharing works on iPhone 14 and later running iOS 16.1 or newer. The other person doesn't need any special hardware - they get your location in their normal Find My app.

Tip

This is the feature to remember before a long hike, road trip through the desert, or any time you'll be off cellular for hours. It's free for the first two years on supported iPhones.

Products Used

☐ The Checklist

How to Share Your Location on iPhone Using Find My

Tools
1
Steps
6
Video
7 min

Your Guide

Apple Support

As an Amazon Associate we earn from qualifying purchases. Links on this page may be affiliate links - clicking them and buying doesn't change your price, but helps support ShowMeStepByStep.

Tags

What's next

Weekly Digest

Liked this tech tutorial?

Pick the categories you want to hear about. Weekly digest of new step-by-step tutorials. No spam, easy unsubscribe.

Send me tutorials about

We only email about new tutorials. Easy unsubscribe anytime.