How to Take Cornell Notes in 6 Steps

By ShowMeStepByStepPublished Updated

Based on a video by Jennifer DesRochers.

The Cornell note-taking system was developed at Cornell University in the 1940s and it's still the standard taught in study skills courses today. Why? It bakes active recall into the note-taking process itself - so the same act that captures the lecture also creates the study guide.

This walkthrough from Mrs. DesRochers' biology class shows the 6 steps that turn a blank sheet of paper into a tool you can actually study from. Works for lectures, textbooks, podcasts, and YouTube videos. Total time investment: 5 extra minutes per page versus normal note-taking, in exchange for hours saved at exam time.

Step-by-Step Guide

1

Step 1: Divide Your Paper Into Three Sections

0:35
Step 1: Step 1: Divide Your Paper Into Three Sections

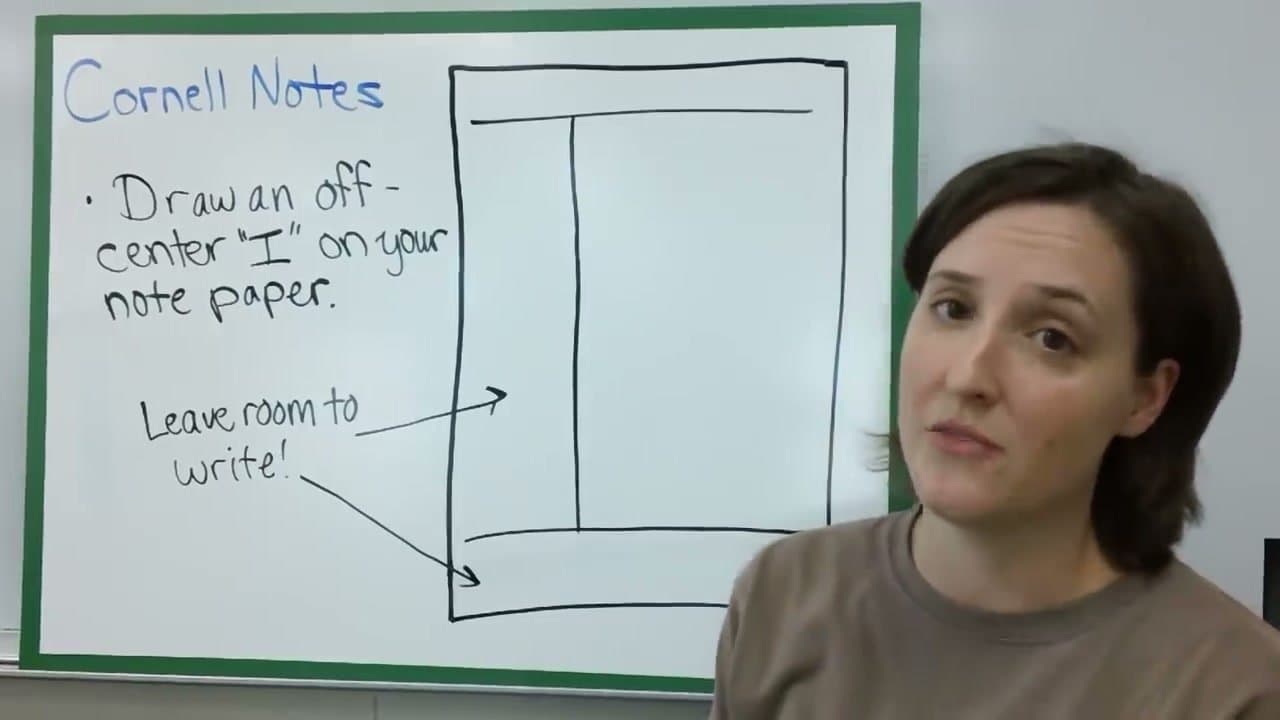
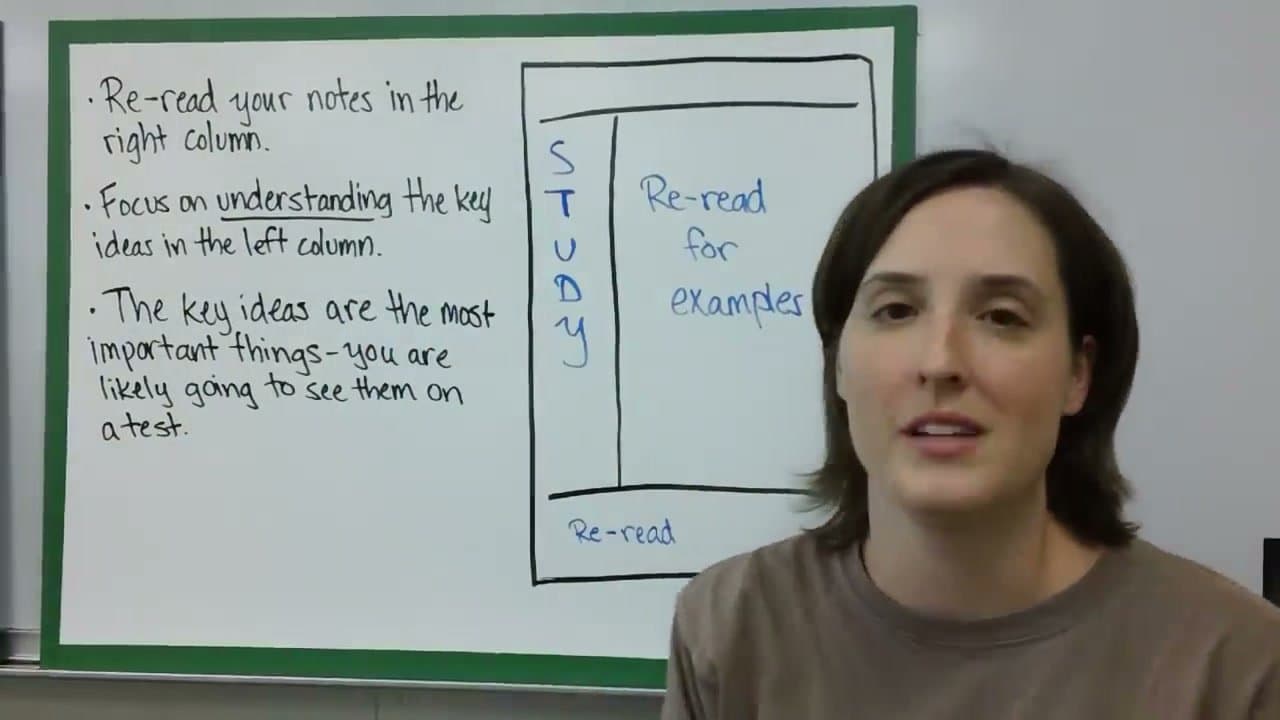
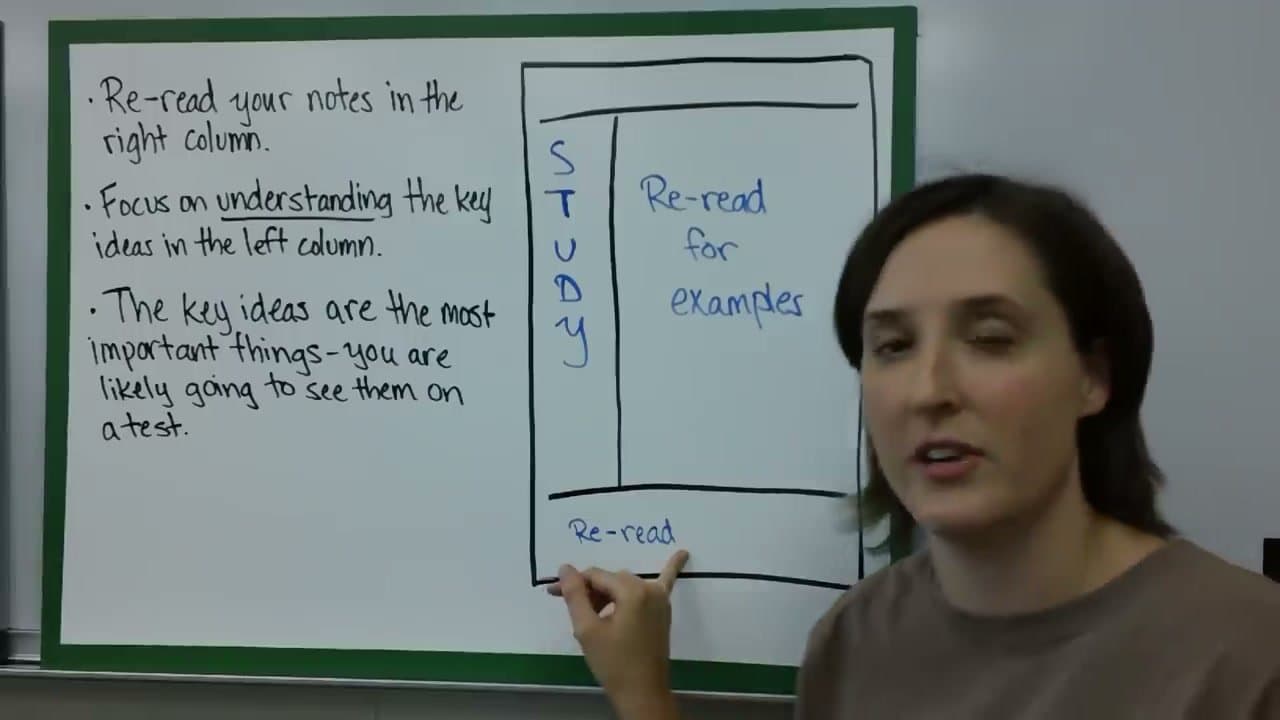
Take a blank sheet of notebook paper. Draw a horizontal line about 2 inches from the bottom. Draw a vertical line about 2.5 inches from the left edge, stopping at the horizontal line.

You now have three zones: a narrow left column (cues), a wide right area (notes), and a bottom strip (summary). Leave plenty of space everywhere - cramped paper is hard to read back.

2

Step 2: Label the Top: Topic, Name, and Date

1:00
Step 2: Step 2: Label the Top: Topic, Name, and Date

On the very top line, write the topic of the lecture, video, or chapter. Under it, write your name (in case the page gets lost) and today's date.

The date is what helps you place the notes in context months later when you're studying for a final. Without it, you'll have a stack of pages you can't sequence.

3

Step 3: Take Notes in the Right Column - Skip Lines Between Ideas

2:10
Step 3: Step 3: Take Notes in the Right Column - Skip Lines Between Ideas

As you watch, listen, or read, take notes in the wide right column. Skip 2-3 lines between distinct ideas - tightly packed notes are unreadable later.

Abbreviate freely (w/ for with, b/c for because, → for leads to) but only use abbreviations you'll remember. Sketches and diagrams in this section are encouraged - the brain remembers visuals better than blocks of text.

4

Step 4: Pull Out Key Ideas Into the Left Column

3:15
Step 4: Step 4: Pull Out Key Ideas Into the Left Column

After the lecture or reading is over, go back through your right-column notes and pull out the main ideas, key terms, important people, or dates. Write these as short cues in the LEFT column, lined up next to the notes they correspond to.

The left column becomes your study guide - test questions usually map to these cues. This step is what most note-takers skip and it's the magic of the system.

5

Step 5: Write a Summary in the Bottom Section

4:00
Step 5: Step 5: Write a Summary in the Bottom Section

In the bottom strip, write 2-4 sentences summarizing the whole page. Ask yourself: 'If I had to explain this to someone who never learned it, what would I say?'

Forcing yourself to summarize in your own words is what locks the material into memory - it's the difference between recognition (familiar but can't recall) and retrieval (you actually know it).

Tip

Do the summary the same day, not at exam time. Concepts feel obvious right after the lecture and confusing two weeks later - capture the clarity while you have it.

6

Step 6: Study by Reviewing Cues, Not Notes

4:50
Step 6: Step 6: Study by Reviewing Cues, Not Notes

Before a test, cover the right column with a piece of paper. Read each cue in the left column and try to recall the matching notes from memory. Check yourself by uncovering the right side.

This is active recall - the most efficient study method we know of. Re-read the bottom summary last to lock in the big picture. Repeat 2-3 times across multiple days for spaced repetition.

Your Guide

Jennifer DesRochers

As an Amazon Associate we earn from qualifying purchases. Links on this page may be affiliate links - clicking them and buying doesn't change your price, but helps support ShowMeStepByStep.

Tags

Test your knowledge

Did the lesson stick? Find out in 2 minutes.

5 quick questions covering what you just read. No signup, no score saved — just a gut check.

Quick reference

Key takeaways from How to Take Cornell Notes in 6 Steps

5 questions, answers, and one-line explanations. Tap to expand.

  1. 1.Cornell page divides into how many zones?

    Answer: Three sections

    Narrow left (cues), wide right (notes), bottom strip (summary). Lines drawn ~2.5 in from left + 2 in from bottom.

  2. 2.What goes in the RIGHT (wide) column?

    Answer: Live notes captured

    Notes during lecture/reading. Skip 2-3 lines between distinct ideas. Abbreviate freely. Sketches encouraged.

  3. 3.What gets pulled out into the LEFT column?

    Answer: Cues + key terms

    Done AFTER the lecture. Pull main ideas, key terms, important people, dates. The cues become your study guide.

  4. 4.Bottom strip is for...

    Answer: 2-4 sentence summary

    Write the page's main idea in your own words. Forces summary = locks material into memory (recall vs recognition).

  5. 5.Right way to study from Cornell notes?

    Answer: Cover right, recall cues

    Active recall: cover right column, read each left cue, try to recall the matching notes. Most efficient study method.

What's next

Related collections

Curated theme pages that include this tutorial.

Weekly Digest

Liked this learning tutorial?

Pick the categories you want to hear about. Weekly digest of new step-by-step tutorials. No spam, easy unsubscribe.

Send me tutorials about

We only email about new tutorials. Easy unsubscribe anytime.