How to Check Tire Pressure (Step by Step)

By ShowMeStepByStepPublished Updated

Based on a video by Dad, how do I?.

Your dashboard tire light comes on and you have no idea what number your tires are actually supposed to be at. You're not alone. Most people drive around for years without checking their tire pressure once, and they end up with tires wearing out twice as fast and gas mileage dropping by 3 percent for every 1 PSI low.

This walkthrough from Rob Kenney at Dad, how do I? covers everything you need: where to find your car's recommended PSI, how to use a hand-held gauge on the valve stem, and how to add or release air until each tire matches. Five minutes per car, no shop visit required. The same routine works for every car you'll ever own.

If you want the rest of the basic car-care routine while you're at it, check out how to check your oil, how to change a car tire, and how to properly jump-start a car.

Step-by-Step Guide

1

Step 1: Find the Recommended PSI Sticker

3:10
Step 1: Step 1: Find the Recommended PSI Sticker

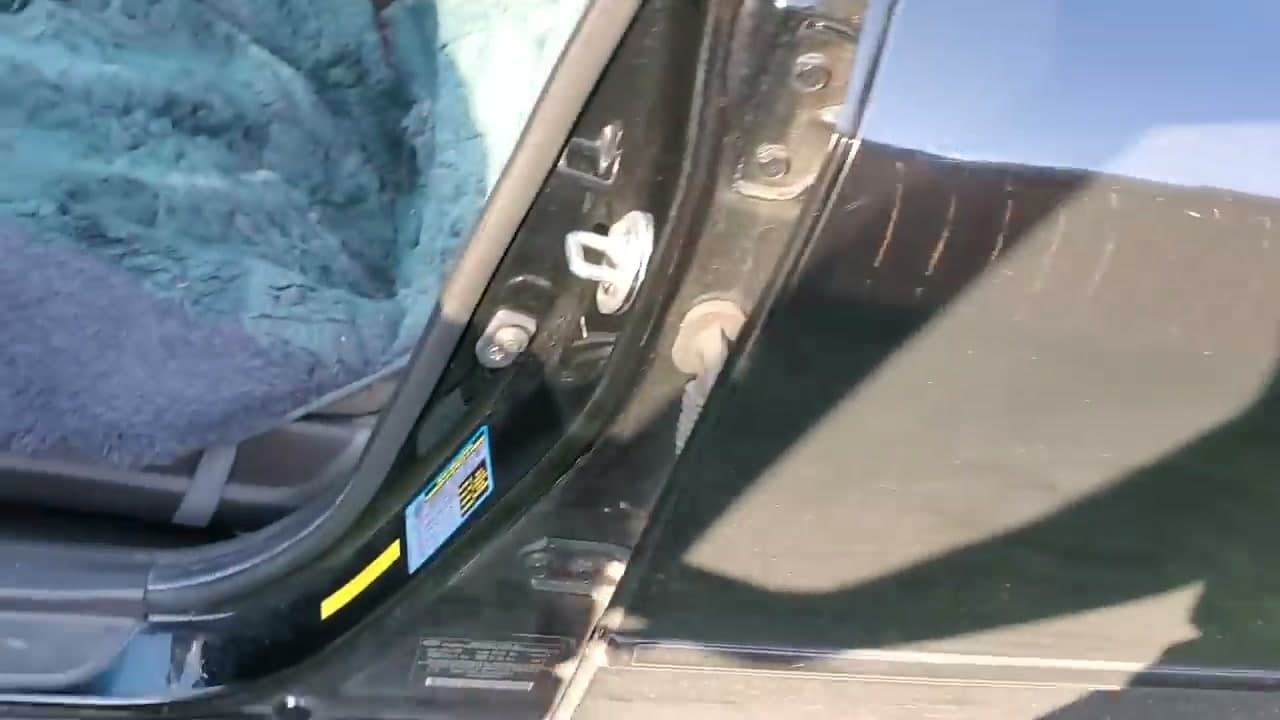
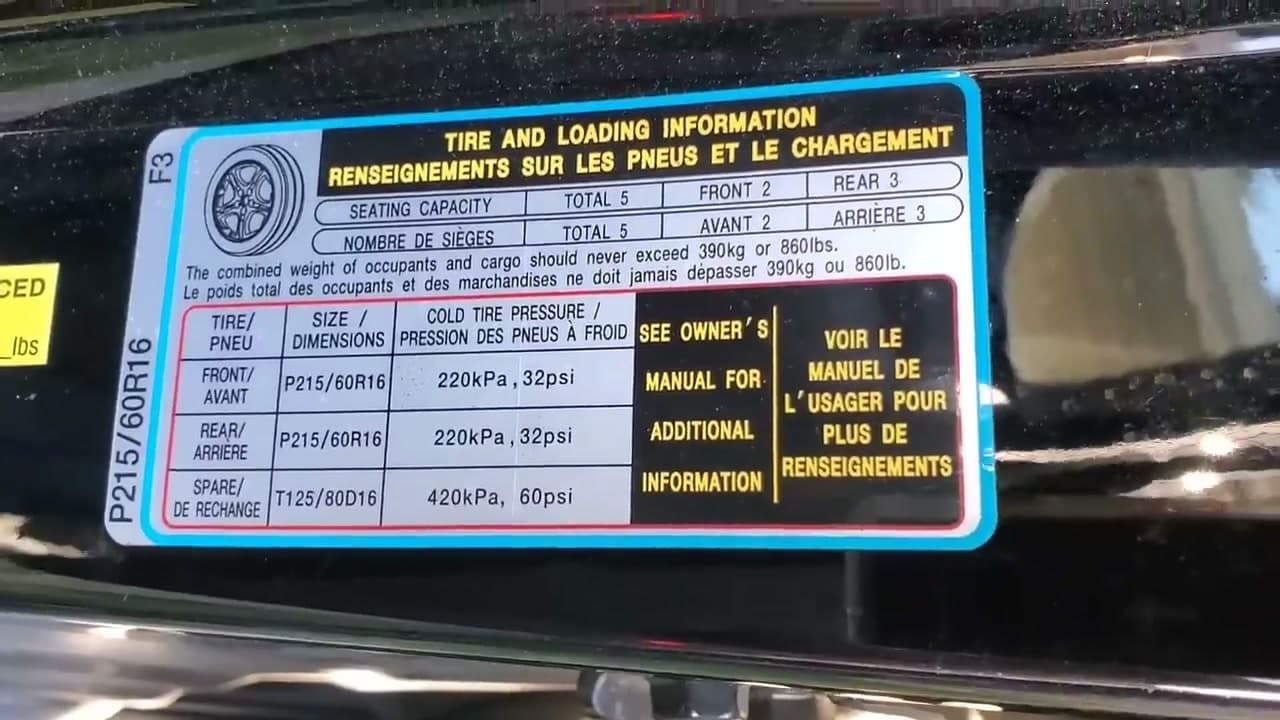
Open the driver's-side door and look at the door jamb - the metal frame that the door latches into. There's a sticker there with your car's recommended cold tire pressure printed on it, usually somewhere around 30 to 35 PSI for a regular sedan or SUV.

Use the number on this sticker, not the big number stamped on the side of the tire itself. The number on the tire is the maximum pressure the tire can hold, not what your car was designed to run at. The sticker is the right answer for your vehicle.

Tip

If the door-jamb sticker has faded or peeled off, the same number lives in your owner's manual under tire pressure. A quick Google search for your year, make, and model also turns it up.

2

Step 2: Unscrew the Valve Cap

1:08
Step 2: Step 2: Unscrew the Valve Cap

Crouch down by one of your tires and find the valve stem - that little black rubber nipple sticking out of the wheel with a screw-on cap. Twist the cap counter-clockwise to remove it, and tuck it somewhere you won't lose it. A shirt pocket works fine.

Check the four tires together rather than doing one at a time. That way you can read all four and decide which ones need air before you start the compressor or feed coins into the gas-station pump.

Tip

Replace the cap right after each tire's reading if you're worried about losing it. The cap keeps dirt out of the valve. A missing cap won't drain your tire by itself, but grit in the valve can cause a slow leak over time.

3

Step 3: Press the Gauge Onto the Valve

1:28
Step 3: Step 3: Press the Gauge Onto the Valve

Take your tire gauge and press the open end straight down onto the valve stem. You'll hear a brief hiss of air as the gauge engages - that's normal, it's just a tiny puff. Push firmly enough that the hissing stops, which means the gauge has a good seal.

Keep it pressed on long enough to get a stable reading. If you can hear air leaking out the whole time, you're not pushing straight or hard enough. Pull off and try again.

Tip

A manual stick gauge shoots a marked plastic rod out the bottom when you press it on the valve - the number where the rod stops is your PSI. A digital gauge displays the number on the screen instead. Either works.

Products used in this step

4

Step 4: Read the PSI Number

1:38
Step 4: Step 4: Read the PSI Number

Pull the gauge away and look at the reading. On a manual stick gauge the white plastic rod will stick out from the bottom with PSI numbers printed along it - read the highest number that's still showing above the lip.

Write the number down or remember it. You're going to compare it to the recommended PSI on the door-jamb sticker in the next step. Repeat the gauge press on each of the four tires before you move to filling.

Tip

Digital gauges read more accurately and are easier on aging eyes than a stick gauge, but they run on a battery that dies eventually. Manual stick gauges last forever and never need batteries. Both belong in the glove box if you can swing it.

Products used in this step

5

Step 5: Compare to the Recommended PSI

3:22
Step 5: Step 5: Compare to the Recommended PSI

Look back at the sticker on the driver's-side door jamb. The chart shows the recommended cold tire pressure for the front tires and the rear tires - they're usually the same number, but not always. Match each tire's gauge reading against the sticker's number.

If a tire is more than 2 PSI under the recommendation, it needs air. More than 2 PSI over, and you'll want to release a little. Cold-tire readings are the standard, so do this when the car has been parked a few hours and the tires haven't been heated by driving.

Tip

Do not use the maximum PSI number printed on the tire's sidewall - that's the absolute ceiling, not the recommended operating pressure. Always use the door-jamb number.

6

Step 6: Add or Release Air to Match

1:45
Step 6: Step 6: Add or Release Air to Match

Hook the air compressor hose onto the valve stem the same way you used the gauge. Most portable compressors have a built-in gauge so you can watch the PSI climb as the tire fills. Stop when you hit the door-sticker number.

If a tire is over-inflated, press the small pin in the center of the valve with a fingernail or the back of the gauge to release a short burst of air. Re-check with the gauge, repeat until you're at the right PSI. Slow and steady is faster than overshooting and bleeding back down.

Tip

Gas station air pumps usually take coins or a credit card and run on a timer - $1.50 for two minutes is typical. Pull the gauge readings on all four tires first so you don't waste the clock running around the car deciding which one to start with.

7

Step 7: Replace the Cap and Move to the Next Tire

1:52
Step 7: Step 7: Replace the Cap and Move to the Next Tire

Screw the valve cap back on, snug but not cranked down. Move to the next tire and repeat - press the gauge, read the PSI, top up or release until you match the door sticker, replace the cap.

Once all four tires match and you drive a few miles, the dashboard low-tire light will turn itself off. If it stays on after a short drive with all four tires at the right PSI, you may have a slow leak in one tire and a shop visit is worth scheduling.

Tip

Plan to check your tire pressure once a month and before any long road trip. Cold weather drops the pressure - about 1 PSI for every 10 degrees Fahrenheit the temperature falls. A tire that read 32 PSI in the summer can be 5 PSI low by January.

Products Used

☐ The Checklist

How to Check Tire Pressure (Step by Step)

Tools
2
Steps
7
Video
5 min

Your Guide

Dad, how do I?

As an Amazon Associate we earn from qualifying purchases. Links on this page may be affiliate links - clicking them and buying doesn't change your price, but helps support ShowMeStepByStep.

Tags

Test your knowledge

Did the lesson stick? Find out in 2 minutes.

5 quick questions covering what you just read. No signup, no score saved — just a gut check.

Quick reference

Key takeaways from How to Check Tire Pressure (Step by Step)

5 questions, answers, and one-line explanations. Tap to expand.

  1. 1.Where do you find your car's recommended tire pressure?

    Answer: The sticker on the driver's-side door jamb

    The door-jamb sticker shows what your car was designed for; the tire sidewall shows the maximum the tire can hold.

  2. 2.What does the number stamped on the tire's sidewall represent?

    Answer: The MAXIMUM pressure the tire can hold safely

    The sidewall number is the tire's max - filling to it would over-inflate for your car.

  3. 3.When is the best time to check tire pressure?

    Answer: When the car has been parked for hours and the tires are cold

    Cold-tire readings are the standard; warm tires read higher than they actually are.

  4. 4.What's the threshold for needing to add air?

    Answer: More than 2 PSI under the recommended number

    Within 2 PSI is fine; more than 2 PSI under and it's time to top up.

  5. 5.If the dashboard low-tire light stays on after fixing all four tires correctly, what should you do?

    Answer: Investigate - you may have a slow leak in one tire and a shop visit is worth scheduling

    A slow leak is the most likely cause; a shop can find the puncture before it goes flat at speed.

What's next

Related collections

Curated theme pages that include this tutorial.

Weekly Digest

Liked this adulting tutorial?

Pick the categories you want to hear about. Weekly digest of new step-by-step tutorials. No spam, easy unsubscribe.

Send me tutorials about

We only email about new tutorials. Easy unsubscribe anytime.