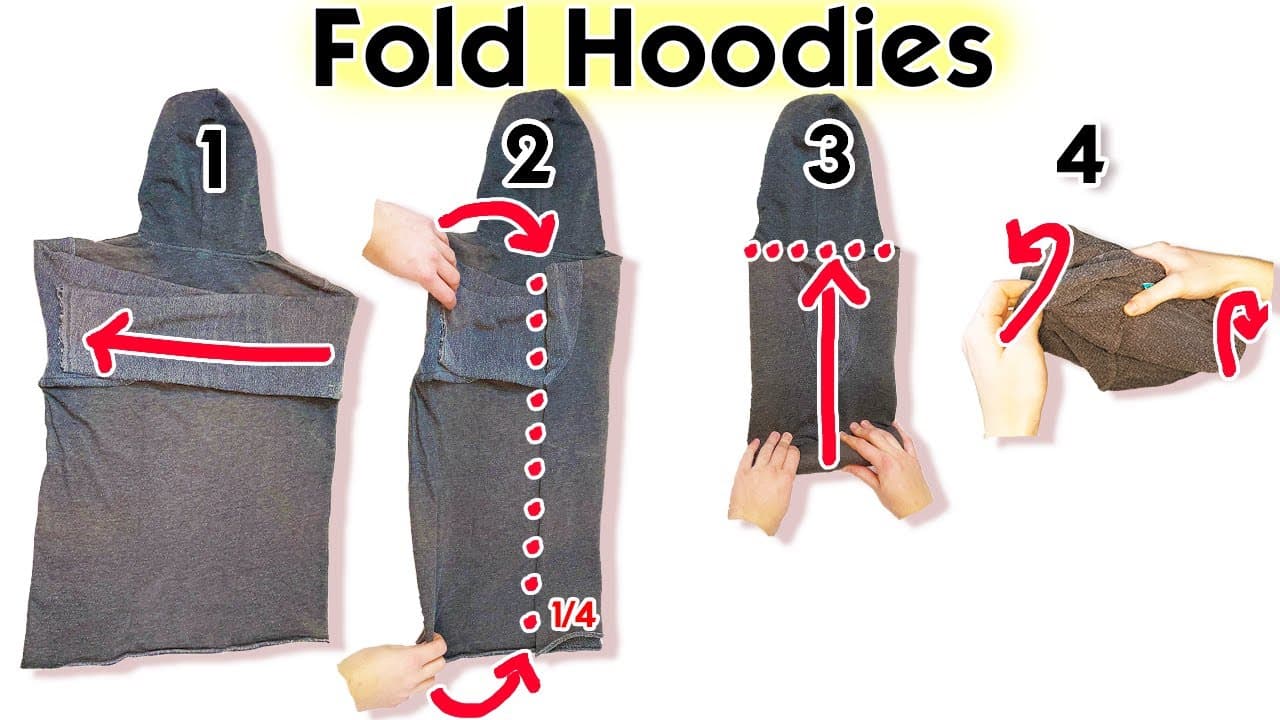
How to Fold Clothes the KonMari Way

Also in:Adulting

By ShowMeStepByStepPublished Updated

Based on a video by Marie Kondo.

If you've ever opened a drawer and had a pile of shirts collapse on you, this is the fix. The KonMari fold method, developed by organizer Marie Kondo, transforms any garment into a stable upright rectangle. No more digging to the bottom to find what you're looking for.

The key idea is always the same: fold toward the center, then fold into thirds so the item stands on its own edge. Once every garment is folded this way, you can see every item at a glance - no unfolding the whole stack to reach a shirt in the back.

Step-by-Step Guide

1

Step 1: Understand the Goal

0:17
Step 1: Step 1: Understand the Goal

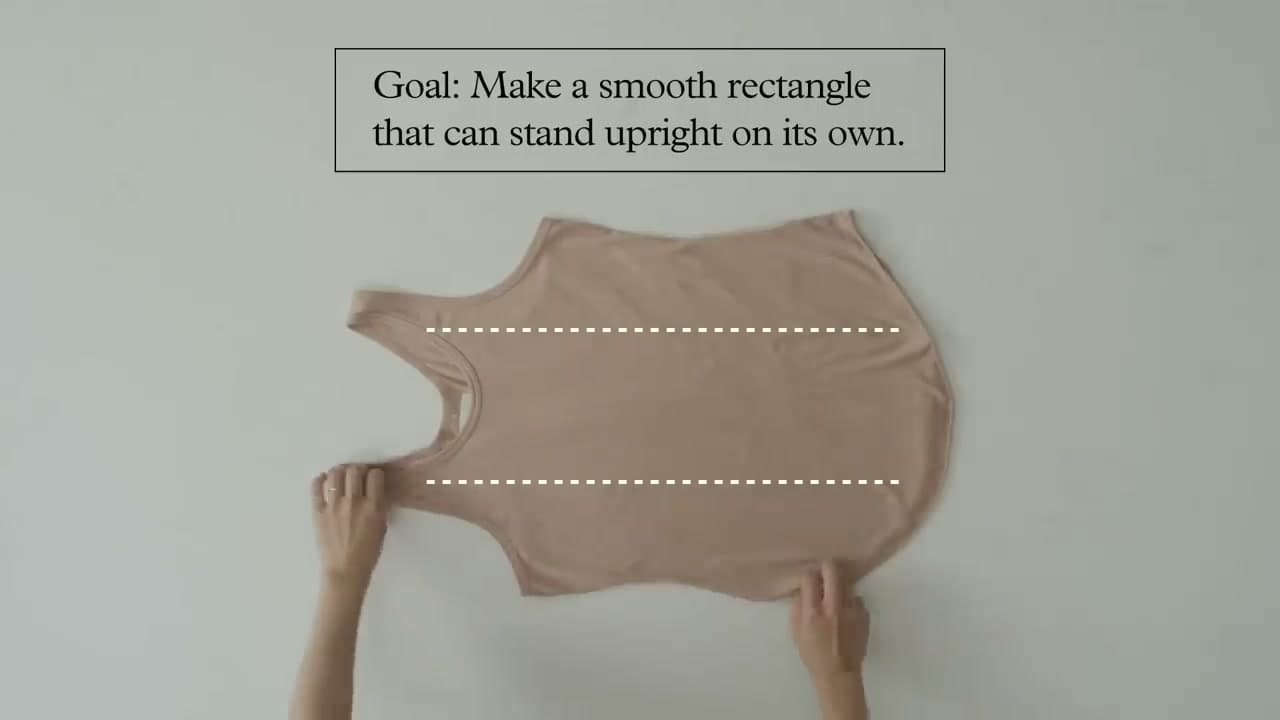
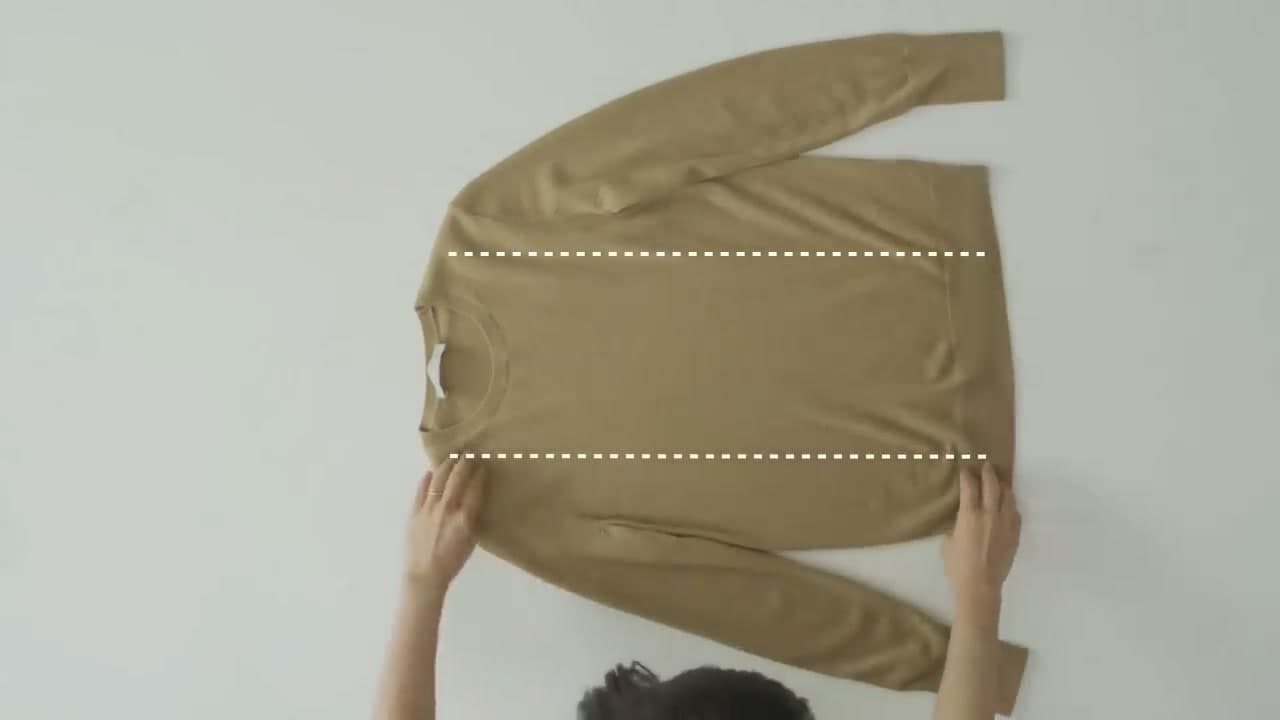
Before you start folding, it helps to know what you're aiming for. The KonMari method has one target for every garment: a smooth rectangle that can stand upright on its own. When you're done, the item should hold its shape without flopping over. That's what makes vertical storage possible - every piece stands in the drawer like a file in a cabinet, visible from above.

Tip

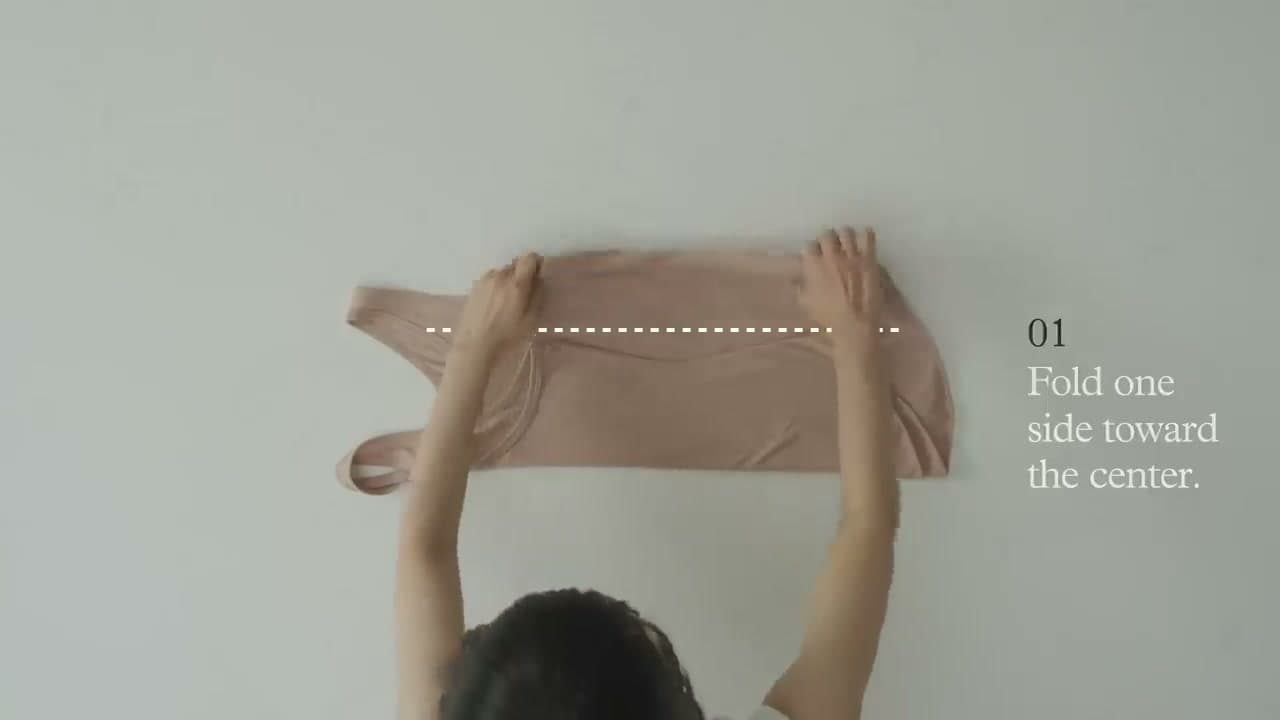
The video shows this goal right at the start with a pink tank top and two dashed lines indicating where to fold. Keep that finished shape in mind as you work through each step.

2

Step 2: Fold One Side Toward the Center

0:22
Step 2: Step 2: Fold One Side Toward the Center

Lay the garment flat on a surface. Take one side - left or right edge, including any sleeve - and fold it inward toward the center of the shirt. You want the folded edge to reach roughly the middle of the garment, not past it. This narrows the shirt down to a strip about a third of its original width. The video labels this move step 01: "Fold one side toward the center."

Tip

For tank tops, the strap folds in along with the side. Don't try to tuck it separately.

3

Step 3: Fold the Other Side and Fold in Half Lengthwise

0:30
Step 3: Step 3: Fold the Other Side and Fold in Half Lengthwise

Fold the opposite side toward the center the same way, so both edges meet in the middle. Then fold the whole thing in half lengthwise - but here's the part that matters: leave a small gap at the top edge instead of folding all the way to the edge. That gap is what prevents a wrinkle crease from forming at the fold point. You should now have a long narrow strip.

Tip

The gap at the edge is subtle - maybe a centimeter. The video shows this clearly at step 03 with on-screen text: "Fold in half lengthwise and leave a little gap at the edge."

4

Step 4: Apply the Same Method to T-Shirts

0:57
Step 4: Step 4: Apply the Same Method to T-Shirts

T-shirts follow the exact same sequence. Lay the shirt flat, fold one side with its sleeve toward the center, fold the other side to match, then fold lengthwise with that small gap at the top. The video demonstrates this on a pale yellow t-shirt so you can see how the sleeve tucks in cleanly on both sides before the final lengthwise fold. The shape and steps don't change between garment types.

Tip

The dashed line in the video shows where to fold - roughly through the armhole level. Fold at that line so the sleeve ends up tucked inside, not sticking out the side.

5

Step 5: Make the Final Fold Into Thirds

1:15
Step 5: Step 5: Make the Final Fold Into Thirds

Take the long strip you've made and fold it in thirds from bottom to top - bottom up to the center, then the top portion down over that. The result is a compact rectangle that stands on its edge. When you hold it upright and let go, it should stay standing. That's the test. The video shows this on the yellow t-shirt with vertical dashed lines marking where to fold left and right thirds together.

Tip

If your rectangle won't stand upright, the fold is probably uneven. Try evening out the two lengthwise folds so both sides are the same height.

6

Step 6: Fold Sweaters and Long-Sleeved Shirts

2:30
Step 6: Step 6: Fold Sweaters and Long-Sleeved Shirts

Long-sleeved shirts and thin sweaters need one extra move: fold the sleeves in before you do anything else. Fold each sleeve back along the body of the garment so it lies flat. Then proceed with the same three-part fold - sides toward center, lengthwise with a gap, then into thirds. The video shows a tan thin sweater at this point, with two horizontal dashed lines indicating where to fold the garment into thirds vertically.

Tip

With longer sleeves, you may need to fold each sleeve twice so it fits within the body width. The sleeve should be invisible in the final rectangle - completely tucked inside.

7

Step 7: Fold Pants and Shorts

3:30
Step 7: Step 7: Fold Pants and Shorts

Pants start differently. Fold one leg over the other so both legs line up, then fold the waistband down to the hem so the pants are half their length. From there, use the same finishing fold - into thirds - to create the standing rectangle. The video demonstrates this on dark blue jeans with on-screen text: "03 Fold in half or thirds." Shorts with wider legs may only need two folds instead of three.

Tip

Line up the inseam and outseam before folding legs together - it keeps the fold flat and prevents bunching at the pocket area.

8

Step 8: Store Everything Upright in the Drawer

3:50
Step 8: Step 8: Store Everything Upright in the Drawer

The last part is where it all comes together. Stand each folded item on its edge in the drawer, front to back, like files in a filing cabinet. The finished shorts shown at this point - olive green, folded into a neat rectangle - represent what every item in your drawer should look like. When everything stands upright, you can see every garment at once without pulling anything out. Darker colors tend to stand more firmly than lighter fabrics, so if something keeps falling, try adjusting the fold to make it slightly tighter.

Tip

Drawer dividers help keep folded items from tipping sideways as the drawer fills and empties. Even a simple cardboard divider works well.

Products Used

Your Guide

Marie Kondo

As an Amazon Associate we earn from qualifying purchases. Links on this page may be affiliate links - clicking them and buying doesn't change your price, but helps support ShowMeStepByStep.

Tags

What's next

Related collections

Curated theme pages that include this tutorial.

Weekly Digest

Liked this lifestyle tutorial?

Pick the categories you want to hear about. Weekly digest of new step-by-step tutorials. No spam, easy unsubscribe.

Send me tutorials about

We only email about new tutorials. Easy unsubscribe anytime.