How to Make Pumpkin Pie (Classic Thanksgiving Recipe)

CookingMedium11:499 stepsBrowse more →
Also in:Baking

By ShowMeStepByStepPublished

Based on a video by Natashas Kitchen.

Pumpkin pie is the one Thanksgiving dessert that doesn't change. Same color, same spice, same custard wobble, year after year. This is Natasha Kravchuk's version from NatashasKitchen.com, and the reason it tops every taste test on her site is two small tricks: the crust gets a quick egg-white seal so it doesn't go soggy under the wet filling, and the filling uses one whole egg plus three extra yolks for a custard texture closer to creme brulee than baby food.

Classic pumpkin pie works for Halloween parties and Thanksgiving alike. The same slice that ends a turkey dinner doubles as the dessert at a Halloween potluck, and the orange custard against a fluted golden crust photographs gorgeously next to jack-o-lanterns or fall foliage. Make it the day before either holiday and refrigerate overnight - the flavor deepens as the spices meld.

The recipe is built on Libby's canned pumpkin puree, evaporated milk (the Carnation kind), and a teaspoon of pumpkin pie spice plus a half teaspoon of extra cinnamon. No fancy ingredients, no roasting your own pumpkin. The technique is what makes it next-level: chill the crust hard before blind baking, dock the bottom with fork holes after pulling the weights, and use room-temperature milk so the custard sets evenly. Total active time is about 30 minutes, plus an hour to bake and a few hours to cool. Pair this with homemade waffles the next morning to use the extra egg whites.

Step-by-Step Guide

1

Step 1: Roll Out the Pie Dough

0:55
Step 1: Step 1: Roll Out the Pie Dough

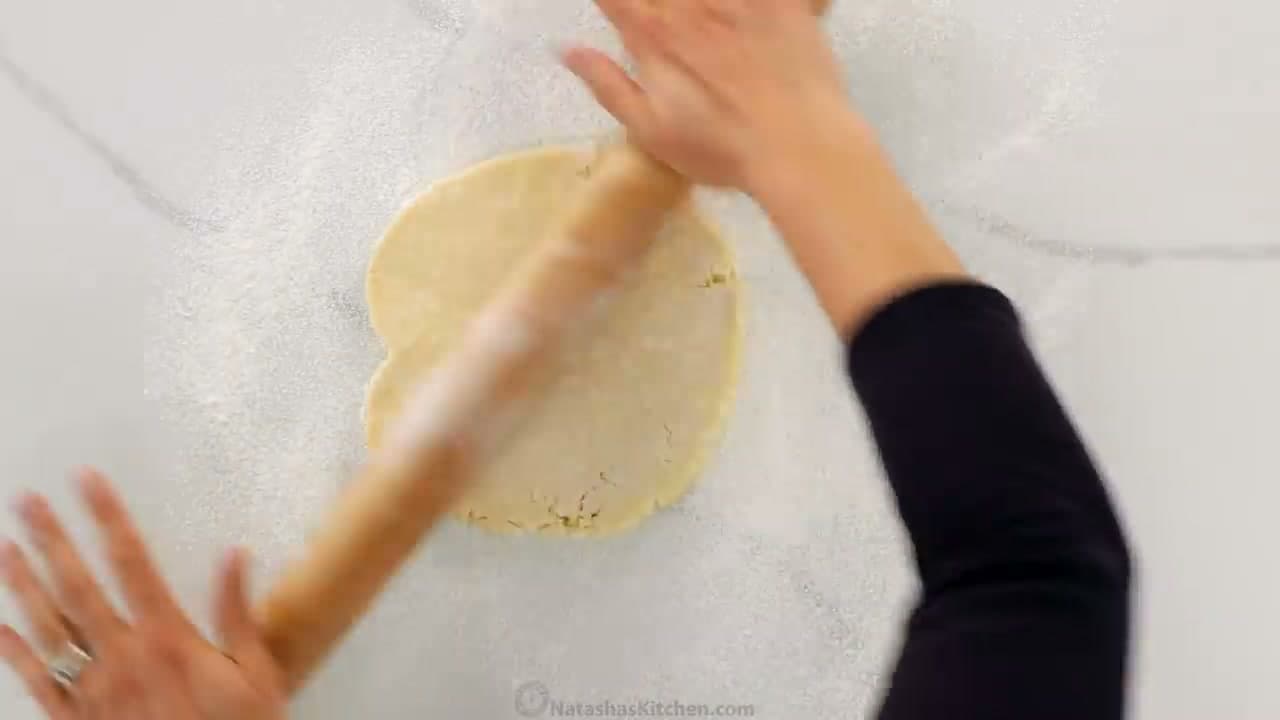
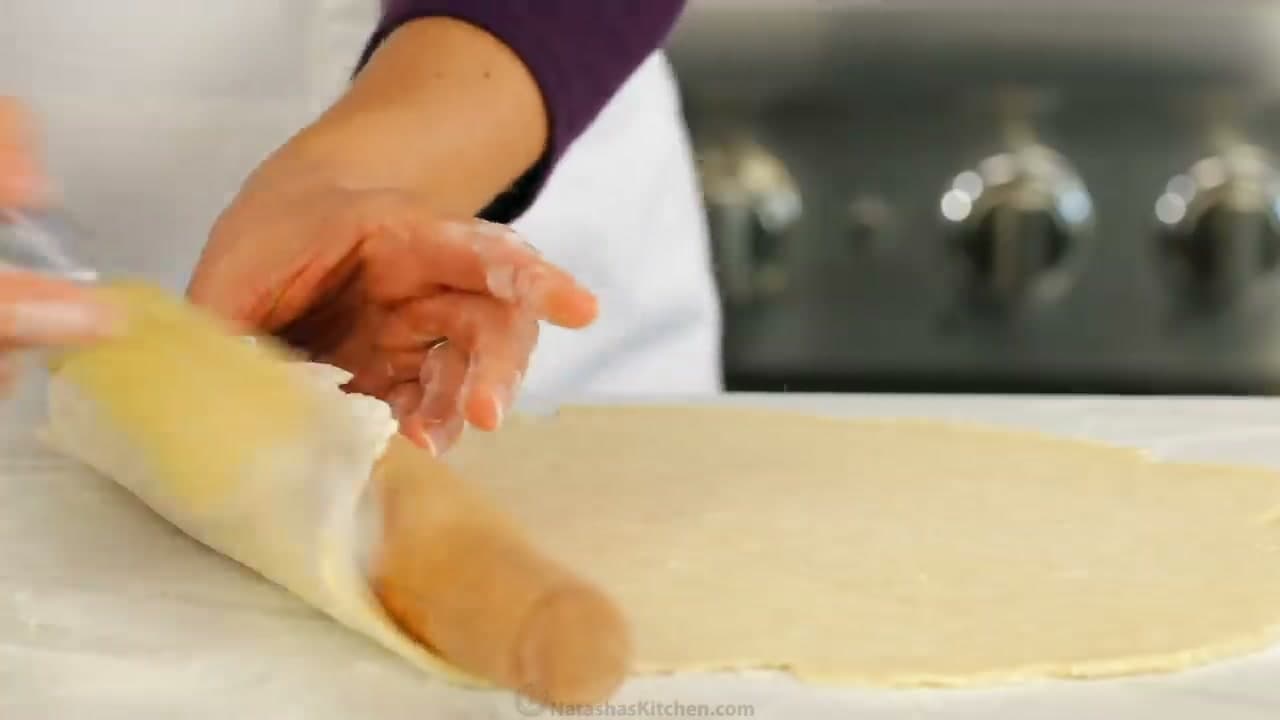
Pull one chilled disc of pie dough from the fridge. It should feel firm but bend slightly when you press the edge - too hard and it'll crack, too soft and it'll stick to everything.

Dust your work surface generously with flour and set the disc in the middle. Roll from the center outward in long, even strokes, rotating the dough a quarter-turn every few rolls so it stretches into an even circle rather than an oval. Aim for a 12-inch round - bigger than your pie pan, so you'll have overhang to crimp later. If it sticks, slide a bench scraper under the edge and add more flour.

Tip

Watch this step. You can see the small bits of cold butter in the dough - those are what make the crust flaky. Don't try to roll them smooth.

2

Step 2: Transfer the Dough to a 9-inch Pie Pan

1:28
Step 2: Step 2: Transfer the Dough to a 9-inch Pie Pan

Lay the rolling pin across one edge of the dough circle. Loosely wrap the dough around the pin, lifting it free of the work surface in one piece. The pin carries the weight so the dough doesn't stretch or tear.

Position the pin over the far edge of a 9-inch glass pie pan and unroll the dough so it falls into place across the pan. Lift the edges gently with your fingertips and let the dough settle down into the corners by gravity - don't press it in from the top, or you'll stretch it and it will shrink back during baking.

Tip

Watch this step. A glass pie pan is worth the swap if you only own metal. You can see through the bottom while baking, so you actually know when the crust is done.

3

Step 3: Crimp the Crust Edge

2:30
Step 3: Step 3: Crimp the Crust Edge

Trim any uneven overhang to a roughly 1-inch border with kitchen scissors, then fold that overhang under so it sits on top of the rim of the pan. You want a thick double layer of dough all the way around - that's what gives the crimped edge its height.

To crimp, put two fingers from one hand on the outside of the rim and one finger from the other hand on the inside. Press the inside finger between the two outside fingers to push the dough into a V-shaped flute. Move around the rim about an inch at a time. It takes less than a minute and turns a rustic pie into something that looks bakery-made.

Tip

Watch this step. Cold dough crimps cleaner than warm dough. If your kitchen is hot, stick the pan in the fridge for five minutes between trimming and crimping.

4

Step 4: Chill, Then Line with Parchment and Pie Weights

3:40
Step 4: Step 4: Chill, Then Line with Parchment and Pie Weights

This step is non-negotiable. Cover the crimped pan with plastic wrap and freeze it for 30 minutes (or refrigerate for one full hour). A warm crust slumps and the crimped edges lose their shape in the oven. A properly chilled crust feels rock-firm when you tap it.

While the crust chills, preheat the oven to 425 F. Tear a sheet of parchment paper into a rough circle that overhangs the pan, then crumple it up tight and smooth it back out. The wrinkles let it mold to the contours of the crust without lifting the weights. Pour in about a pound and a half of dried beans (or ceramic pie weights), filling the cavity three-quarters of the way up.

Tip

Watch this step. Save the beans in a labeled jar after - they cook down with each use but stay fine for blind baking forever. Don't try to eat them; they're permanently dried out.

5

Step 5: Blind Bake and Seal with Egg White

4:35
Step 5: Step 5: Blind Bake and Seal with Egg White

Bake the weighted crust at 425 F for 17 minutes - just until the crimped edges start to turn light golden brown. Carefully lift the parchment with the beans straight up and out (watch for steam), and set the beans aside in a heatproof bowl to cool.

The base will be pale and may be bubbling up slightly. Poke the bottom all over with a fork - 15 to 20 dock holes - so any trapped steam can escape. Brush the entire base with a thin coat of raw egg white. This seals the crust against the wet filling so it stays crisp instead of going soggy underneath. Slide the pan back into the 425 F oven for another 5 minutes, until the base is dry and faintly tanned. Cool the crust completely before adding filling.

Tip

Watch this step. You can blind-bake the crust a full day ahead - just cover it loosely with foil at room temperature. That spreads the work out and makes pie day way easier.

6

Step 6: Whisk the Pumpkin Filling Base

5:30
Step 6: Step 6: Whisk the Pumpkin Filling Base

In a large mixing bowl, scrape in the full 15-ounce can of Libby's pumpkin puree. Crack in one whole large egg, then add three additional egg yolks (save the whites for an omelet or for the egg-white wash on your next crust). The extra yolks are what give this pie its custard-like silky texture - skip them and you get a flat, dense filling instead.

Add 1/2 cup of packed light brown sugar (squeeze any clumps between your fingers first), 1/4 cup of granulated sugar, 1 teaspoon of pumpkin pie spice, 1/2 teaspoon of ground cinnamon, 1/2 teaspoon of fine salt, and 1 teaspoon of pure vanilla extract. Whisk until the color is uniform deep orange and you don't see streaks of egg or sugar.

Tip

Watch this step. Libby's tests better than store brands in side-by-side tastings because it's all sugar pumpkin (Dickinson variety), denser and less watery than field pumpkin. The label says "100% Pure Pumpkin" - read it; pumpkin pie filling is the pre-spiced version and not what you want.

7

Step 7: Add Evaporated Milk and Pour Into the Crust

6:28
Step 7: Step 7: Add Evaporated Milk and Pour Into the Crust

Pour in a 12-ounce can of Carnation evaporated milk. It must be at room temperature - cold milk straight from the fridge can cause the filling to seize and crack in the oven. Whisk slowly to incorporate. Aim to break up any large air bubbles as you go; bubbles in the filling become cracks on the surface of the baked pie.

Pour the filling slowly into the cooled blind-baked crust. Stop pouring when it sits about a quarter inch below the lip of the crust. Filling too high spills over the crimped edges and burns onto the pan. If you have a little extra, pour it into a small ramekin and bake it alongside as a crust-free custard.

Tip

Watch this step. Evaporated milk is not the same as sweetened condensed milk. They live next to each other on the shelf and the labels look almost identical. Check twice - sweetened condensed turns the pie cloyingly sweet and changes the texture.

8

Step 8: Bake at 350 F and Cool Completely

7:00
Step 8: Step 8: Bake at 350 F and Cool Completely

Slide the filled pie carefully onto the center rack and bake at 350 F for 55 to 60 minutes. You're done when the edges look fully set but the center 2-inch circle still wobbles slightly when you bump the pan. The center will firm up as the pie cools - if it's already firm in the oven, you've gone too long and the filling will crack.

Lift the pie out onto a wire cooling rack and leave it for at least 2 to 3 hours at room temperature, or chill it overnight in the fridge. Cutting into a warm pumpkin pie collapses the slice - the custard needs time to set up fully. Cover loosely with foil if you're refrigerating overnight to prevent the surface from drying.

Tip

Watch this step. If the crimped crust browns too fast, tent the edges loosely with foil or use a silicone crust shield from the start. The filling needs the full 55 minutes - don't pull it early just because the crust is dark.

9

Step 9: Whip the Rum Whipped Cream and Pipe Over the Pie

9:53
Step 9: Step 9: Whip the Rum Whipped Cream and Pipe Over the Pie

Pour 1 cup of cold heavy whipping cream into a chilled mixing bowl. Beat on medium speed with an electric hand mixer until soft peaks form - the cream should hold a shape but the tips flop over when you lift the beaters. Add 3 tablespoons of granulated sugar, 1/2 tablespoon of golden rum, and 1/2 teaspoon of vanilla extract.

Continue beating on medium-high until you reach medium-stiff peaks - the cream holds its shape cleanly when you pipe it. Don't overbeat or it turns grainy. Spoon the cream into a large pastry bag fitted with an open star tip. Pipe a fat rosette over the entire pie or, for prettier individual plating, pipe one on each slice as you serve. Slice and serve.

Tip

Watch this step. Between slices, dip a sharp knife in hot water and wipe it dry on a paper towel. The clean cuts make the slices look bakery-cut, and the residue from the previous slice doesn't smear into the next one.

Products Used

❖ The Recipe

How to Make Pumpkin Pie (Classic Thanksgiving Recipe)

American
Serves
Makes one 9-inch pie, serves 8
Prep
30 min
Cook
1 hr
Total
1 hr 30 min

Ingredients

16 items
  • 1 dischomemade pie crust dischalf of a 2-crust pie dough recipe, chilled; store-bought refrigerated crust works in a pinch
  • 1egg whiteto brush the inside of the hot blind-baked crust as a seal
  • 15 ozLibby's pumpkin puree1 can, at room temperature; not pumpkin pie filling
  • 1 wholelarge eggroom temperature
  • 3 largeegg yolksroom temperature; these are what make the filling custard-like
  • 1/2 cuplight brown sugarpacked; break up any hard clumps before adding
  • 1/4 cupgranulated sugar
  • 1 tsppumpkin pie spice
  • 1/2 tspground cinnamonin addition to the pumpkin pie spice
  • 1/2 tspfine salt
  • 1 tsppure vanilla extract
  • 12 ozevaporated milkCarnation brand; room temperature for a smooth filling
  • 1 cupheavy whipping creamfor the topping
  • 3 Tbspgranulated sugar (for cream)
  • 1/2 Tbspgolden rumoptional; a little goes a long way
  • 1/2 tsppure vanilla extract (for cream)

Method

  1. 1
    Step 1: Roll Out the Pie Dough. Pull one chilled disc of pie dough from the fridge.
  2. 2
    Step 2: Transfer the Dough to a 9-inch Pie Pan. Lay the rolling pin across one edge of the dough circle.
  3. 3
    Step 3: Crimp the Crust Edge. Trim any uneven overhang to a roughly 1-inch border with kitchen scissors, then fold that overhang under so it sits on top of the rim of the pan.
  4. 4
    Step 4: Chill, Then Line with Parchment and Pie Weights. This step is non-negotiable.
  5. 5
    Step 5: Blind Bake and Seal with Egg White. Bake the weighted crust at 425 F for 17 minutes - just until the crimped edges start to turn light golden brown.
  6. 6
    Step 6: Whisk the Pumpkin Filling Base. In a large mixing bowl, scrape in the full 15-ounce can of Libby's pumpkin puree.
  7. 7
    Step 7: Add Evaporated Milk and Pour Into the Crust. Pour in a 12-ounce can of Carnation evaporated milk.
  8. 8
    Step 8: Bake at 350 F and Cool Completely. Slide the filled pie carefully onto the center rack and bake at 350 F for 55 to 60 minutes.
  9. 9
    Step 9: Whip the Rum Whipped Cream and Pipe Over the Pie. Pour 1 cup of cold heavy whipping cream into a chilled mixing bowl.
☐ The Checklist

How to Make Pumpkin Pie (Classic Thanksgiving Recipe)

Tools
16
Materials
13
Steps
9
Video
12 min

Your Guide

Natashas Kitchen

As an Amazon Associate we earn from qualifying purchases. Links on this page may be affiliate links - clicking them and buying doesn't change your price, but helps support ShowMeStepByStep.

Tags

What's next

Related collections

Curated theme pages that include this tutorial.

Weekly Digest

Liked this cooking tutorial?

Pick the categories you want to hear about. Weekly digest of new step-by-step tutorials. No spam, easy unsubscribe.

Send me tutorials about

We only email about new tutorials. Easy unsubscribe anytime.