How to Make Hash Browns in 9 Steps

CookingMedium9:459 stepsBrowse more →

By ShowMeStepByStepPublished Updated

Based on a video by Joshua Weissman.

The McDonald's hash brown is iconic for a reason - oval, salty, crackly on the outside, fluffy in the middle. The home version usually doesn't come close because most recipes skip the part that does all the work. The crust isn't from frying alone. It's from getting the potato dry, getting the starch right, and giving the patty time to firm up in the fridge before it ever hits hot oil.

This is Joshua Weissman's three-ingredient method from his But Better series. Russet potatoes, duck fat, and salt. You grate the potatoes, rinse off the surface starch, wring every drop of water out, and then you do something that sounds fussy but takes ten minutes of actual work - you confit the shreds in cold duck fat at 215°F. The duck fat coats every strand, the low heat cooks the potato through without browning, and once it's cool you press it into ovals and stash it in the fridge overnight. The next morning you fry from cold at 355°F and the patty turns into glass on the outside while the inside stays tender.

It is a two-day recipe. You can't shortcut the chill step - the cold fat is what holds the patty together when it hits the fryer, and without it the shreds open up and you get a sad mess. But the active time is short on both days, and these are the best hash browns you will eat at home. Pair them with oven bacon and slow-scrambled eggs for the full weekend breakfast.

Step-by-Step Guide

1

Step 1: Peel the Russet Potatoes

3:08
Step 1: Step 1: Peel the Russet Potatoes

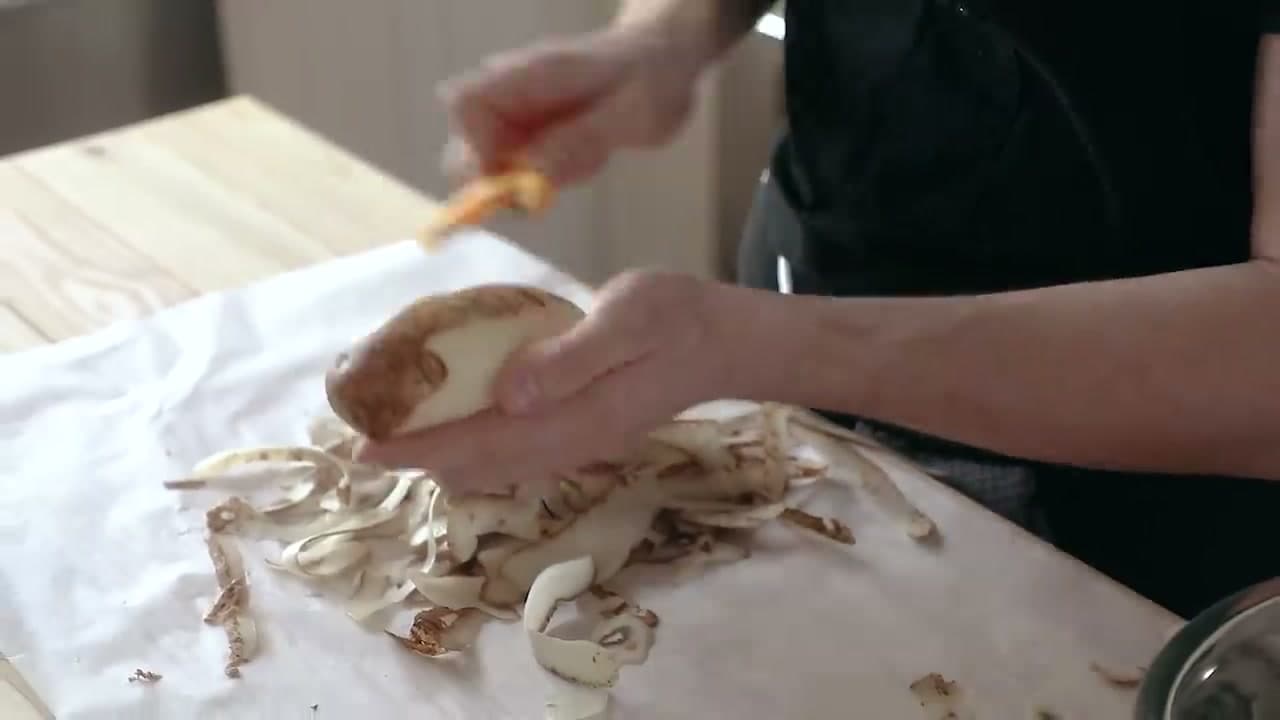
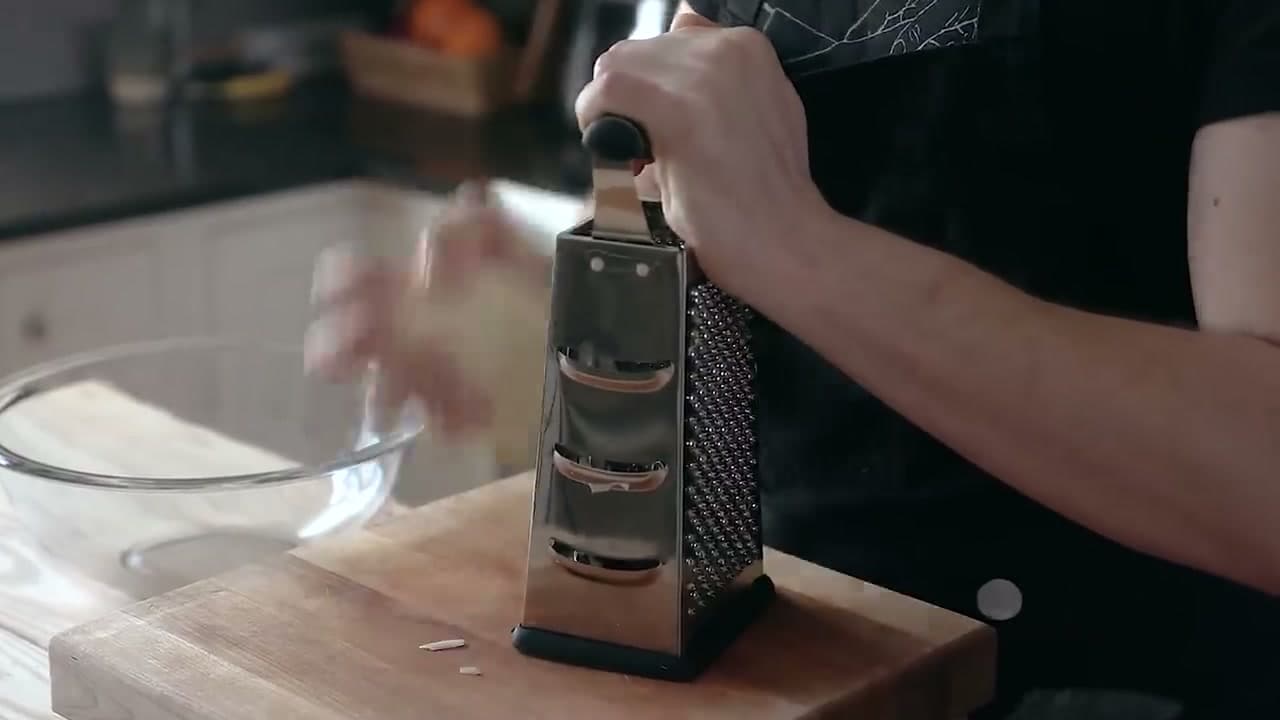
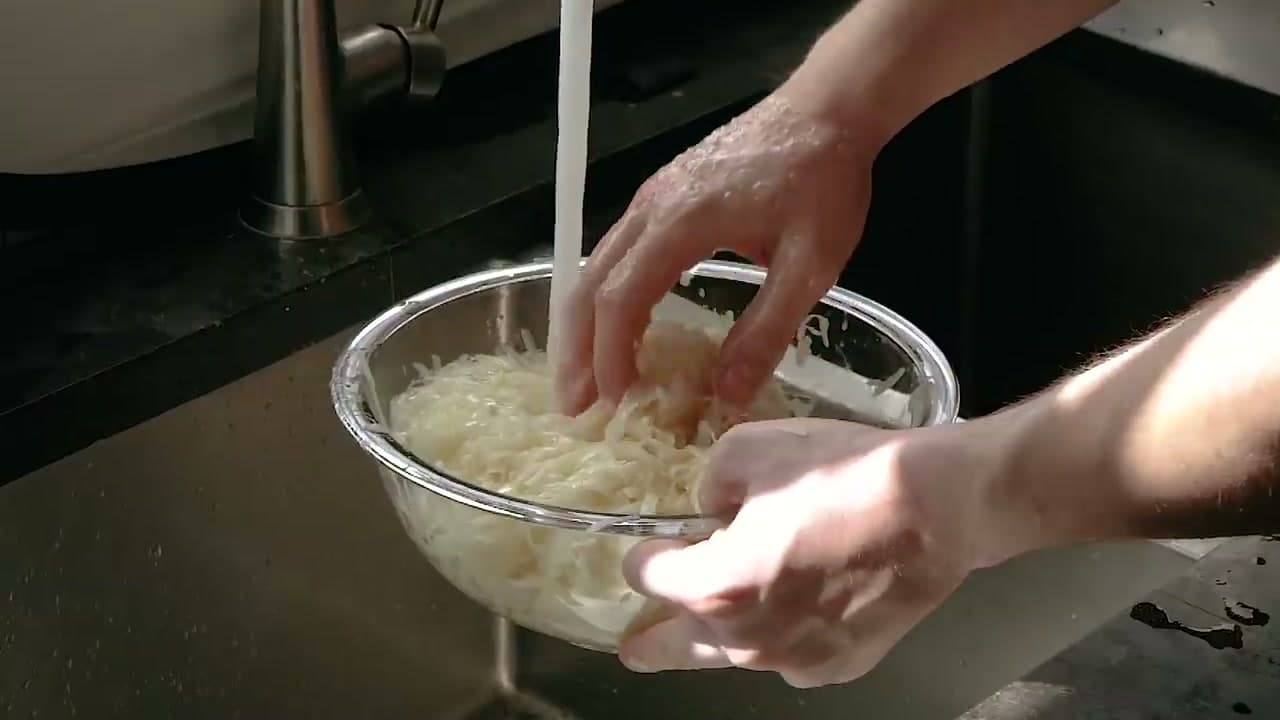
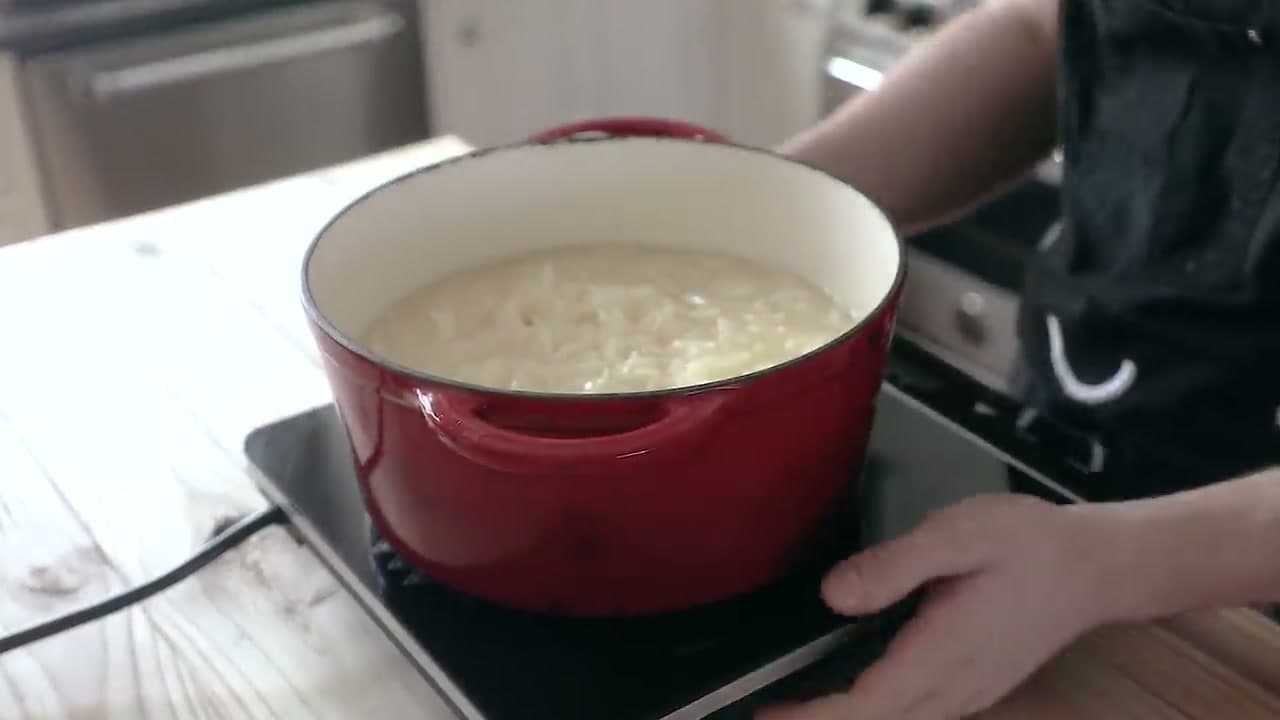
Start with two pounds (about one kilo) of russet potatoes. Russets only - the high starch and low water content is what builds the crust later. Yukon Golds turn gummy.

Peel every potato clean. No skins, no leftover eye scraps. The skin browns at a different rate than the flesh and shows up as dark flecks in the fried patty.

Tip

Watch this step. A Y-peeler is faster than a swivel peeler for big russets. Toss the peels in a bowl of water while you work so they don't oxidize and stain your cutting board.

2

Step 2: Grate on a Box Grater

3:12
Step 2: Step 2: Grate on a Box Grater

Set a large mixing bowl on a cutting board to catch the shreds. Run each peeled potato down the large holes of a box grater, applying steady downward pressure.

Work fast. Grated potato oxidizes within minutes and turns pink, then gray. The rinse in the next step pulls some of the discoloration out, but the cleaner you keep the shreds at this stage, the whiter your finished hash browns will be.

Tip

Watch this step. Stop grating when the potato gets down to your fingertips. The skin grates fine on these holes too and you don't want it.

3

Step 3: Rinse the Starch Off

3:21
Step 3: Step 3: Rinse the Starch Off

Cover the grated potatoes with cold tap water right in the bowl. Agitate with your hand - sweep through the shreds for about 30 seconds. The water will turn cloudy white. That's the surface starch coming off.

Drain the cloudy water through a colander, then put the shreds back in the bowl and rinse a second time with fresh water if the water is still milky. You want the water running mostly clear before you move on. The leftover starch is the thing that makes hash browns gluey instead of crisp.

Tip

Watch this step. Use cold water. Warm water starts cooking the surface starch and makes the next squeeze step harder.

4

Step 4: Wring Out the Liquid in a Cloth

3:35
Step 4: Step 4: Wring Out the Liquid in a Cloth

Spread a clean, lint-free kitchen towel or a double layer of cheesecloth flat on the counter. Pile the rinsed potato shreds in the middle. Gather the four corners up to make a bag, twist the top, and squeeze with both hands as hard as you can.

Real elbow grease. You will be surprised how much water comes out - probably a full cup or more. Keep twisting and pressing until you can't get another drop. Dry potatoes are the difference between hash browns and steamed potato mush.

Tip

Watch this step. A flour-sack towel or a clean pillowcase squeezes better than a terry kitchen towel. Do the squeezing over the sink unless you want a wet counter.

5

Step 5: Cold Start in Duck Fat

3:52
Step 5: Step 5: Cold Start in Duck Fat

Put the squeezed potato shreds into a large heavy-bottomed pot or Dutch oven. Add about three and a half quarts of duck fat right on top, while everything is still cold. The fat will be solid - that's fine, it melts as it heats.

If the duck fat doesn't completely cover the potatoes once it melts, top off with neutral vegetable oil. The proper pot for this recipe is around seven quarts. A smaller pot makes the potatoes harder to cover and harder to stir.

Tip

Watch this step. Beef tallow or lard work if you can't get duck fat. The only rule is the fat has to handle high heat and solidify when chilled - vegetable shortening technically works but tastes flat. Don't use butter for this; it burns long before you hit fry temperature.

6

Step 6: Slowly Heat to 215°F (Confit)

4:05
Step 6: Step 6: Slowly Heat to 215°F (Confit)

Place the pot on the stove over medium heat. Let the duck fat melt and the potatoes warm together. Stir gently every minute or two so the shreds don't catch on the bottom.

Bring the fat up to 215°F (100°C). Use an instant-read or candy thermometer - don't guess. That low temperature is the confit. The fat is cooking the potato through without browning it. Hold the temperature there for two to three minutes once you hit it, then kill the heat.

Tip

Watch this step. If you see bubbles racing up - small champagne bubbles - the heat is too high. Pull the pot off the burner for 30 seconds. You're confiting, not frying. The shreds should be soft and translucent when you pull them.

7

Step 7: Drain and Season Generously

4:20
Step 7: Step 7: Drain and Season Generously

Strain the confited potatoes out through a fine-mesh sieve set over a heat-safe bowl. Catch every drop of that duck fat - you reuse it tomorrow.

Spread the drained potato shreds across a large baking sheet so they cool quickly and stop cooking. Season very generously with kosher salt. Taste a strand or two as you go. Properly salted potatoes need zero salt after frying, but under-seasoned ones turn into bland straw no matter how golden they get.

Tip

Watch this step. Let the reserved duck fat cool fully, then cover and refrigerate. Strained and chilled, it keeps for months and gets used for roast potatoes, fried eggs, basically anything.

8

Step 8: Form Patties and Chill Overnight

4:35
Step 8: Step 8: Form Patties and Chill Overnight

Line a sheet pan (or two quarter-sheet trays) with wax paper or parchment. Scoop a small handful of the cooled, seasoned potato onto the paper and press it into an oval with your hands.

The McDonald's dimensions are about two and a half inches wide, three and a half inches long, and three-quarters of an inch thick. Pack tight. Loose patties open up and fall apart when they hit the fryer. Repeat with the rest of the potato, then slide the trays - uncovered or loosely covered - into the fridge overnight. The chill step is non-negotiable; the cold fat is what binds the patty.

Tip

Watch this step. If you're in a hurry, two hours in the freezer can stand in for the overnight chill - but overnight is better. The patties keep on the tray, wrapped, for up to three days in the fridge. You can also freeze them solid and fry from frozen; add a minute or two to the fry time.

9

Step 9: Fry to Deep Golden Brown

5:05
Step 9: Step 9: Fry to Deep Golden Brown

The next day, scoop the reserved duck fat into a deep pot - the same one you used yesterday is fine - and heat to 355°F (180°C). Confirm with your thermometer; the first minute of frying is the most fragile, and if the oil is even thirty degrees cold the patty will fall apart.

Lower in two patties at a time, no more. Fry from cold for three to six minutes, until the crust is the color of a graham cracker and the patty floats. Lift out with a spider strainer, drain on a wire rack, and serve right away. If you salted properly back in step 7, no further salt is needed.

Tip

Watch this step. Don't crowd the pot. Two at a time keeps the oil temperature stable; four crashes it down to confit temperature and you end up with greasy patties. A wire rack over a sheet pan beats paper towels - paper traps steam and softens the crust.

Products Used

❖ The Recipe

How to Make Hash Browns in 9 Steps

American
Serves
Makes about 8-10 hash brown patties
Prep
30 min
Cook
35 min
Total
1 hr 5 min

Ingredients

4 items
  • 2 lbs (about 1 kg)russet potatoesrussets only - their high starch and low moisture is what gives the crust; Yukon Gold turns gummy
  • 3.5 quarts (3.5 L)duck fatbeef tallow or lard work as substitutes; must be a fat that handles high heat and solidifies when chilled
  • to tastekosher saltseason generously after draining - properly salted potatoes need no further salt after frying
  • as neededneutral vegetable oilto top off if duck fat doesn't fully cover the potatoes in your pot

Method

  1. 1
    Step 1: Peel the Russet Potatoes. Start with two pounds (about one kilo) of russet potatoes.
  2. 2
    Step 2: Grate on a Box Grater. Set a large mixing bowl on a cutting board to catch the shreds.
  3. 3
    Step 3: Rinse the Starch Off. Cover the grated potatoes with cold tap water right in the bowl.
  4. 4
    Step 4: Wring Out the Liquid in a Cloth. Spread a clean, lint-free kitchen towel or a double layer of cheesecloth flat on the counter.
  5. 5
    Step 5: Cold Start in Duck Fat. Put the squeezed potato shreds into a large heavy-bottomed pot or Dutch oven.
  6. 6
    Step 6: Slowly Heat to 215°F (Confit). Place the pot on the stove over medium heat.
  7. 7
    Step 7: Drain and Season Generously. Strain the confited potatoes out through a fine-mesh sieve set over a heat-safe bowl.
  8. 8
    Step 8: Form Patties and Chill Overnight. Line a sheet pan (or two quarter-sheet trays) with wax paper or parchment.
  9. 9
    Step 9: Fry to Deep Golden Brown. The next day, scoop the reserved duck fat into a deep pot - the same one you used yesterday is fine - and heat to 355°F (180°C).

Your Guide

Joshua Weissman

As an Amazon Associate we earn from qualifying purchases. Links on this page may be affiliate links - clicking them and buying doesn't change your price, but helps support ShowMeStepByStep.

Tags

What's next

Related collections

Curated theme pages that include this tutorial.

Weekly Digest

Liked this cooking tutorial?

Pick the categories you want to hear about. Weekly digest of new step-by-step tutorials. No spam, easy unsubscribe.

Send me tutorials about

We only email about new tutorials. Easy unsubscribe anytime.