How to Ice Dye a Geode T-Shirt (Single Geode Method)

CraftsEasy11:597 stepsBrowse more →
Also in:Other Crafts

By ShowMeStepByStepPublished

Based on a video by Fun Endeavors.

Ice dye looks complicated, but it's mostly waiting. You tie a shirt in a geode pattern, pile dye powder and ice on top, and walk away for 24 hours. The ice melts slowly, the meltwater carries the dye through the fabric in soft drips, and the dye reacts with soda ash to bond permanently to the cotton. The result is a shirt with sharp white lines and split colors you couldn't get from any other method.

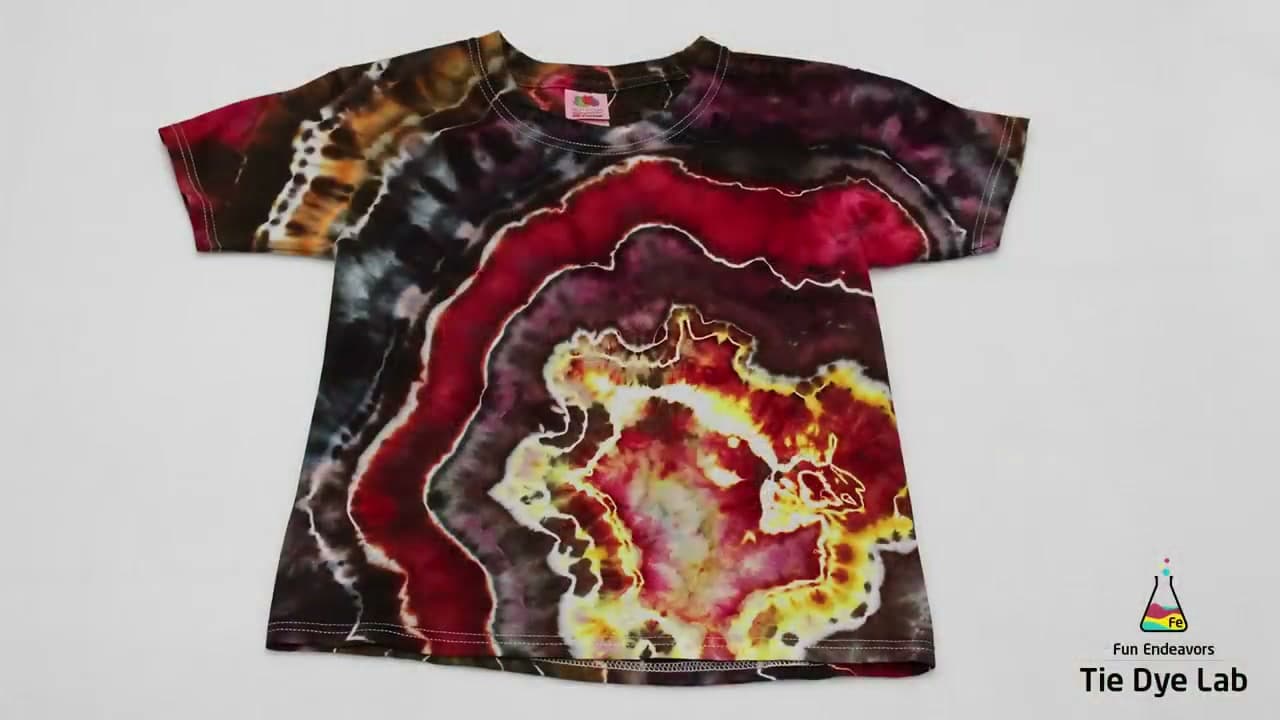
This tutorial walks through the single-geode method taught by Angie at Fun Endeavors Tie Dye Lab. A single geode is a one-circle design with the rings radiating from a single pinched center, which makes it the friendliest starting point if multi-geode shirts feel intimidating. The same setup works for any colorway - the original video uses warm earthy tones (Sunrise Red, Chocolate Brown, Brazilnut, Black Cherry, Bronze, Ecru), but a red, white, and blue version makes a stunning 4th of July piece. Drop fire red at the center, leave a sinew-tied white ring, then layer navy or royal blue toward the outside.

You'll need fiber-reactive dye (Procion MX from Dharma Trading is the standard), soda ash as the fixer, a white 100% cotton shirt, a wire rack inside a plastic tub, ice, and waxed sinew or strong cotton string for the ties. None of it is hard to source, and the dye and soda ash will last through many shirts. If you've already done a basic tie-dye shirt with squeeze bottles, you have most of the supplies already - ice dyeing just swaps the bottle for a pile of ice cubes.

The single biggest factor in how the shirt turns out isn't your technique - it's the dye choices. Colors that "split" (separate into their component pigments as the water pulls them through) give the most interesting results. Sunrise Red splits to yellow. Chocolate Brown splits to bronze and pink. Black Cherry splits to red and purple. Avoid pure colors like Lemon Yellow if you want surprise; pick the splitters if you want fireworks.
Step-by-Step Guide

1

Pre-Soak Your Shirt in Soda Ash

0:10
Step 1: Pre-Soak Your Shirt in Soda Ash

Wash and dry a white 100% cotton shirt first. Mix soda ash with warm water in a plastic tub - about one cup of soda ash per gallon - and submerge the shirt for at least 20 to 30 minutes. Wring it out so it's damp but not dripping (a spin dryer makes this fast). Turn the shirt inside out before tying. Soda ash is the fixer that lets fiber-reactive dye bond permanently to cotton, so don't skip this step.

Tip

Wear gloves whenever you handle soda ash solution - it's a mild base and dries out skin fast. The shirt should feel damp like a wrung-out dishcloth, not sopping wet.

2

Pinch the Center Point of the Geode

0:50
Step 2: Pinch the Center Point of the Geode

Lay the damp shirt flat and pick a spot on the lower front where you want the geode's center. Pinch only the top layer of fabric and lift straight up off the table. Slide your free hand down the lifted shirt to smooth it into a long tube. The pinched point becomes the heart of the geode, and the fabric falling below it becomes the rings radiating outward. For a single geode design, one center point is all you need.

Tip

Only grab the top layer. If you accidentally pinch through both the front and back, the geode pattern will mirror on the back of the shirt and look muddy on the front.

3

Tie Off the Geode Rings with Sinew

2:10
Step 3: Tie Off the Geode Rings with Sinew

Start at the bottom of the lifted shirt (the geode center) and tie tight bands with waxed artificial sinew. Space the lines unevenly - some thin, some thick - so the rings look organic instead of mechanical. Pull each tie hard; the wax forms a waterproof barrier that keeps dye out and leaves crisp white lines. Add a few intentional wrinkles and gathers near the center so the final shape reads like a real geode, not a bullseye. Every sinew line equals a white line in the finished design.

Tip

If you don't have waxed sinew, regular cotton kitchen twine works but lets a little dye seep under the ties. That can be a feature - softer rings instead of sharp white lines.

4

Set the Shirt on a Rack Over a Tub

3:35
Step 4: Set the Shirt on a Rack Over a Tub

Place a wire cooling rack inside a plastic storage tote (Sterilite underbed bins work great). Set the tied shirt on the rack so meltwater can drip through without re-staining the fabric. Use silicone cake molds, foil, or cardboard clipped with wooden clothespins to build a low wall around the shirt - this dam holds the ice pile in place. Let the shirt air-dry on the rack for an hour or two if the tied center still feels soaked; wet folds give you big white blank spots.

Tip

The rack has to sit at least an inch above the bottom of the tub. If meltwater pools high enough to touch the shirt, the dye will bleed and you lose the geode definition.

5

Sprinkle Dye Powder Directly on the Shirt

4:40
Step 5: Sprinkle Dye Powder Directly on the Shirt

Put on gloves. Working section by section between the sinew lines, sprinkle dry fiber-reactive dye powder with a small spoon. For a 4th of July patriotic colorway, hit the center with fire red, the next ring with bronze or chocolate brown, and the outer rings with a navy or royal blue (Dharma's Navy or Better Black work). For the classic geode shown in the video, layer warm tones like Sunrise Red, Chocolate Brown, Brazilnut, Black Cherry, and Bronze. Don't be precious - random feels better than planned.

Tip

Powder fiber-reactive dye is fine and floats - wear a dust mask if you're sensitive, and don't sprinkle in front of a fan. A regular metal teaspoon works as well as any fancy applicator.

6

Pile Ice on Top and Add a Final Dye Dust

8:00
Step 6: Pile Ice on Top and Add a Final Dye Dust

Sprinkle a little extra soda ash over the dye, then pile ice cubes thickly across the whole shirt - cover every dyed area. Add one more sprinkle of a contrast color (Ecru, white, or a light pastel) on top of the ice for surface splits. As the ice melts, water drags the powder through the fabric and the dye reacts with the soda ash. Set the tub somewhere it can stay undisturbed at room temperature.

Tip

If the first layer of ice melts and you can still see a lot of undissolved dye sitting on top of the shirt, add a second layer of ice. The dye keeps reacting as long as there's meltwater carrying it through the fabric.

7

Wait 24 Hours, Then Rinse and Reveal

9:30
Step 7: Wait 24 Hours, Then Rinse and Reveal

Leave the shirt for at least 24 hours - longer if the room is cool. After the ice fully melts and the colors set, rinse under cold running water until the runoff is mostly clear, then gradually switch to hot. Cut off the sinew, untie the shirt, and soak it in hot water with a drop of Blue Dawn dish soap. Finish in the washing machine on hot with textile detergent, then tumble dry. Open it up and you'll have a one-of-a-kind geode shirt with sharp white rings and split colors you didn't even plan for.

Tip

Wash the finished shirt by itself the first two or three times. Excess dye will keep rinsing out for a few cycles and can stain anything you wash with it. After that it's safe to wash with other darks.

Products Used

☐ The Checklist

How to Ice Dye a Geode T-Shirt (Single Geode Method)

Tools
8
Materials
8
Steps
7
Video
12 min

Your Guide

Fun Endeavors

As an Amazon Associate we earn from qualifying purchases. Links on this page may be affiliate links - clicking them and buying doesn't change your price, but helps support ShowMeStepByStep.

Tags

What's next

Weekly Digest

Liked this crafts tutorial?

Pick the categories you want to hear about. Weekly digest of new step-by-step tutorials. No spam, easy unsubscribe.

Send me tutorials about

We only email about new tutorials. Easy unsubscribe anytime.