How to Cook Rice Perfectly

CookingEasy4:347 steps

Based on a video by Tasty.

Rice is the dish people are most embarrassed about messing up. It sticks. It burns. It turns into porridge. The fix is simpler than it looks: measure carefully, rinse the grains, and trust the timer.

This tutorial follows Tasty's breakdown, a video with over 13 million views that covers ratios, rinsing, and resting. The steps below walk through the full method and end with a pilaf upgrade that makes weeknight rice feel like a restaurant side.

Step-by-Step Guide

1

Get the Rice-to-Water Ratio Right

0:40
Step 1: Get the Rice-to-Water Ratio Right

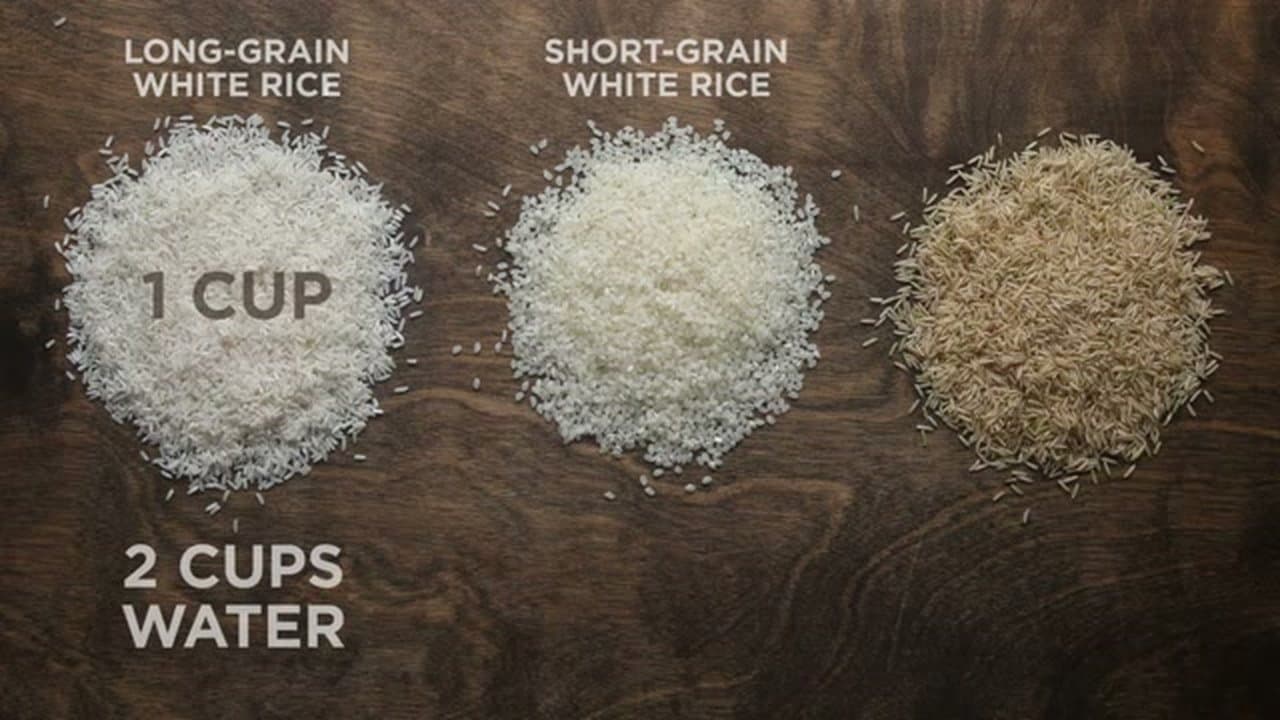
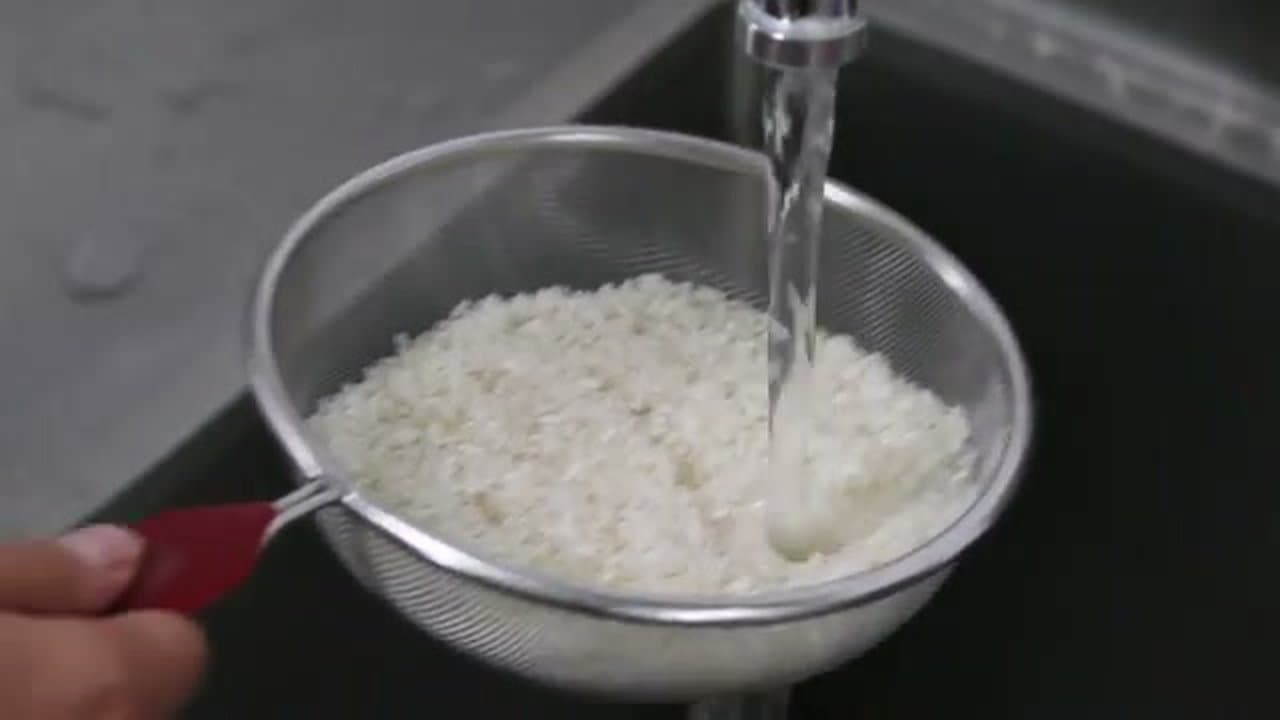
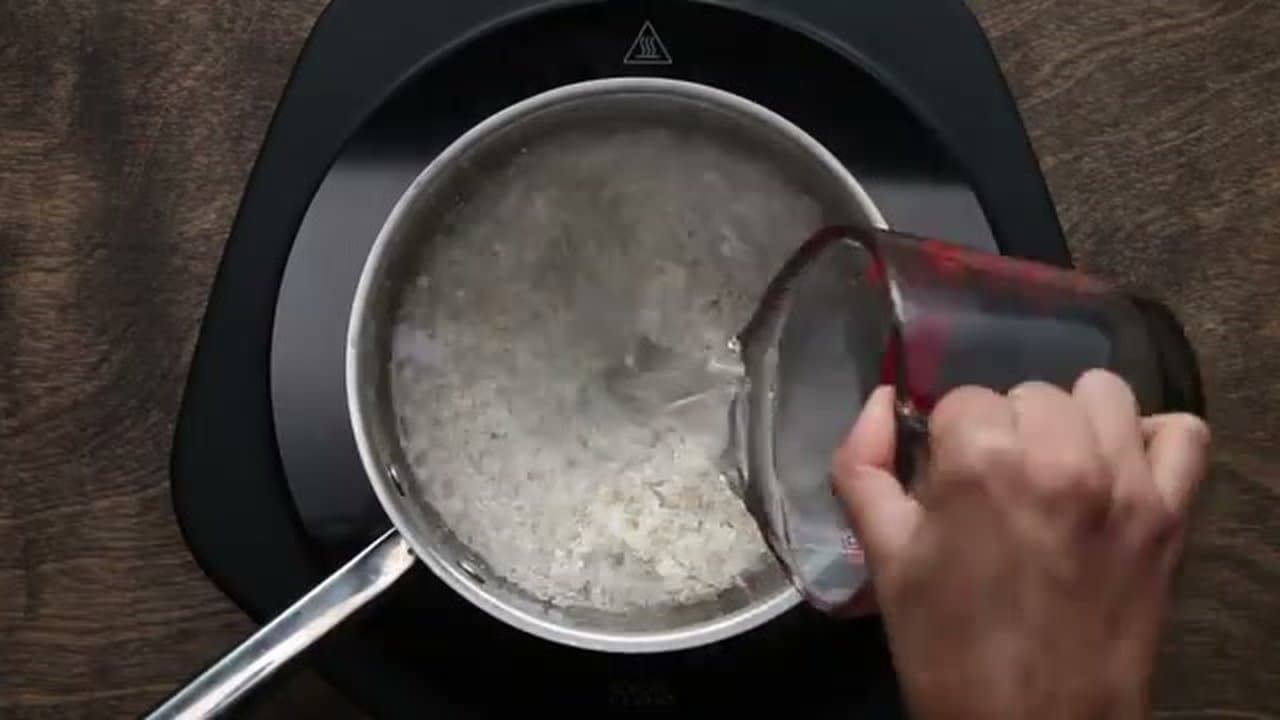
Rice is about two things: timing and ratios. Nail both and you can stop guessing.

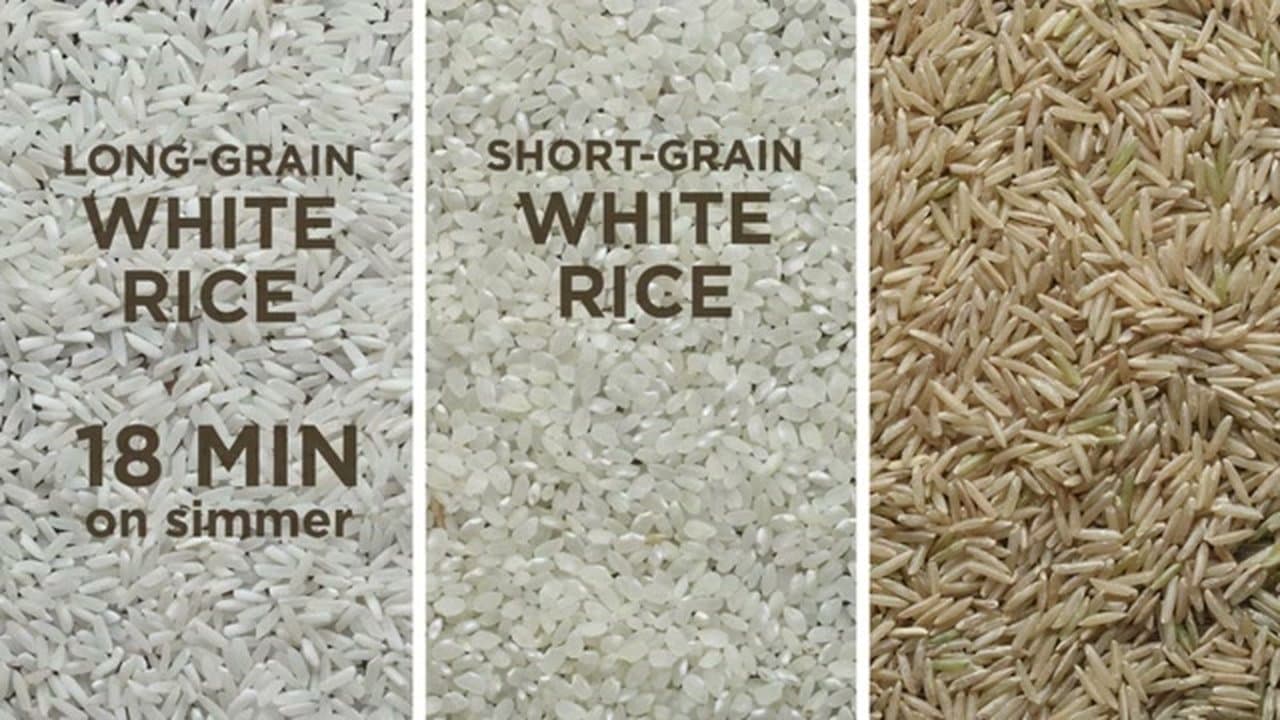
  • Long-grain white rice: 1 cup rice to 2 cups water
  • Short-grain white rice: 1 cup rice to 1¼ cups water
  • Brown rice: 1 cup rice to 1¾ cups water

Measure before you pour. Eyeballing is how rice ends up gummy or crunchy.

Watch this moment in the video.

Tip

If you're using a rice type not listed here, check the package. Most brands print their recommended ratio on the back.

Products used in this step

2

Rinse the Rice Three Times

0:58
Step 2: Rinse the Rice Three Times

Pour your rice into a strainer or bowl and rinse it under cold water. Swirl it around, drain, and repeat two more times.

You're washing off the extra starch that makes rice clump and turn gluey. The water won't run fully clear after three rinses and that's fine.

If you're in a hurry you can skip this step, but rinsed rice fluffs up noticeably better.

Watch this moment in the video.

Tip

A fine-mesh strainer works best, but a regular bowl works fine too. Just pour the cloudy water off carefully so you don't lose grains down the drain.

Products used in this step

3

Combine Rice, Water, and Salt in a Pot

1:10
Step 3: Combine Rice, Water, and Salt in a Pot

Tip the rinsed rice into a small pot. Add the water you measured out in Step 1. Toss in a pinch of salt, around ⅛ teaspoon for one cup of rice.

The pot should be small enough that the rice and water fill at least a couple of inches deep. Too wide a pot and the water evaporates unevenly, which throws off your cook time.

Watch this moment in the video.

Tip

Salt is optional but makes a big difference. If you switch to stock in Step 7, cut back on salt since stock is already seasoned.

Products used in this step

4

Bring to a Boil and Stir Once

1:17
Step 4: Bring to a Boil and Stir Once

Turn the burner to high and wait for the water to hit a rolling boil. When it does, stir the rice once from the bottom to lift any grains that have settled.

One stir is the goal. Over-stirring releases more starch and brings back the stickiness you washed off a minute ago.

Watch this moment in the video.

Tip

A rolling boil means big sustained bubbles, not just a few wisps of steam. Wait for it. Rushing this step is what leaves a raw layer at the bottom of the pot.

5

Cover and Simmer for the Right Time

1:28
Step 5: Cover and Simmer for the Right Time

Drop the lid on tight and turn the heat down to the lowest simmer your burner will hold.

  • Long-grain white rice: 18 minutes
  • Short-grain white rice: 15 minutes
  • Brown rice: 45 minutes

Set a timer and walk away. Don't lift the lid to peek. Every time you do, steam escapes and the cook time goes out of whack.

Watch this moment in the video.

Tip

If your burner doesn't go low enough (electric stoves are tricky), use a flame tamer or move to a smaller burner. You want the barest simmer, not a bubbling pot.

Products used in this step

6

Rest Off the Heat for 5 to 10 Minutes

1:50
Step 6: Rest Off the Heat for 5 to 10 Minutes

When the timer goes off, take the pot off the heat but keep the lid on. Let it sit undisturbed for 5 to 10 minutes.

The residual steam finishes cooking the grains and evens out any damp spots on the bottom. Fluff with a fork before serving.

Skip the rest and the rice comes out wetter and less defined.

Watch this moment in the video.

Tip

Don't fluff while the rice is still covered. Let it finish steaming, then take the lid off and fluff. Steaming without fluffing keeps the bottom grains from turning mushy.

7

Level Up with Pilaf Technique

2:50
Step 7: Level Up with Pilaf Technique

Same pot, same ratios, better rice.

  1. Before adding water, warm a tablespoon of olive oil on high heat
  2. Cook a finely chopped shallot until it's golden
  3. Add your dry rice and stir for 30 seconds to coat every grain
  4. Splash in a few tablespoons of white wine if you have it
  5. Pour in chicken or vegetable stock instead of water

From there, it's boil-cover-simmer-rest, same as before. One shallot and a stock swap turns weeknight rice into restaurant rice.

Watch this moment in the video.

Tip

Swap the shallot for garlic, onion, or scallions. Any allium works. If you make rice a few times a week, a rice cooker (the Zojirushi is the gold standard) takes most of the fuss out.

Products Used

❖ The Recipe

How to Cook Rice Perfectly

Serves
2 to 3
Prep
5 min
Cook
28 min
Total
33 min

Ingredients

7 items
  • 1 cuplong-grain white ricefor short grain use 1 1/4 cups water; for brown rice use 1 3/4 cups water
  • 2 cupswater
  • 1/8 teaspoonsalt
  • 1 tablespoonolive oil (optional)for the pilaf upgrade
  • 1, finely choppedshallot (optional)for the pilaf upgrade
  • a few tablespoonswhite wine (optional)for the pilaf upgrade
  • 2 cupschicken or vegetable stock (optional)replaces water for the pilaf upgrade

Method

  1. 1
    Get the Rice-to-Water Ratio Right. Rice is about two things: timing and ratios.
  2. 2
    Rinse the Rice Three Times. Pour your rice into a strainer or bowl and rinse it under cold water.
  3. 3
    Combine Rice, Water, and Salt in a Pot. Tip the rinsed rice into a small pot.
  4. 4
    Bring to a Boil and Stir Once. Turn the burner to high and wait for the water to hit a rolling boil.
  5. 5
    Cover and Simmer for the Right Time. Drop the lid on tight and turn the heat down to the lowest simmer your burner will hold.
  6. 6
    Rest Off the Heat for 5 to 10 Minutes. When the timer goes off, take the pot off the heat but keep the lid on.
  7. 7
    Level Up with Pilaf Technique. Same pot, same ratios, better rice.

Your Guide

Tasty

As an Amazon Associate we earn from qualifying purchases. Links on this page may be affiliate links - clicking them and buying doesn't change your price, but helps support ShowMeStepByStep.

Related Tutorials