Keurig Not Working? How to Unclog the Needles

AdultingEasy6:2310 stepsBrowse more →

By ShowMeStepByStepPublished

Based on a video by Just A Dad Approved.

A Keurig that suddenly brews nothing is usually not broken. Six needles carry water into and out of the K-Cup, and coffee oils and grounds block them over time. Clear them with a paperclip and the machine comes back.

Just A Dad Approved walks through it on a K-Supreme, which has the most needles of any model. Fewer needles on other machines, same fix.

Symptoms That Point at a Clogged Needle

  • You press brew and nothing comes out at all
  • You get a half cup, or a cup that takes far longer than it used to
  • The coffee is weak even on the strong setting
  • Grounds end up in the cup
  • The machine sputters partway through the brew

All five point at the same place. None of them mean the pump has failed.

What You Need

One paperclip, straightened. Soap, water and a sink. That is the whole list, and the job takes about ten minutes.

Clogged Needles or Scale?

These are two different problems with overlapping symptoms. Blocked needles usually come on suddenly and often follow a messy K-Cup. Scale builds up slowly, makes the machine louder and the coffee cooler, and eventually triggers the descale light.

Start with the needles, because it is free and takes ten minutes. If the flow is still poor afterwards, work through descaling your Keurig next.

Step-by-Step Guide

10 steps · about 6 minutes.Check off each step as you go and your progress saves automatically.

1

Step 1: Know Where the Needles Are

0:24
Step 1: Step 1: Know Where the Needles Are

Open the lid and look inside. A K-Supreme has five needles in the cluster up top and one more hidden underneath, in the base of the K-Cup holder. Six in total, and any of them can block.

Coffee oils and grounds build up in those openings over months. When they clog, you press brew and either nothing comes out or you get a weak half cup. The machine is fine. The holes are blocked.

Tip

Other Keurig models have fewer needles but the same failure and the same fix. Find the entry and exit needles and clear both.

2

Step 2: Lift Out the K-Cup Holder

1:05
Step 2: Step 2: Lift Out the K-Cup Holder

The holder pops straight out, but not by pulling from the top. Reach underneath and push up from the bottom while pinching the two small tabs on the sides.

It releases with a bit of a shove. There is no needle on the underside, so you can push there without catching a finger.

Tip

Do not put your fingers down into the well while the holder is out. The bottom needle sits in the holder itself, but the machine still has sharp edges.

3

Step 3: Split the Holder Open

1:32
Step 3: Step 3: Split the Holder Open

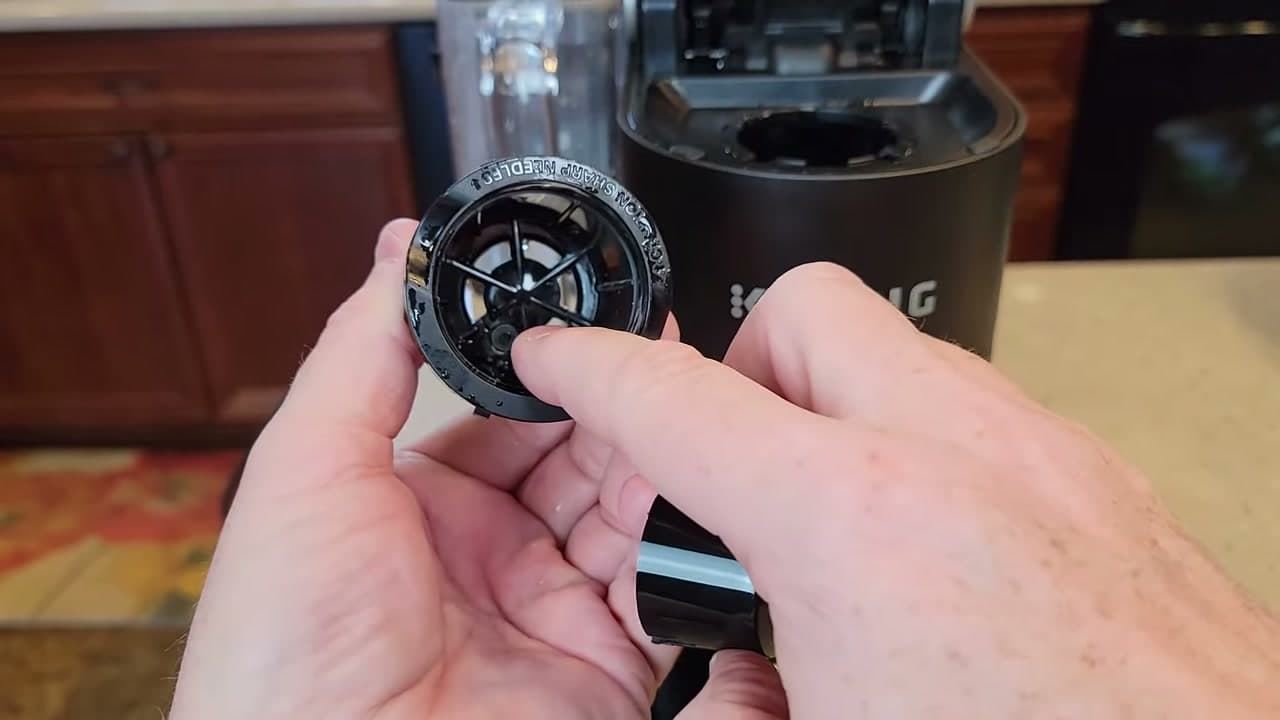
The holder comes apart in two pieces. Grip it and pull firmly and it snaps, which sounds alarming the first time and is exactly what it is meant to do.

Look for the CAUTION SHARP NEEDLE lettering moulded into the rim. That side faces you, and it is your reference for putting the thing back together the right way round.

Tip

Two small ears hold the halves together. Note where they sit before you separate it.

4

Step 4: Push a Paperclip Through the Bottom Needle

1:40
Step 4: Step 4: Push a Paperclip Through the Bottom Needle

Straighten out an ordinary paperclip. Feed it up through the needle from underneath and work it back and forth.

It will not pass all the way through, and it does not need to. You are breaking up the packed grounds sitting in the opening.

Tip

A paperclip is the right tool here. A pin or a needle is thin enough to score the inside of the channel, which gives the next lot of grounds something to catch on.

5

Step 5: Flush the Holder Until the Needle Runs Clear

2:08
Step 5: Step 5: Flush the Holder Until the Needle Runs Clear

Take both halves to the sink and wash them properly with soap and water. Run water through the needle channel while you work the paperclip, so the grounds you have loosened actually leave rather than settling back.

This part is worth doing every few months whether or not the machine has stopped. The holder collects far more coffee residue than people expect.

Tip

Hold the needle end up to a light afterwards. If you can see through the channel, it is clear.

Products used in this step

6

Step 6: Snap It Back Together and Reinstall

2:42
Step 6: Step 6: Snap It Back Together and Reinstall

Line the two ears up with their holes and press until the halves click. Give it a gentle twist to check it has seated.

Then put the holder back in the machine with the CAUTION SHARP NEEDLE lettering facing you and readable. Push until it sits flush. If the words are upside down or you cannot read them, it is in the wrong way round.

Tip

A holder that is not fully flush will brew badly or leak, so press until it stops moving.

7

Step 7: Find the Holes on the Top Needles

3:08
Step 7: Step 7: Find the Holes on the Top Needles

The top cluster does not come apart, so it gets cleared in place. The openings are not where you would expect.

There is a neoprene washer partly covering them, and the holes run sideways rather than straight down. Push the seal back gently with a finger and you will see them on the flanks of each needle.

Tip

Nothing goes straight into these needles from below. If you are pushing straight up and meeting resistance, you are on the wrong axis.

8

Step 8: Clear the Large Centre Needle at an Angle

3:48
Step 8: Step 8: Clear the Large Centre Needle at an Angle

Start with the big one in the middle. It has three holes and they come in at an angle, so bend the end of your paperclip slightly and approach on the diagonal.

Work each hole in turn. You can go a little way up inside to clear the tube behind it, but only a little. That tube is plastic and you can punch through it.

Tip

This is the sharpest needle in the machine. Keep your other hand well clear.

Products used in this step

9

Step 9: Clear the Four Multi-Stream Needles

4:24
Step 9: Step 9: Clear the Four Multi-Stream Needles

The four smaller needles around the outside are the multi-stream design specific to the Supreme line. They sit at an angle too.

Push the seal back where you need to and work the paperclip into each one. The two at the back are the awkward ones, but they are positioned so you can reach all four without taking anything apart.

Tip

Expect some sludge to come out. That is the point.

10

Step 10: Run Two Fresh Water Rinses

5:10
Step 10: Step 10: Run Two Fresh Water Rinses

Close the lid with no K-Cup in the holder, pick the 8 or 10 ounce size and hit brew. Plain hot water forces through everything you just loosened.

Run it twice. If the flow is back to full strength, you are done. If it is still weak, go round the needles once more, because a bad clog often needs a second pass.

Tip

Still nothing after two rinses and a second clean? At that point it is worth descaling, since scale in the pump causes the same symptom.

Products used in this step

Products Used

Your Guide

Just A Dad Approved

As an Amazon Associate we earn from qualifying purchases. Links on this page may be affiliate links - clicking them and buying doesn't change your price, but helps support ShowMeStepByStep.

Tags

Sunday How-To

New adulting tutorials, every Sunday

One short email with the week's best step-by-step guides. Free, no spam, unsubscribe anytime.

Did this work for you?

What's next

Related collections

Curated theme pages that include this tutorial.

Weekly Digest

Liked this adulting tutorial?

Pick the categories you want to hear about. Weekly digest of new step-by-step tutorials. No spam, easy unsubscribe.

Send me tutorials about

We only email about new tutorials. Easy unsubscribe anytime.