How to Make Polymer Clay Earrings

Also in:Crafts

By ShowMeStepByStepPublished

Based on a video by Heart Box Clayworks.

Polymer clay earrings are one of the most beginner-friendly jewelry projects out there. You do not need a workshop or a kiln. A small ceramic tile, an oven, and a couple of cutters is all it takes to turn a block of clay into a pair you would actually wear.

This walkthrough is built around Heart Box Clayworks' beginner's guide on YouTube. She covers the brand choices that matter, the conditioning step most beginners skip, and how she layers colored chips into a terrazzo slab. Follow along once and you will have the muscle memory to riff on your own colors and shapes.

If you are new to polymer clay in general, you may also want to read how to soften polymer clay before you start - hard clay straight from the package is the most common first-project frustration. After baking, getting the bake right and smoothing the edges are the two finishing skills that separate a craft-fair piece from a kitchen-table one.

Step-by-Step Guide

1

Pick a Clay Brand That Bakes Flexible

0:15
Step 1: Pick a Clay Brand That Bakes Flexible

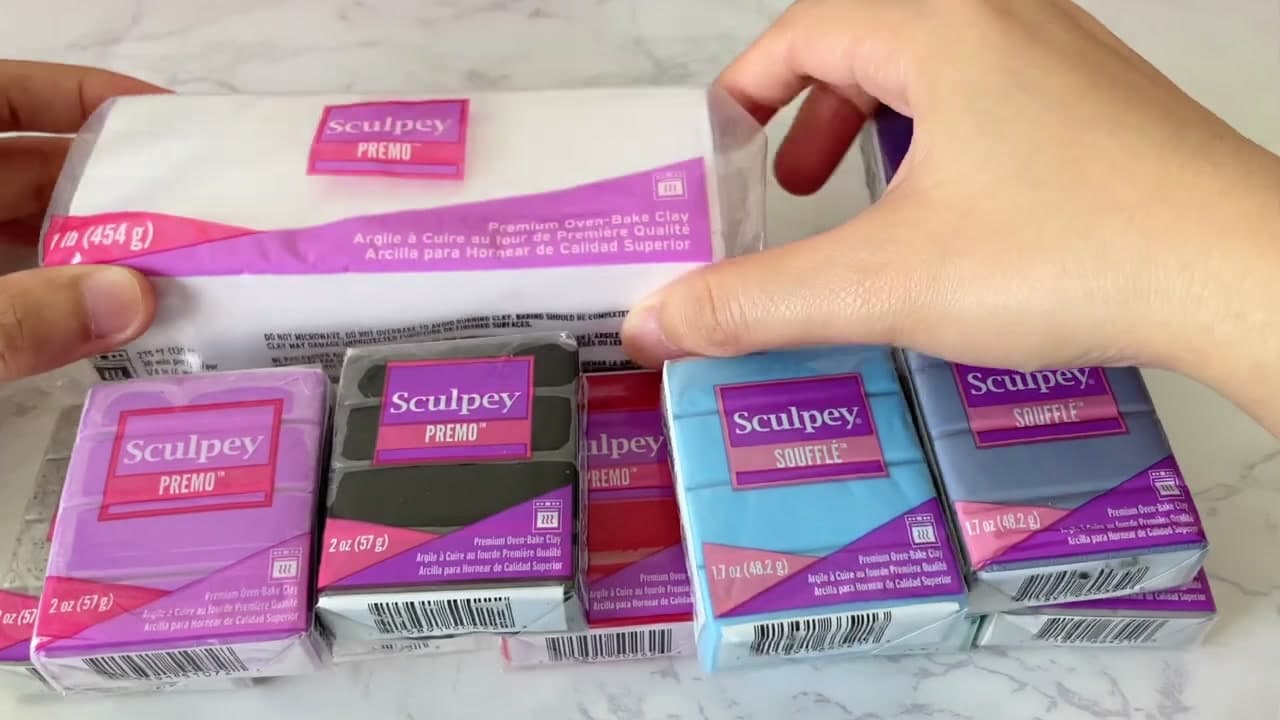
Not every polymer clay survives daily wear. For earrings you want something that flexes a little after baking instead of snapping. Sculpey Premo and Sculpey Souffle are the workhorse picks - easy to condition, easy to find, and forgiving once baked. Cernit is another solid choice for jewelry and comes in fun lines like Number One, Nature, and Opaline.

One brand to skip: Sculpey III. It is fine for figurines but turns brittle once cured, so a single drop on a hard floor will crack your earring.

Tip

Brands matter more than color choice when you are starting out. Buy two or three blocks of one good brand before you stock up on a rainbow of a brittle one.

2

Gather Your Tools and Findings

1:10
Step 2: Gather Your Tools and Findings

The starter kit is short. You need a way to roll the clay flat, a way to cut it, a surface to work on, and a way to attach hardware once the pieces are baked.

For rolling, an acrylic rolling pin plus a depth guide gets you started; a pasta or clay machine speeds things up if you plan to make more than one pair. For cutting, you want a precision knife, a long blade, and a handful of metal or 3D-printed cutters. A ceramic tile doubles as both work surface and oven tray. For the findings, gather earring posts, jump rings (6 mm and 7 mm cover most styles), and a pair of jewelry pliers. A small electric or manual drill rounds it out.

Tip

3D-printed cutters open up the most fun shape options - arches, abstract blobs, geometric outlines - and they are cheaper than buying a dozen metal cutters.

3

Condition the Clay Until It Stops Cracking

2:25
Step 3: Condition the Clay Until It Stops Cracking

Straight from the packet, polymer clay is stiff. You have to work the air bubbles out and warm it up with your hands before it will roll smooth. This is called conditioning, and skipping it is why beginner pieces snap.

Roll the clay back and forth under an acrylic roller, or feed it through a clay machine several passes. Every minute or so, fold a piece in half. If the fold splits or cracks, keep working. When the fold stays smooth, the clay is ready.

Tip

Cold rooms make conditioning take twice as long. Warm the clay in your hands for thirty seconds before you start rolling and you will save real time.

4

Roll a Slab and Build the Terrazzo

3:35
Step 4: Roll a Slab and Build the Terrazzo

Once your clay is conditioned, place it between the depth guides and roll it flat. The guides keep the slab a consistent thickness, which is what stops earrings from baking unevenly.

For the terrazzo look in this demo, the white base sheet gets pressed with small chips of three accent colors. Scatter the chips across the slab, then roll over the top once more to flatten the chips into the surface. The result is a single smooth sheet with the speckled pattern frozen into it. You can riff on the same idea with any color combo.

Tip

Cut the accent chips smaller than you think. Tiny chips press in flat; chunky chips pop back out of the slab during baking.

5

Cut Your Earring Shapes

4:05
Step 5: Cut Your Earring Shapes

Push your cutter straight down into the slab on the ceramic tile, then lift. Use a precision knife to lift away the excess clay around each shape so you do not warp the cut.

Leaving the cut pieces on the tile means they slide straight into the oven without you touching them again. Moving wet clay shapes to a baking tray is where most beginners distort the outline.

Tip

If your cutter is sticking, dust the slab lightly with cornstarch before you press. The cutter will release clean every time.

6

Preheat and Bake at 130 C

4:23
Step 6: Preheat and Bake at 130 C

Set your oven to 130 C (266 F) and let it preheat fully before the clay goes in. The rule of thumb is 30 minutes of baking per 6 mm of thickness. Most earrings come out around 3 mm thick, so 30 minutes covers them with margin.

If you are baking on a tile, slide the tile straight in. If you are using a baking tray instead, tent a piece of aluminum foil over the pieces. The foil buffers any temperature spike so a cheap oven's heating element does not scorch the top of your earrings.

Tip

Always preheat. Putting clay into a cold oven means the temperature climbs slowly and the clay never fully cures - the pieces come out brittle.

7

Drill, Smooth, and Attach the Findings

4:40
Step 7: Drill, Smooth, and Attach the Findings

Let the baked pieces cool fully before you handle them - hot polymer clay flexes and stretches. Once cool, run a sanding sponge or fine-grit sandpaper around any rough edges to soften them.

Drill a small hole near the top of each earring for a jump ring. Open the ring with your pliers, slip it through the hole, thread on an earring post or hook, and close the ring back up. Six and seven millimeter jump rings cover most setups. You have a finished pair.

Tip

Open jump rings by twisting them sideways with two pairs of pliers, not pulling them apart. Twisting keeps the ring round so it closes flush.

Products Used

☐ The Checklist

How to Make Polymer Clay Earrings

Tools
11
Materials
9
Steps
7
Video
5 min

Your Guide

Heart Box Clayworks

As an Amazon Associate we earn from qualifying purchases. Links on this page may be affiliate links - clicking them and buying doesn't change your price, but helps support ShowMeStepByStep.

Tags

Test your knowledge

Did the lesson stick? Find out in 2 minutes.

5 quick questions covering what you just read. No signup, no score saved — just a gut check.

Quick reference

Key takeaways from How to Make Polymer Clay Earrings

5 questions, answers, and one-line explanations. Tap to expand.

  1. 1.Which polymer clay should you AVOID for earrings?

    Answer: Sculpey III - turns brittle once cured and snaps from a single drop

    Sculpey III is for figurines; for daily-wear earrings pick brands that bake flexible.

  2. 2.What does 'conditioning' the clay mean and why does it matter?

    Answer: Working air bubbles out and warming the clay with your hands - skipping it is why beginner pieces snap

    Conditioned clay folds without splitting; un-conditioned clay snaps after baking.

  3. 3.Why use depth guides when rolling the slab?

    Answer: Keeps the slab a consistent thickness - which stops earrings from baking unevenly

    Even thickness = even bake; uneven thickness = some parts overcook while others stay soft.

  4. 4.What's the bake spec?

    Answer: 130 C for about 30 minutes per 6mm of thickness

    130 C (266 F), 30 min per 6mm thickness. Most earrings ~3mm so 30 min covers them.

  5. 5.Why let the baked pieces cool fully before drilling/handling?

    Answer: Hot polymer clay flexes and stretches - you'll distort the shape if you handle it warm

    Hot polymer is soft; cool fully or you'll bend and ruin the shape.

What's next

Weekly Digest

Liked this pottery tutorial?

Pick the categories you want to hear about. Weekly digest of new step-by-step tutorials. No spam, easy unsubscribe.

Send me tutorials about

We only email about new tutorials. Easy unsubscribe anytime.