How to Iron a Dress Shirt Like a Pro

Also in:Adulting

By ShowMeStepByStepPublished Updated

Based on a video by Gentleman's Gazette.

A crisp shirt isn't about the shirt - it's about the order you iron in. Pros work the same sequence every time: cuffs, sleeves, collar, yoke, front, back, hang. Do it that way and the parts you iron last don't undo the parts you ironed first. Do it in any other order and you'll keep chasing fresh wrinkles into fabric you already pressed.

This walkthrough is from Gentleman's Gazette, who shoot ironing tutorials with an overhead camera so you can see exactly where the iron goes. The technique works for any cotton or poly-blend dress shirt with a barrel or French cuff. About ten minutes per shirt once you have the rhythm down.

If you're working through a whole closet refresh, the same finishing-touch logic shows up across the look-sharp set: folding dress pants without losing the crease, folding a dress shirt for travel, folding a pocket square, tying a tie, and tying a bow tie.

Step-by-Step Guide

1

Step 1: Prep the iron, board, and water

2:10
Step 1: Step 1: Prep the iron, board, and water

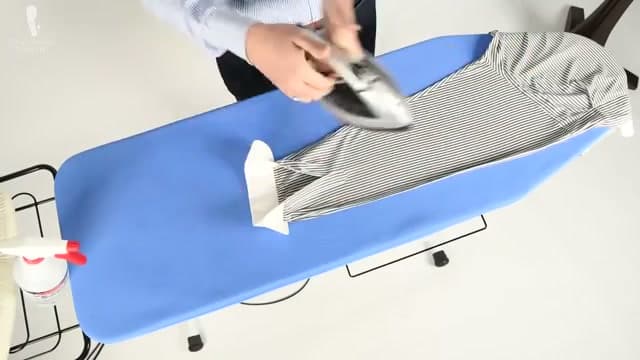
Set up your board with the tip pointing left if you're right-handed (right if you're left-handed). Pull the shirt label and match the iron's heat dial to the fiber - cotton wants high heat, poly blends want lower. Going too hot on a poly will melt or scorch the fibers and there's no fix for that.

Fill the iron's reservoir with distilled water, not tap. Hard tap water leaves a chalky calcium residue that clogs the steam holes and eventually leaves grey streaks on white shirts. Fill the spray bottle while you're at it - the bottle's mist is finer than the iron's built-in spray and handles stubborn wrinkles better.

Tip

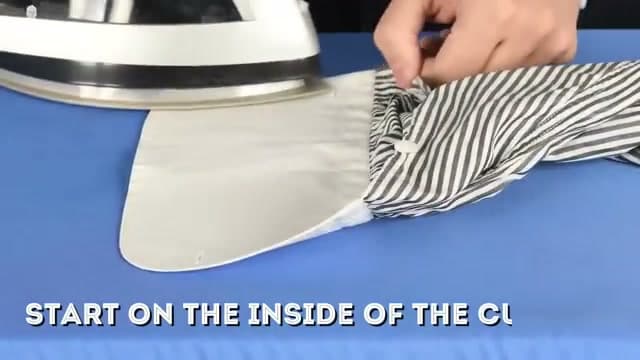
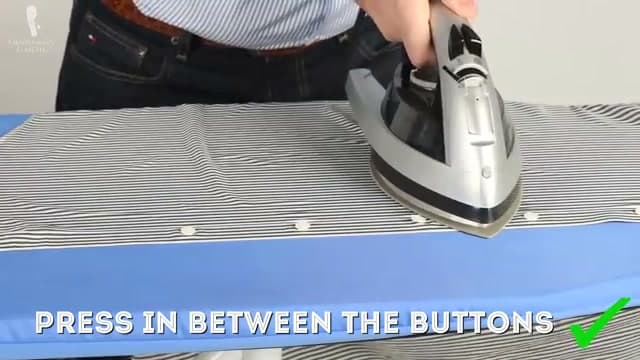
Let the iron come fully up to temp before you touch the shirt. A barely-warm iron drags fabric instead of pressing it and leaves shiny wear marks on the cuff edges.

2

Step 2: Iron the cuffs first

3:53
Step 2: Step 2: Iron the cuffs first

Always start with the cuffs. Unbutton them, lay one flat on the board with the inside facing up, and press from the outer edge of the cuff in toward the placket. Working outside-in keeps the stitching at the cuff edges from puckering - going the other way pushes fabric into the seams and locks in tiny wrinkles you'll see every time you push up your sleeves.

Flip the cuff over and press the outside the same way. Cuffs are usually two or three layers of interlined fabric, so they need a bit more dwell time than the rest of the shirt. Do both cuffs before you move on so you're not switching tools later.

Tip

French cuffs (the ones that fold back for cufflinks) get pressed completely flat in the unfolded position. The fold happens after the shirt is on - don't crease it during ironing.

3

Step 3: Press the sleeves

4:28
Step 3: Step 3: Press the sleeves

Lay the sleeve flat with the underarm seam aligned along the back edge of the sleeve. You're now pressing two layers of fabric at once, so the alignment matters - any twist now will iron in as a permanent diagonal crease. Press the back of the sleeve first using short controlled strokes, then flip and do the front.

If you don't want a sharp crease down the top of the sleeve, use a sleeve board (a small narrow board that fits inside the sleeve like a sleeve-shaped pillow). Slide it in, rotate the sleeve around it, and you get a fully pressed sleeve with no crease anywhere. The classic pressed-crease look comes from skipping the sleeve board and pressing the top edge flat.

Tip

Short controlled strokes beat long sweeping ones. Long strokes drag fabric and create the wavy look you're trying to iron out. Press, lift, move, press.

4

Step 4: Iron the collar from the outside in

6:35
Step 4: Step 4: Iron the collar from the outside in

Flip the collar up and pull out any removable collar stays - leaving them in melts the plastic and warps the collar permanently. Press the underside first, working from each outer point toward the center, never in one continuous motion across. Stop in the middle, lift, then come from the other side.

Once the underside is flat, flip the collar over and repeat on the outside using the same outside-to-center motion. Collars have multiple layers of fabric plus an interlining, so you may need to pass twice to get them properly flat. If you want a soft roll collar, don't press the collar fold flat at the end - leave the natural curl.

Tip

Keep a small bowl on the board for collar stays so you don't lose them. They get hot enough to leave burn marks on a board cover if you drop them on the way out.

5

Step 5: Press the yoke (shoulder panel)

9:43
Step 5: Step 5: Press the yoke (shoulder panel)

The yoke is the panel that runs across the shoulders and connects the collar to the rest of the shirt. Drape one shoulder of the shirt over the rounded tip of the board so the yoke lays flat across the curve. Press from the center of the yoke out to the shoulder seam, then rotate the shirt and do the other side.

Use short strokes here. Pressing too hard or too long can iron deep wrinkles into the back panel that you'll have to fix later. The yoke is small and the board tip is shaped to fit it - let the board's geometry do the work and don't force the fabric flat with the iron alone.

Tip

After you finish the body, double-check the yoke one more time. The act of moving the shirt around the board can pull fresh wrinkles into the shoulders, and a 5-second touch-up is the difference between a shirt that looks done and a shirt that looks great.

6

Step 6: Iron the front panel with the placket

7:50
Step 6: Step 6: Iron the front panel with the placket

Lay the shirt buttons-down on the board first so you can press the back of the placket (the button strip) in one clean motion without dragging the iron over the buttons. The whole front panel comes flat in a few strokes from collar to hem.

Now flip the shirt so the buttons face up. Tap the iron between each button rather than sliding through them - sliding will jam the buttons and leave wavy lines on a striped shirt. Use the point of the iron in the gaps and press, lift, move, press. On solid shirts you can sweep through the button areas more freely.

Tip

If your shirt has a chest pocket, press it separately and last. Iron along the pocket seams, not across them, so any excess fabric inside the pocket doesn't get folded into a fresh crease.

7

Step 7: Iron the back panel and any pleats

9:15
Step 7: Step 7: Iron the back panel and any pleats

Lay the back of the shirt flat with one side on the board first. If the back has a pleat (most dress shirts have a single box pleat or two side pleats running down from the yoke), align the pleat with your fingers and press it in a single sharp line. Pleats look intentional when they're sharp and sloppy when they're not.

Smooth the rest of the panel from the center out to the side seam, then rotate the shirt across the board to do the middle and the other side. The back is the biggest single piece of fabric on the shirt, so take an extra few seconds here to make sure you didn't pull a wrinkle in while pressing the front.

Tip

If a wrinkle won't lift, spray it directly with the spray bottle (or the iron's spray button) and press again. A damp spot ironed dry is what releases a stuck wrinkle - dry pressing alone won't get it.

8

Step 8: Hang and button the top button

9:56
Step 8: Step 8: Hang and button the top button

Slide the shirt onto a sturdy wooden hanger and button the top button. If the collar is wide (a spread or cutaway), button the second button too so the collar holds its shape while the shirt cools. A flimsy wire hanger lets the shoulders pucker and undoes the yoke work from step 5.

Leave the shirt on the hanger for a few minutes before putting it in the closet. The press sets as the fabric cools, and folding or hanging it tight against other shirts before it cools traps fresh wrinkles. Ironing a batch of shirts at once is the most efficient way to use this technique - the setup time amortizes across every shirt you iron.

Tip

Wooden hangers with shaped shoulders preserve the yoke shape better than flat plastic ones. If you only upgrade one closet item, upgrade the hangers for your dress shirts and suit jackets first.

Products Used

☐ The Checklist

How to Iron a Dress Shirt Like a Pro

Tools
5
Materials
3
Steps
8
Video
11 min

Your Guide

Gentleman's Gazette

As an Amazon Associate we earn from qualifying purchases. Links on this page may be affiliate links - clicking them and buying doesn't change your price, but helps support ShowMeStepByStep.

Tags

Test your knowledge

Did the lesson stick? Find out in 2 minutes.

5 quick questions covering what you just read. No signup, no score saved — just a gut check.

Quick reference

Key takeaways from How to Iron a Dress Shirt Like a Pro

5 questions, answers, and one-line explanations. Tap to expand.

  1. 1.Why fill the iron with distilled water?

    Answer: Minerals stain shirts

    Mineral deposits build up inside the iron and stain clothing. Distilled keeps it clean for years.

  2. 2.Why is the shirt damp (not dry) when ironing?

    Answer: Steam relaxes fibers

    Slightly damp + heat = the steam that does the actual wrinkle-removing work. A bone-dry shirt just presses creases in.

  3. 3.Right order for parts of a dress shirt?

    Answer: Cuffs, sleeves, collar, body

    Small detailed pieces first (cuffs, sleeves, collar), then larger panels (front, back). Order prevents re-wrinkling completed parts.

  4. 4.On a STRIPED shirt, wrong way to move the iron?

    Answer: Slide lengthwise

    Sliding heat distorts striped patterns. Tap down, lift, move, tap down again - that's the trick for stripes.

  5. 5.Right after ironing, what should you do?

    Answer: Hang and button top

    Warm fabric cools INTO shape. Folding while warm presses creases in; hanging warm lets gravity smooth it.

What's next

Related collections

Curated theme pages that include this tutorial.

Weekly Digest

Liked this lifestyle tutorial?

Pick the categories you want to hear about. Weekly digest of new step-by-step tutorials. No spam, easy unsubscribe.

Send me tutorials about

We only email about new tutorials. Easy unsubscribe anytime.