How to Draw a Face: Beginner Proportions Guide

The finished result: How to Draw a Face: Beginner Proportions Guide
Also in:Painting

By ShowMeStepByStepPublished Updated

Based on a video by SamDoesArts.

Drawing a believable face is mostly about getting a few measurements right. Sam Yang (SamDoesArts) skips anatomy, planes, and skull structure here on purpose. He's giving you the same beginner method he learned years ago when he started doing portraits, and he still uses it today.

The whole thing comes down to one big idea: the human face follows predictable proportions. Once you know where the brow line, nose line, and chin sit relative to each other, and how far apart the eyes should be, your portraits stop looking awkward. You can use this approach with a pencil and paper or a digital tablet - the measurements work the same either way.

Faces are proportion work more than pencil work. If the sketching and shading here feel like guesswork, the fundamentals - pencil grades, the light-pass method and picking a light source - are at how to draw.

The proportion rules in one place

  • Eyes halfway down the head. Measure from the top of the skull, not the hairline.
  • One eye-width between the eyes. Left eye, gap, right eye - three equal spaces.
  • Nose base about halfway from eyes to chin. Its width matches the inner eye corners.
  • Mouth a third of the way from nose to chin. The corners line up under the pupils.
  • Ears between the brow and the nose base. They sit behind the jaw, not on the cheek.

These are averages. Real faces break them a little, and that is what makes a likeness. Learn the grid first, then nudge it.

Drawing a face at an angle

Turn the head and the center line curves around the circle like a line of longitude on a globe. Everything follows it. The horizontal guides wrap around the head too, so they become gentle curves instead of flat lines.

The eye on the far side gets narrower and the gap between the eyes shrinks. The nose pushes past the center line toward the far cheek. Push the ear on the near side back toward the middle of the head. Try a three-quarter view once the front view feels easy - it is the angle most portraits use.

Once the placement is right

This page owns placement. The features each have their own lesson: how to draw eyes, how to draw a nose and how to draw lips. Hair changes the whole silhouette of the head, so how to draw hair is a good one to do after.

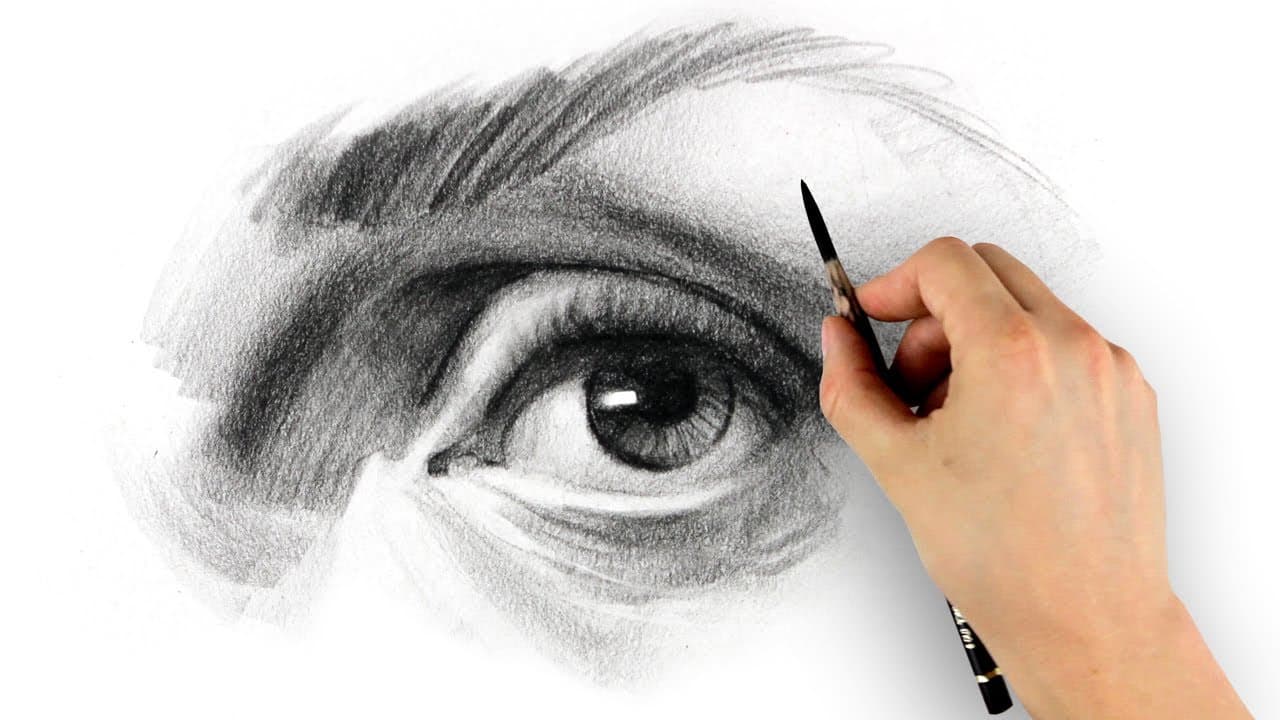
For simple shading, pick one light source and keep to it. Shade the eye sockets, the side of the nose away from the light, the area under the lower lip and the neck under the jaw. Those four patches alone turn a flat outline into a head with form.

Face drawing ideas to try next

  • Profile view. Keep the same horizontal lines, but the eye moves back from the front edge and the ear sits right behind the jaw hinge.
  • Different ages. A child has bigger eyes set lower on the head and a tiny chin. An older face gets a longer nose, thinner lips and a softer jaw.
  • Expressions. Draw the same face three times: smiling, surprised and angry. Only the brows, eyelids and mouth move.
  • A cartoon face. Keep the grid and push it. Huge eyes, a dot nose and a wide mouth still look right if they sit on the guide lines.
  • The structure underneath. Drawing a skull shows you where the cheekbones and eye sockets really sit.

Common mistakes

  • Eyes too high. The number one beginner error. It shrinks the forehead and makes the face look like a mask.
  • Forehead too small. The cranium is big. If the hairline hugs the brows, check your thirds.
  • Features too big. Eyes and mouth take up less of the face than you think. Measure against the grid.
  • Pressing hard on the guidelines. Keep them light so they erase cleanly at the end.
What you'll need

Step-by-Step Guide

7 steps · about 9 minutes.Check off each step as you go and your progress saves automatically.

1

Draw the Cranium and Center Line

1:00
Step 1: Draw the Cranium and Center Line - How to Draw a Face: Beginner Proportions Guide

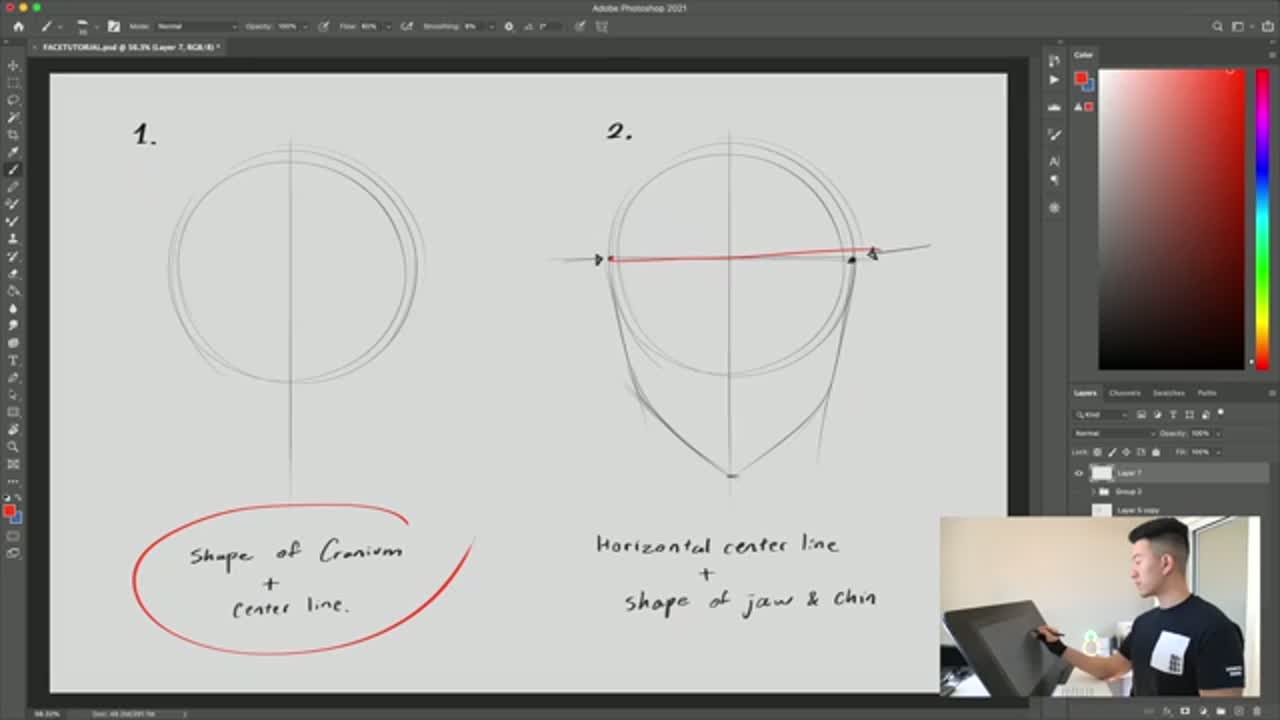
Start with a circle for the cranium - that's the top part of the skull that holds your brain. From the front, the cranium reads as a round egg shape, so a circle is close enough to get going.

Now run a vertical center line straight down through it. The center line is your anchor for everything that follows. If you ever tilt the head later, the center line tilts with it, so every feature stays glued to the right spot on the face.

Tip

Keep the circle loose. You'll refine the outline later, so don't sweat a perfect shape - what matters is that the proportions are right.

2

Add the Jaw and Bring the Chin to a Point

1:35
Step 2: Add the Jaw and Bring the Chin to a Point - How to Draw a Face: Beginner Proportions Guide

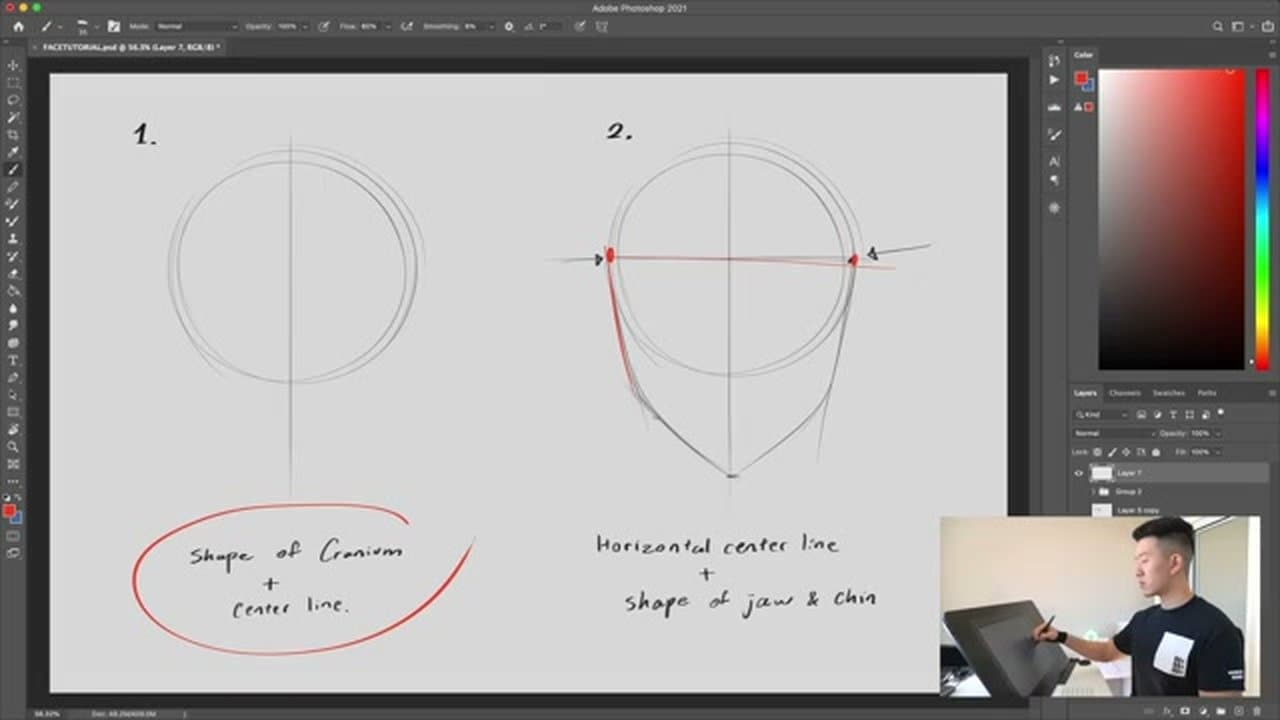
Find the horizontal midpoint of your circle. From the outermost left and right points of the cranium, drop two lines that angle inward and meet at a point below the circle. That point is the chin.

The jaw lines aren't straight - they curve slightly inward as they head down toward the chin. Sam keeps the chin coming to a soft point on the center line, unless your character has a deliberately uneven or stylized face.

Tip

The full head height (top of cranium to chin) should land roughly one and a half times the diameter of your cranium circle. That's a quick sanity check while you're sketching.

3

Mark the Hairline, Brow Line, and Nose Line

2:25
Step 3: Mark the Hairline, Brow Line, and Nose Line - How to Draw a Face: Beginner Proportions Guide

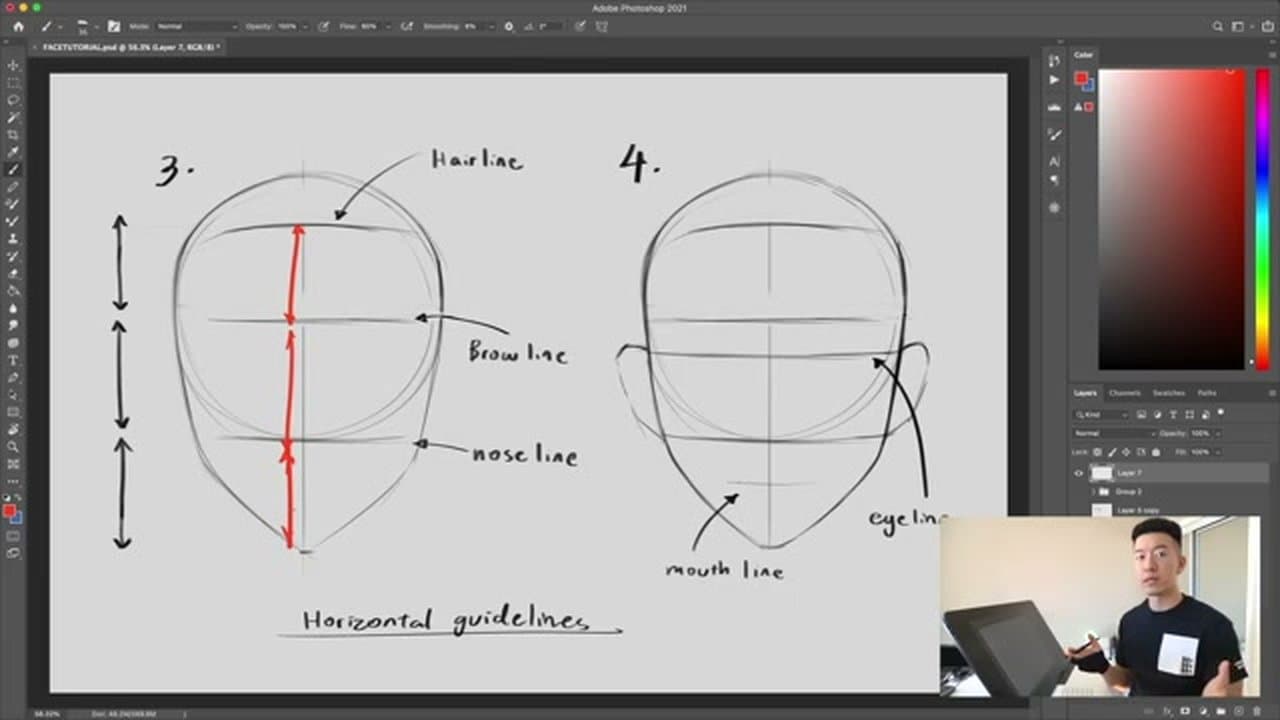
Three horizontal lines do most of the heavy lifting on a face. The hairline is where hair meets the forehead. The brow line connects the two eyebrows. The nose line marks where the bottom of the nose ends.

Here's the trick most beginners miss: on a proportional face, the distances between these three lines are all roughly equal. Hairline to brow, brow to nose, and nose to chin should each cover about a third of the face. Person to person you'll see variation (Sam jokes that his chin is longer than average), but equal thirds is the rule of thumb that keeps faces looking right.

4

Add the Eye Line and Mouth Line

3:05
Step 4: Add the Eye Line and Mouth Line - How to Draw a Face: Beginner Proportions Guide

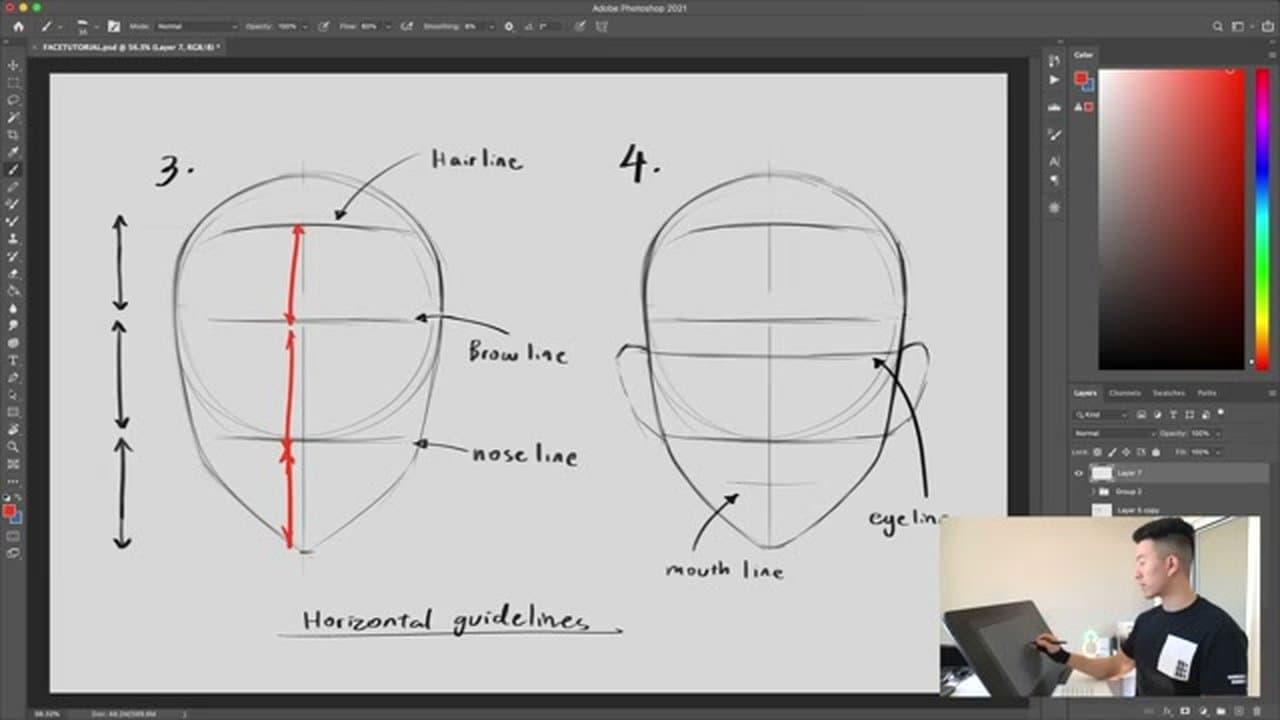
The eye line runs horizontally through the inner corners of the eyes. On a typical adult face it sits right at the midpoint of the head - halfway between the top of the cranium and the chin. Beginners almost always place eyes too high. Drop them lower than feels right.

The mouth line goes between the nose line and the chin, but not dead center. It sits a little above the halfway point - closer to the nose than to the chin. That gives you the right space for the lower lip and the soft area under the mouth.

5

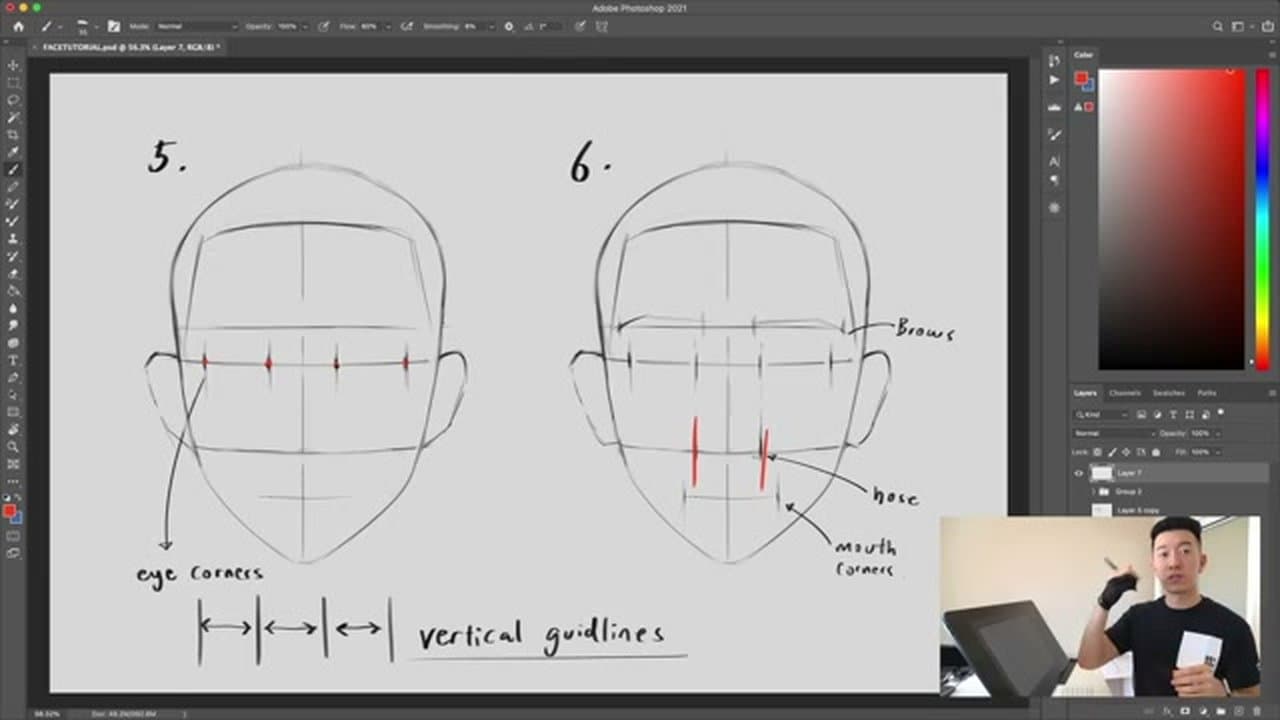
Place the Eye Corners (One Eye-Width Apart)

3:50
Step 5: Place the Eye Corners (One Eye-Width Apart) - How to Draw a Face: Beginner Proportions Guide

On the eye line, mark four vertical points: the outer corner of the left eye, the inner corner of the left eye, the inner corner of the right eye, and the outer corner of the right eye. The space between the two inner corners should be roughly the width of one eye.

So you end up with three equal spaces along the eye line: left eye, gap, right eye. If the gap is too wide, the face looks awkward. Too narrow and it looks cramped. Three equal spaces is the safe default.

Tip

This rule shifts a little person to person, so glance at your reference. But three equal spaces is the proportion you fall back to when in doubt.

6

Mark Nose Edges and Mouth Corners

4:40
Step 6: Mark Nose Edges and Mouth Corners - How to Draw a Face: Beginner Proportions Guide

For the outer edges of the nose, drop vertical lines from the inner corners of the eyes down to the nose line. Most of the time the nose is exactly that wide. It's one of the easiest relationships to use because you've already plotted the eye corners.

For the corners of the mouth, drop verticals from somewhere between the inner and outer edges of each eye - usually about the center of each pupil. That gives you the natural width of the mouth without it looking too pinched or too wide.

7

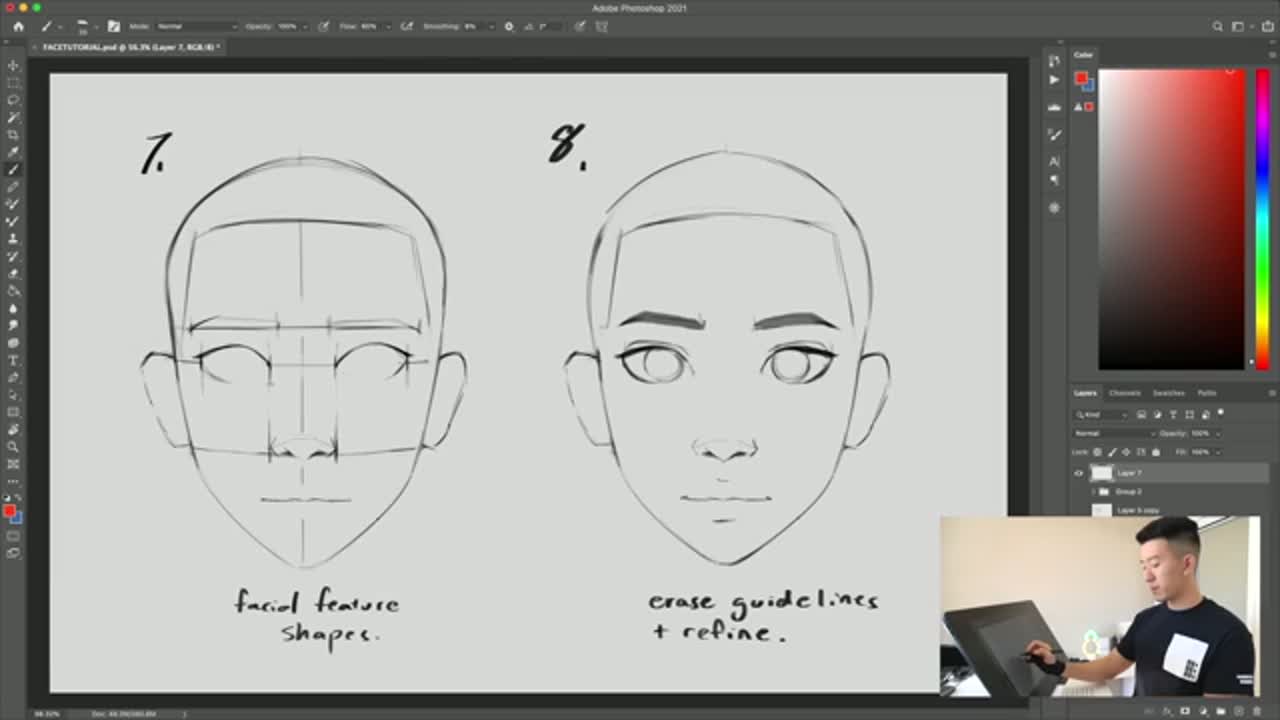
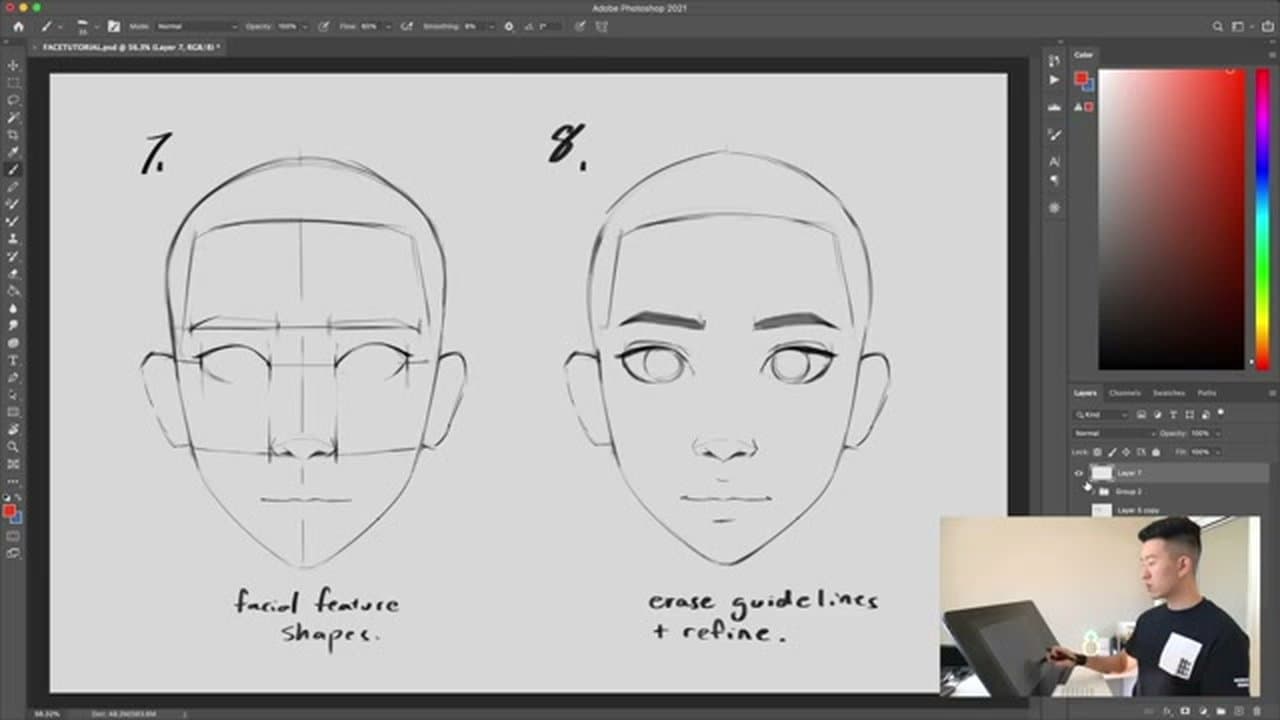
Refine Features, Add Ears, and Finish Details

6:20
Step 7: Refine Features, Add Ears, and Finish Details - How to Draw a Face: Beginner Proportions Guide

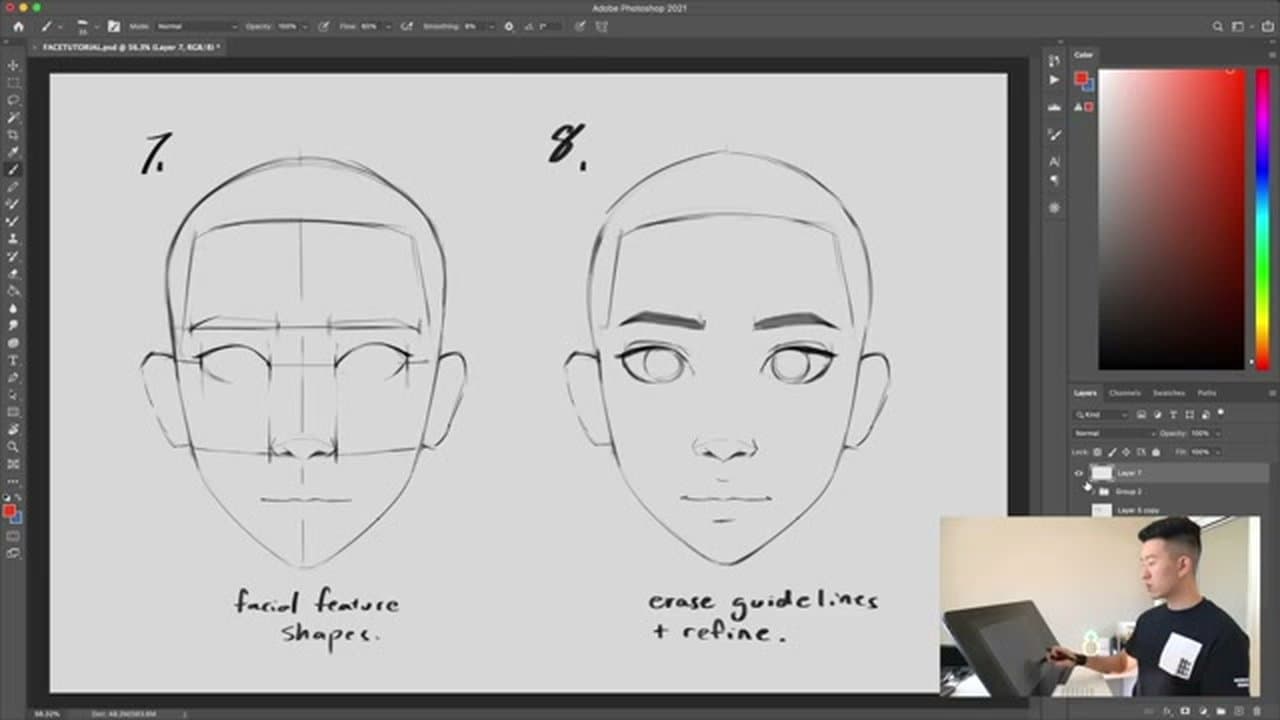
Now replace the guidelines with actual feature shapes. Draw the eyes inside the eye-corner marks. Sketch in the eyebrows just above the brow line. Carve out the hairline. Drop in the nose ending at the nose line. Replace the mouth line with a basic lip shape.

For the ears: the top of each ear lines up with the brow line (where the eyes start), and the bottom of each ear lines up with the nose line. That's it. Once the basic shapes are down, erase the guidelines, refine the outline of the head, and add small details like pupils, eye folds, lip definition, and any hair you want.

Tip

If the ears are giving you trouble, give your character long hair and cover them up. Sam's actual advice from the video.

Keep going

How to Make a Pinecone Wreath

Products Used

The Checklist

How to Draw a Face: Beginner Proportions Guide

Tools
4
Materials
2
Steps
7
Video
9 min

Tools we recommend

Your Guide

SamDoesArts

As an Amazon Associate we earn from qualifying purchases. Links on this page may be affiliate links - clicking them and buying doesn't change your price, but helps support ShowMeStepByStep.

Tags

Sunday How-To

New crafts tutorials, every Sunday

One short email with the week's best step-by-step guides. Free, no spam, unsubscribe anytime.

Test your knowledge

Did the lesson stick? Start with this one.

5 questions covering what you just read. No signup, no score saved, and you can stop after this one.

Question 1 of 5

On a proportional face, how should the spaces between hairline, brow line, and nose line relate?

Quick reference

Key takeaways from How to Draw a Face: Beginner Proportions Guide

5 questions, answers, and one-line explanations. Tap to expand.

  1. 1.On a proportional face, how should the spaces between hairline, brow line, and nose line relate?

    Answer: All roughly equal - each covers about a third of the face

    Equal thirds (hairline-to-brow, brow-to-nose, nose-to-chin) is the rule of thumb that keeps faces looking right.

  2. 2.Where does the eye line sit on a typical adult face?

    Answer: Halfway between the top of the cranium and the chin (the midpoint of the head)

    Beginners almost always place eyes too high; drop them to the midpoint of the head.

  3. 3.How wide should the gap between the two inner eye corners be?

    Answer: About one full eye width

    Three equal spaces along the eye line (eye, gap, eye) is the safe default proportion.

  4. 4.How do you get the natural width of the nose?

    Answer: Drop verticals from the INNER corners of each eye down to the nose line

    Inner eye corners give you the nose-width verticals automatically.

  5. 5.Where do the EARS line up vertically on the face?

    Answer: Top of ear at the brow line, bottom of ear at the nose line

    Ears sit between brow and nose lines vertically - easy to forget and easy to get wrong.

Did this work for you?

What's next

Related collections

Curated theme pages that include this tutorial.

Weekly Digest

Liked this crafts tutorial?

Pick the categories you want to hear about. Weekly digest of new step-by-step tutorials. No spam, easy unsubscribe.

Send me tutorials about

We only email about new tutorials. Easy unsubscribe anytime.