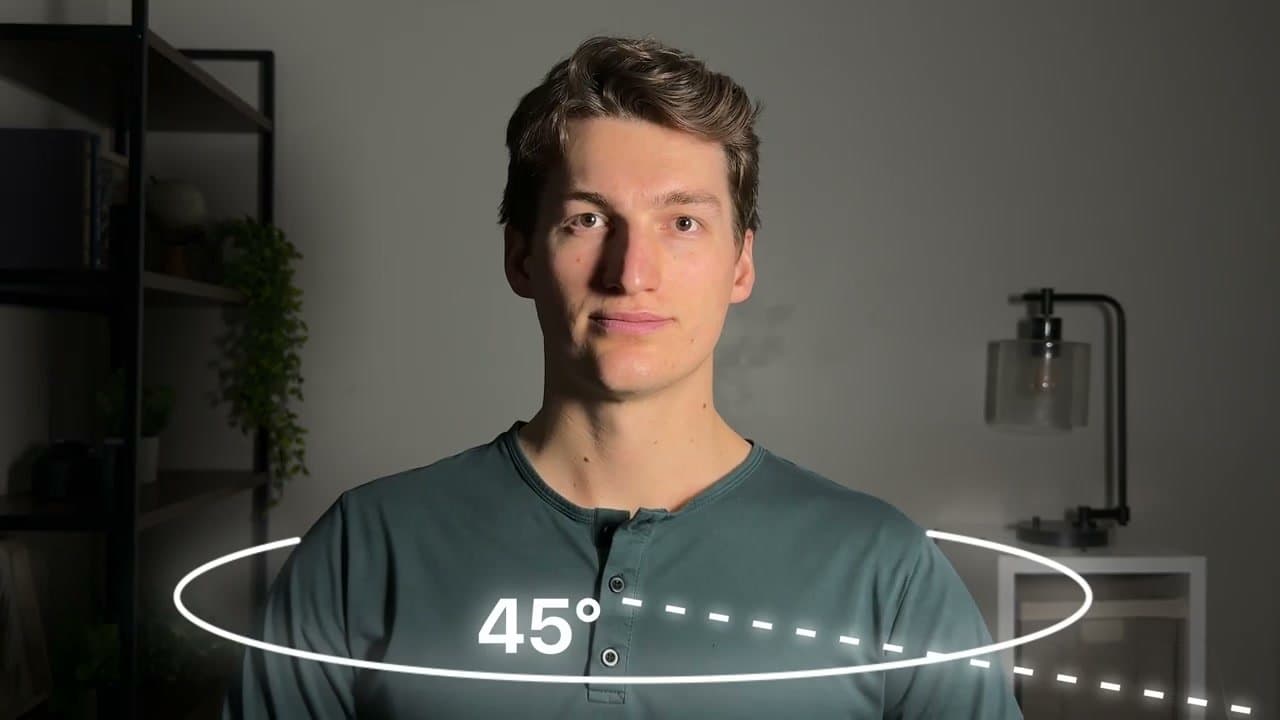
How to Set Up a Budget YouTube Studio

TechEasy20:427 steps

Based on a video by Content Creators.

You don't need a $10,000 camera setup to make YouTube videos that look professional. Most of what separates a good-looking video from a bad one comes down to four things: composition, lighting, audio, and camera settings. Get those right and the gear almost doesn't matter.

This walkthrough builds a cinematic talking-head setup for roughly $100 using your smartphone as the camera. Connor from contentcreator.com runs through each of the four pillars with real before-and-after shots. Even if you're filming in a small apartment corner, the framework still applies.

The order matters. Pick your background first (free), then sort the lighting (the biggest impact-per-dollar), then the mic (what actually kills most videos), then dial in the camera settings last. Skip any one of these and the result falls apart.

Step-by-Step Guide

1

Pick a Clean Background

2:20
Step 1: Pick a Clean Background

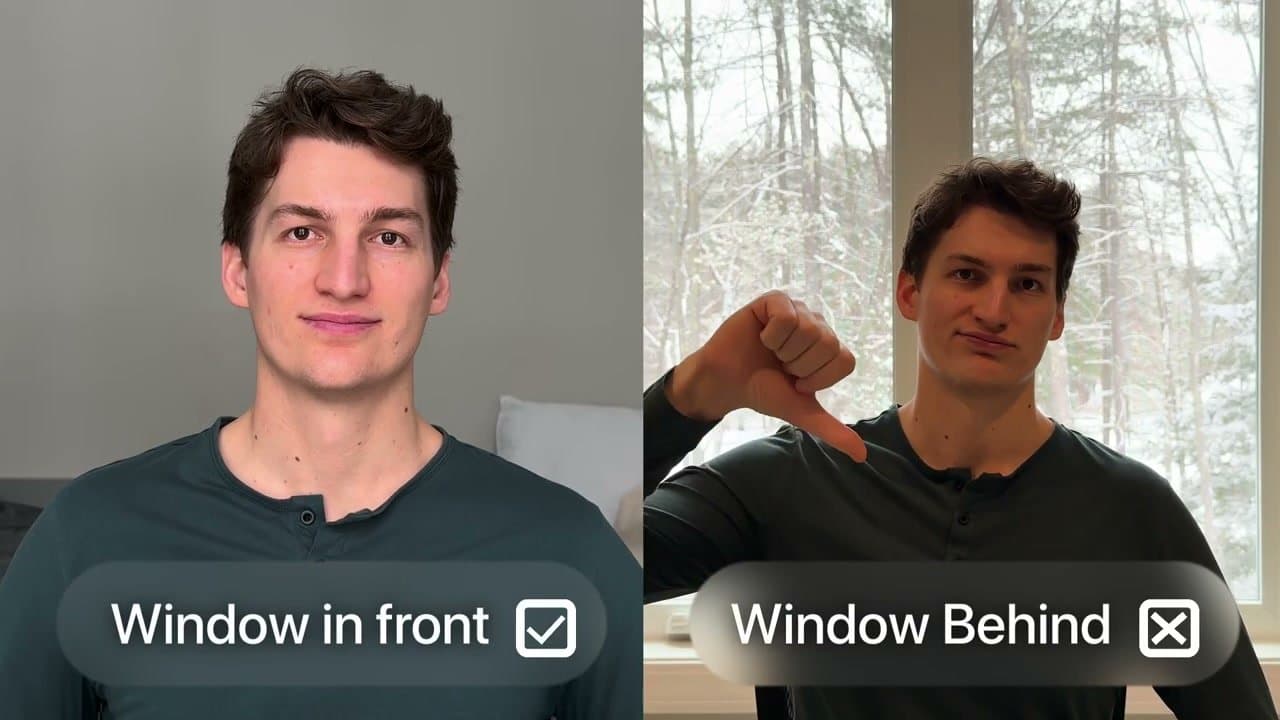
Find a corner of your room with an uncluttered wall. Avoid backgrounds with lots of overlapping lines, busy art, or windows - a window behind you creates a strong backlight that washes out your face. You want the window in front of you, lighting your face.

Once you pick the spot, stage a couple of small decor pieces on a shelf or side table behind you: a plant, a book, a camera, something that gives the shot character without adding clutter.

Tip

If you have a white wall with nothing on it, the shot will look sterile. Two or three objects spaced across the frame are enough - don't overdo it.

2

Move Three to Six Feet Away From the Wall

3:15
Step 2: Move Three to Six Feet Away From the Wall

Phone cameras have deep depth of field - they don't blur the background on their own. Physical distance between you and the wall is how you fake that cinematic look.

If you're right up against the wall, the shot feels flat and mug-shot-ish. Pull your chair as far from the background as your space allows, ideally three to six feet. More separation equals more depth in the final shot.

3

Set Up the Tripod and Frame With Rule of Thirds

5:15
Step 3: Set Up the Tripod and Frame With Rule of Thirds

Clip your phone onto a cheap extendable tripod and place it two to three feet in front of your chair. Never handhold - any jitter looks amateur.

For framing, split the screen mentally into thirds both ways. Sit in the center column with your eyes landing on the top horizontal line. Make sure vertical lines in your scene (door frames, shelves) are actually vertical - a slightly tilted shot reads as wrong even when you can't name why.

4

Kill Ambient Light and Soften Your Key Light

6:50
Step 4: Kill Ambient Light and Soften Your Key Light

Turn off every light in the room - overhead fixtures, lamps, everything. If there's a window, cover it with blackout curtains or a thrown blanket. You want a blank lighting slate before you add your own.

Set up your main (key) light - a 12-inch LED panel is plenty for a budget build. Then soften it: hang a white bed sheet in front of the panel or clip on a diffuser. Diffused light is always more flattering than a bare bulb. Bigger and closer equals softer.

5

Place the Key Light at 45 Degrees, Add a Fill or Hair Light

8:45
Step 5: Place the Key Light at 45 Degrees, Add a Fill or Hair Light

Don't put the key light directly in front of your face - that flattens everything. Move it off to one side at about a 45 degree angle. You'll see one side of your face catch shadow, which gives the shot depth.

If that shadow is too harsh, add a second light on the opposite side at roughly one-third the key's intensity - that's a fill light. Alternatively, place the second light behind you aimed at your shoulders and hair for edge separation from the background. Skip ring lights - they flatten your face and can't diffuse well.

Tip

If you want to go further, add a small light wand behind you aimed at the background for a pop of accent color. Totally optional but it reads very professional.

6

Use a Real Microphone

11:40
Step 6: Use a Real Microphone

Your phone's built-in mic is the single biggest giveaway that you're filming on a smartphone. Grab an external mic.

Under $10, the Pop Voice Pro lavalier plugs straight into your phone with a 6 or 14 foot cable - clip it to your shirt collar and you're set. For more flexibility, a wireless lav like the Hollyland Lark A1 lets you move freely and has built-in noise cancellation for rooms with any background hum. Most viewers tolerate average-looking video; no one tolerates bad audio.

7

Dial In Your Camera Settings

14:20
Step 7: Dial In Your Camera Settings

Use the rear camera of your phone, not the front - better sensor, better resolution, better color. Set resolution to 4K if your phone supports it, and frame rate to 24 or 30 fps (either works for talking-head).

On iPhone, turn HDR off - it tries to auto-balance bright and dark areas and ends up wrecking your colors in editing. Turn on Lock White Balance so the color temperature doesn't shift mid-recording. If you want to see what the rear camera captures without constant test recordings, clip on a small selfie monitor - saves a lot of setup time.

Products used in this step

Products Used

☐ The Checklist

How to Set Up a Budget YouTube Studio

Tools
5
Materials
1
Steps
7
Video
21 min

Your Guide

Content Creators

As an Amazon Associate we earn from qualifying purchases. Links on this page may be affiliate links - clicking them and buying doesn't change your price, but helps support ShowMeStepByStep.

Tags